Posts: 11,744
Threads: 571
Joined: Nov 2008
Don't know if anyone here has assembled one of these, but it's a challenge. There is a step-by-step with parts identified, but no tips on how to keep some sub-assemblies together while waiting to use them in a further step. Looking at the Internet, there are many makers, some look like an hour's assembly time for a five-year old, to hours and hours like with the one I have. This one had 290 parts all wood except for the motor spring, some rods and a bell. No glue, just one suggestion, "if part broke, bring glue".  So far I've only broken one part, did not bring glue, just made a new one out of scraps. 
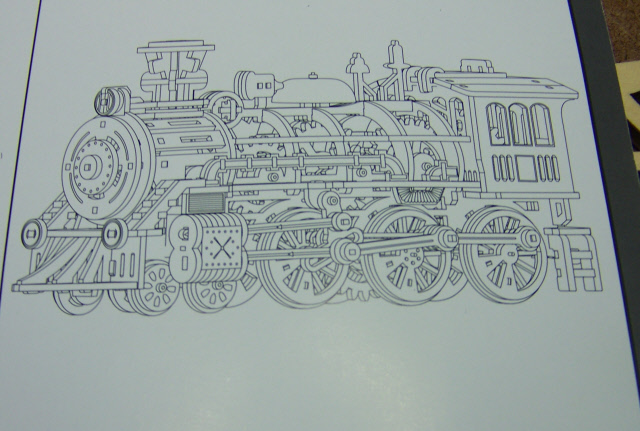
This is a sketch of the finished engine, I'm assuming that the wheel on one side of the cab allows you to wind the motor, not sure if there's an on/off switch or what, but I'll find out sooner or later. So far I think I've got about six hours into it, that includes about three hours repeating step 1 about 42 times because there's no way to hold 11 tiny pieces of wood together until you figure out a place for a rubber band that won't get in the way.  No estimate time to get it finished, if one part goes in wrong, it has to be disassembled back down to that part  . I'm just hoping I get it finished in time to put under the Christmas tree this year.... 

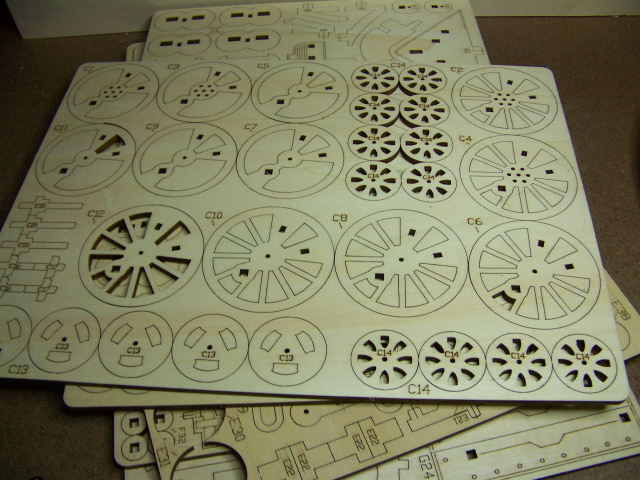
Here are shots of a typical sheet of laser-cut plywood. Some sheets are thicker than others. I found that out when I made the new part.

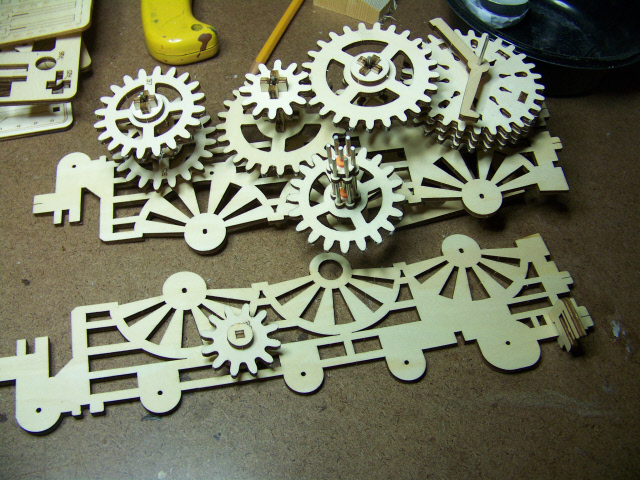
Here I am at step 9, only 38 to go. some steps require at least four hands to complete, others, four hands and two feet, like step 10 where I need to mate the two sides, both sides attach to each other with gears and rods.

Also, a pile left to put together steps 10-47

Don (ezdays) Day
Board administrator and
founder of the CANYON STATE RAILROAD
Posts: 1,120
Threads: 84
Joined: Nov 2010
Don't worry Don.

And at least the spring for the clockwork is the last piece to be mounted. But it is such made, that it will burst all the other pieces apart and scatter them all around. Get sufficiently early broom and dustpan prepositioned.
These things are specifically made to drive retirees into madness ... 
Lutz
Posts: 596
Threads: 12
Joined: Jun 2022
First 9 steps, 6 hours.... 38 steps to go... You might make Christmas.... I might take the hedge that it gets thrown out the window in frustration. Good luck, Don!
Posts: 3,832
Threads: 58
Joined: Dec 2008
You're a braver man than I. Best of luck on your quest.
Tom
Life is simple - Eat, Drink, Play with trains
Occupation: Professional Old Guy (The government pays me to be old.)
Posts: 11,744
Threads: 571
Joined: Nov 2008
You know, this was a Christmas present from my family. I wonder if it's some sort of devious attempt to put me away.
BTW Lutz, the spring was the first thing to put on, held in place by that shaft made up of 11 pieces....  I have nightmares just thinking about step 1.
 
The only saving grace is that it is not N scale.... 
Don (ezdays) Day
Board administrator and
founder of the CANYON STATE RAILROAD
Posts: 3,730
Threads: 44
Joined: Dec 2008
I did one that a friend gave me around 8 years ago. It was a major pain in the butt. Took a couple of weeks, but you being a much smarter man than I am, I'm guessing it will only take you a couple of days.
Mike
Sent from my pocket calculator using two tin cans and a string
Posts: 11,744
Threads: 571
Joined: Nov 2008
(01-05-2023, 09:07 AM)Tyson Rayles Wrote: I did one that a friend gave me around 8 years ago. It was a major pain in the butt. Took a couple of weeks, but you being a much smarter man than I am, I'm guessing it will only take you a couple of days.
Mike, if I was smarter than you, I would have quit around step 2.  Whoever designs these things are evil people destine to take over the world by driving everyone else coo-coo.... How I reached step 9 is beyond comprehension and proof that I have lost all sense of reality. 
There's this blond on TV that said she was proud of herself that she finished a puzzle in only two years when the box said "5 years and up"  I hope I finish this before the warranty runs out.
Don (ezdays) Day
Board administrator and
founder of the CANYON STATE RAILROAD
Posts: 11,744
Threads: 571
Joined: Nov 2008
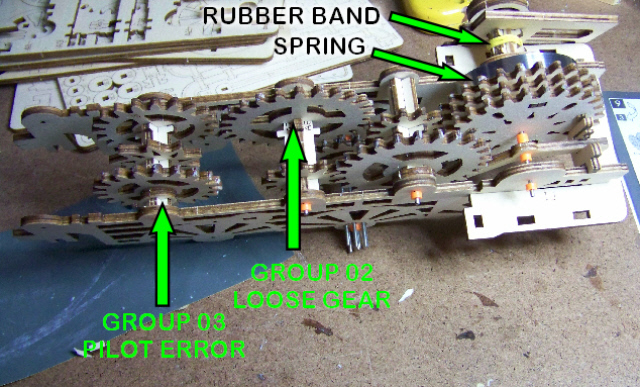
Ah Hah, progress, just finished step 11, much fun so far, steps 12 & 13 consists of 8 separate sub-steps with 16 parts to assemble the coupler housing (group 06), step 14 attaches it under the cab which is built in step 15 & 16. But wait!!! some of my gears are not meshing, I wasn't sure about gear assembly (group 03), and I can see now that it's been assembled backwards. I think I can get it out without taking the whole thing apart, but now you can see why they say "glue is only to fix error when you break part". No breaking part when disassemble, say prayer instead...  Gear-assembly (group 02) is loose, must tighten gear without bringing glue to the party. Also, time to remove the rubber band (must provide own) that was keeping shaft ass'y from falling apart.
Fortunately, step 16b says, "Open enclosed bottle of Sake and consume at your leisure. Return to project when sane and mostly sober". 
Does my report sound cynical and somewhat sarcastic? Of course it does. 

Don (ezdays) Day
Board administrator and
founder of the CANYON STATE RAILROAD
Posts: 3,730
Threads: 44
Joined: Dec 2008
You are only on day 3 so you are making rapid progress Don! BTW mine never did work very well but yours will probably run like a Swiss watch!
Mike
Sent from my pocket calculator using two tin cans and a string
Posts: 11,744
Threads: 571
Joined: Nov 2008
(01-07-2023, 09:49 AM)Tyson Rayles Wrote: You are only on day 3 so you are making rapid progress Don! BTW mine never did work very well but yours will probably run like a Swiss watch!
Thank you good sir, but it seems more like week three, 24/7, to me. I have serious doubts that this will ever run, the spring is held in place by a 1/16" bend and if it comes loose, there's no way of getting back without complete disassembly. Secondly, the gears are so rickety that it may be impossible to get them all to line up at the same time. Besides all that, I may wind up using it as a target before I get to step 20.
 
On top of that, there are errors in the assembly drawings. I thought that group 03 was assembled backwards, well, it wasn't, the drawing in one other step is wrong, and no, the gears in group 02 do not mesh with group 03 as shown in another drawing. 
Don (ezdays) Day
Board administrator and
founder of the CANYON STATE RAILROAD
Posts: 18
Threads: 1
Joined: Jan 2023
A running wooden locomotive that you put together yourself, now that's cool!
I have seen laser cut kits before, assembled a few architecture ones and even printed my own on our laser cutter. Been peeking at a book nook train files set for Christmas. Have not seen any ones that are actually moving.
With (cheap) laser cut kits usually also the manual quality also gets cut, sadly. Wish it wasn't that way because generally they have great potential. I really hope you won't start blasting it apart.
I am curious however, is the rubber band entirely build in? Since it's in the first few steps, could you still replace it if/when it wears out?
Kitty
Playing with trains in scale 1:87 and 1:1
My modeling motto: “too many tools, but no clue”
Posts: 11,744
Threads: 571
Joined: Nov 2008
(01-07-2023, 12:57 PM)Kitty Wrote: A running wooden locomotive that you put together yourself, now that's cool!
I have seen laser cut kits before, assembled a few architecture ones and even printed my own on our laser cutter. Been peeking at a book nook train files set for Christmas. Have not seen any ones that are actually moving.
With (cheap) laser cut kits usually also the manual quality also gets cut, sadly. Wish it wasn't that way because generally they have great potential. I really hope you won't start blasting it apart.
I am curious however, is the rubber band entirely build in? Since it's in the first few steps, could you still replace it if/when it wears out?
Kitty
Thanks, after a while you will see that I am very sarcastic and wouldn't waste bullets on something like this, but the thought is there. 
The motive power is from the wound-up spring, the rubber band was my idea to get past that step and I think it's time I cut if off, but I'm afraid if I do, I may need it if I have to get to the spring again. If there were only two steps to assemble this, step #1 would be, "hold spring in air", step #2, "build model around spring"....
Don (ezdays) Day
Board administrator and
founder of the CANYON STATE RAILROAD
Posts: 9,709
Threads: 233
Joined: Dec 2008
 01-08-2023, 09:56 AM
Don.
You have the patience of Job. That model qualifies for sure. It will be interesting when built. I am sure you can do it.
My kids got me 2 jigsaw puzzles for Christmas. I have been thinking for several months about trying one but I never said a word out loud. One is 1000 pieces and the other 2000. It may be 2030 before I try one.
Keep up the good work and when you are done write an assembly manual. The manuals that come with some of these items reminds me of the M*A*S*H episode where they were disarming a bomb and Hawkeye does a step and the manual says: "but first" and the bomb starts ticking. 
Charlie
Posts: 6,189
Threads: 1,126
Joined: Nov 2008
I've set my puzzle limit at 20.
20 parts or 20 steps, whichever gets there first   
Posts: 11,744
Threads: 571
Joined: Nov 2008
Don (ezdays) Day
Board administrator and
founder of the CANYON STATE RAILROAD
|
 So far I've only broken one part, did not bring glue, just made a new one out of scraps.
 No estimate time to get it finished, if one part goes in wrong, it has to be disassembled back down to that part
  . I'm just hoping I get it finished in time to put under the Christmas tree this year....


 So far I've only broken one part, did not bring glue, just made a new one out of scraps.
 . I'm just hoping I get it finished in time to put under the Christmas tree this year....


 Whoever designs these things are evil people destine to take over the world by driving everyone else coo-coo.... How I reached step 9 is beyond comprehension and proof that I have lost all sense of reality.
  Gear-assembly (group 02) is loose, must tighten gear without bringing glue to the party. Also, time to remove the rubber band (must provide own) that was keeping shaft ass'y from falling apart.
