Posts: 11,749
Threads: 571
Joined: Nov 2008
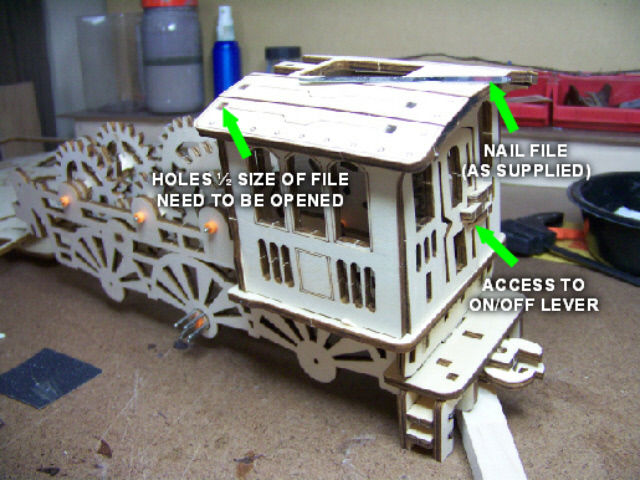
Progress, I've just done step 17. Just a few photos, I had to disassemble the cab to get to the spring. I managed to get the spring hooked back up to the shaft and, yes, I did glue it in place, otherwise it would keep popping out. and it's not easy to get to. The other photo shows the file they include just in case some holes are too small for the slots. It is a nail file and is too large to fit in most slots. Fortunately, I have a set of miniature files (remember, I work in N scale). I also pointed out that there is an on/off lever inside the cab that does not mesh with the gear. I'm hoping I can line up all the gears when it's finished and in spite of the restrictions, use glue to keep them from drifting out of sync. Oh, the lever is not going to be easy to reach either, if I can get it to work in the first place. 
And yes, a few parts fall off where the slots are too big, but not anymore 
On to step 18, I'm just a bit over 1/3 done. 

Don (ezdays) Day
Board administrator and
founder of the CANYON STATE RAILROAD
Posts: 11,749
Threads: 571
Joined: Nov 2008
Giant step, just finished step 26, the past few steps had lots of parts and most took a hammer to put in place. Yes, they did furnish a small hammer to help those stubborn parts to go where they belong. Like each cylinder has 10 parts, the cow catcher 10 and the pilot truck 16. Giant clue, if somewhere you did not get two parts seated properly (easy to do), it will screw things up down the line, that's where the hammer is most useful. Here's a shot of what it looks like now. All parts seem to be seated properly, but not all the gears line up like they should. Maybe later. 

Don (ezdays) Day
Board administrator and
founder of the CANYON STATE RAILROAD
Posts: 9,715
Threads: 233
Joined: Dec 2008
Your efforts are starting to show. That is an interesting build. It is really very nice and would look nice on a fireplace mantle, (I don't suppose you have a fireplace) or in the front window so you can show it off to the neighbors. You can be proud of that build for sure.
Charlie
Posts: 11,749
Threads: 571
Joined: Nov 2008
(01-14-2023, 01:32 PM)Charlie B Wrote: Your efforts are starting to show. That is an interesting build. It is really very nice and would look nice on a fireplace mantle, (I don't suppose you have a fireplace) or in the front window so you can show it off to the neighbors. You can be proud of that build for sure.
Charlie
Thanks Charlie, no fireplace, front window is blocked by a large cactus so if I even get it put together, I'm not at all sure it will look presentable to put anywhere anyway. I might use it as a table centerpiece, hang napkins on it, salt & pepper in the cab. Wind it up and send it over to someone in need. "pass the salt please", "of course", rum, rum, tick, tick, tick.... 
Don (ezdays) Day
Board administrator and
founder of the CANYON STATE RAILROAD
Posts: 3,730
Threads: 44
Joined: Dec 2008
I admire your "stick to it ness" Don. It's looking good!
Mike
Sent from my pocket calculator using two tin cans and a string
Posts: 11,749
Threads: 571
Joined: Nov 2008
Don (ezdays) Day
Board administrator and
founder of the CANYON STATE RAILROAD
Posts: 11,749
Threads: 571
Joined: Nov 2008
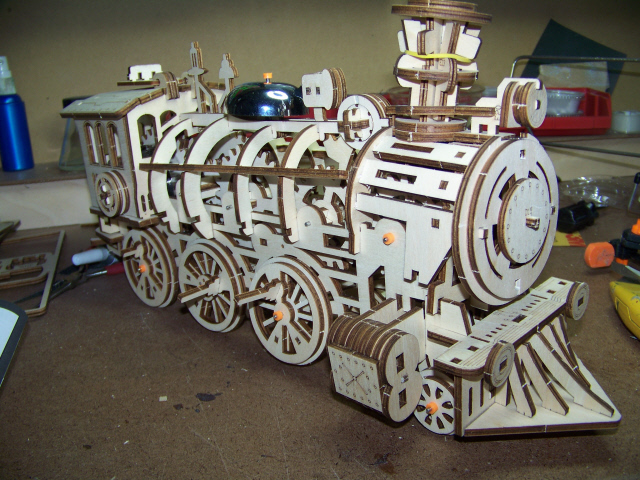
Getting close, now on step 40, but there are many problems yet to be resolved. Back in step 2, I missed putting in two parts that should have locked in the spring. Issue solved with a dab of glue since there's no way of getting to that assembly without stripping back to that step. The front end sags and I have no idea if it is joined in the wrong slot (there is one drawing that is super unclear), or another step will support it better. The say no glue, but there are parts so loose they fall off when you rotate the assembly (note the liberal use of rubber bands). There are other parts that are suppose to move, but bind, all this means there will be a lot of screwing around afterwards. For instance, the hammer that hits the bell neither makes contact to the actuating gear, nor does it move freely. Same goes for the smokestack, it's suppose to rotate but is nowhere near a drive gear.
Lastly, some gears seem to mesh OK, but the spring is not driving the main gear, which was assembled in step 8 and I may have to do some tricky surgery to get to lock in, but one thing I'm not doing is any major disassembly.
I noticed that in the beginning, the instructions say to remove all pieces from the sheet they're attached to before beginning construction. That means a pile of 290 pieces, most marked, some not, some as large as 8", some as small as 1/8".  I left them on the sheet until needed and kept most of my sanity. 
Here's where I am now:

Don (ezdays) Day
Board administrator and
founder of the CANYON STATE RAILROAD
Posts: 599
Threads: 12
Joined: Jun 2022
Better a saggy front end than a saggy butt!
We're having too much fun watching you bang your head against the wall, Don.... This is a family Christmas gift from Hell.
Posts: 3,730
Threads: 44
Joined: Dec 2008
Wonder what gauge that is? G maybe?
Mike
Sent from my pocket calculator using two tin cans and a string
Posts: 11,749
Threads: 571
Joined: Nov 2008
(01-20-2023, 06:58 AM)Tyson Rayles Wrote: Wonder what gauge that is? G maybe?
I thought so too, but it is quite a bit larger. The wheel spacing on this is 2.75". They may have a track kit for this scale, a block of wood and a penknife.  
Don (ezdays) Day
Board administrator and
founder of the CANYON STATE RAILROAD
Posts: 11,749
Threads: 571
Joined: Nov 2008
Hey, we have a giant step.... backwards.  Step 39 1/2 says to disassemble the body and find out why the spring won't engage the main gear. I thought I missed a step way in the beginning because I had 4 J-2 parts that should have been used to lock the spring, but I didn't, they are there. There is two sets of J-2 but only one is used. They also have a J-3 gear that I cannot find where it belongs, so I'm assuming they are used in another assembly and just included to upset the builder.
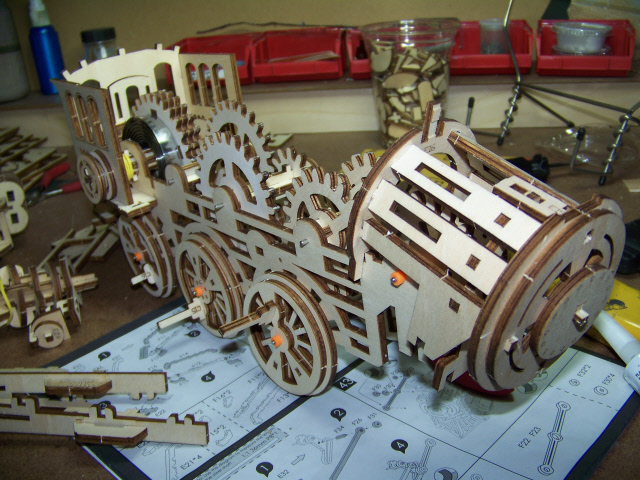
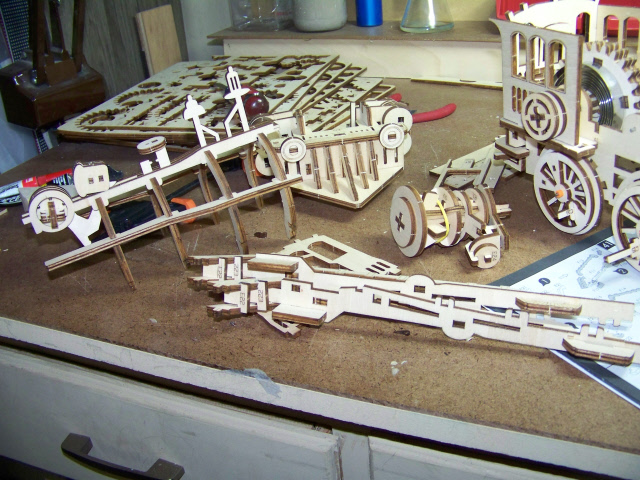
Now for the main problem, I need to find out what the spring/gear issue is and so I took off a bunch of parts and found that there is a gap between the two. Here's what it looks like right now. There is also a shot of the parts that I removed including those that fell off on their own. Remember, no glue required... 
Now to figure out how to get those parts to stay aligned without any glue. 

Don (ezdays) Day
Board administrator and
founder of the CANYON STATE RAILROAD
Posts: 1,061
Threads: 111
Joined: Jan 2009
don you and job must have a lot in common I have had a hard time with the laser cut wood caboose i started to the point i do pull it out from time to time and look at it shake my head and put it back styrene is my go-to material now.
Jim
Posts: 6,193
Threads: 1,126
Joined: Nov 2008
That's why they say "no glue" so you can disassemble when required
Posts: 11,749
Threads: 571
Joined: Nov 2008
(01-23-2023, 07:05 PM)ngauger Wrote: That's why they say "no glue" so you can disassemble when required
That's what I like about this, it has a auto-disassembly feature, rotate it and parts just fall off.. 
Don (ezdays) Day
Board administrator and
founder of the CANYON STATE RAILROAD
Posts: 11,749
Threads: 571
Joined: Nov 2008
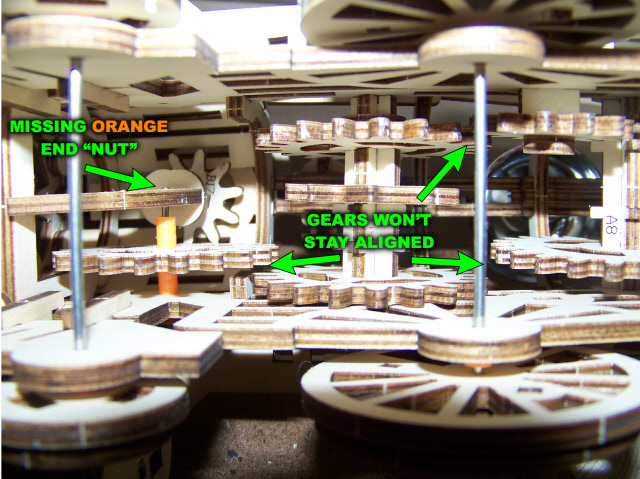
Well, I'm back on schedule, step 41 is now complete. I did get the drive gear issue resolved. there is a ratchet gear inside that group of three gears and the winding shaft wasn't secure to it. Had to use, you guessed it, glue to get it to hold. I seem to need more glue to keep those three gears locked in, just that I have to be careful since that ratchet gear has to be free to rotate on it's own.
A few more issues, those little orange plastic donuts are suppose to act as lock nuts, but they continually pop off. Gotta use a bit of, yup. glue to keep them in place. And I have to do something to keep that main gear shaft from moving, you can see when it can shift side-to-side and the gears won't align. This time I can't use glue because the shaft has to rotate.
Uh, pay no attention to those tubes of glue in the photo, this unit does not require the use of glue (note the liberal use of rubber bands which will be removed soon)... 
Note that the front end of the boiler still sags, it's not suppose to according to the drawings, but it does and now it is locked in place and I cannot even force it up. I am looking through the paperwork to see if I can find a coupon " show the finished engine and this coupon to a psychiatrist for a free visit on us. Some restrictions may apply".  


Don (ezdays) Day
Board administrator and
founder of the CANYON STATE RAILROAD
|


