Posts: 11,766
Threads: 571
Joined: Nov 2008
Don (ezdays) Day
Board administrator and
founder of the CANYON STATE RAILROAD
Posts: 4,553
Threads: 100
Joined: Dec 2008
We always learn far more from our own mistakes, than we will ever learn from another's advice.
The greatest place to live life, is on the sharp leading edge of a learning curve.
Lead me not into temptation.....I can find it myself!
Posts: 4,553
Threads: 100
Joined: Dec 2008
  
Just discovered a "bit of a problem" with the project ! :o    
The support for the crosshead guide, and the valve gear of the lead engine, falls right above the middle driver axle, and spring. I guess I'll have to "get creative", unless I can find some prototypical solution.
The spring rigging on the rear engine is out of the way, below the top surface of the frame, with a yoke bearing on the upper part of the journals. I might just re-rig the front engine suspension, in the same manner, to clear the area for the support.
There's always that surprise drawback when "recycling scrapped locomotive frames and parts" :oops:  hock: :oops:
I did get the brake reservoir, and control valve fittings mounted under the engineer's side of the cab, re-positioned the walkways, and built a new front engine sandbox, with enough room between the filler caps, to mount the headlight. The backup light, for the tender, will get mounted on the tank end, rather than on top of the tank. This way, changing the bulb will be easier. Remove motor assembly; change bulb and re-solder; re-install motor assembly; Done!
We always learn far more from our own mistakes, than we will ever learn from another's advice.
The greatest place to live life, is on the sharp leading edge of a learning curve.
Lead me not into temptation.....I can find it myself!
Posts: 4,553
Threads: 100
Joined: Dec 2008
Finally found a pair of headlight castings, and got them temporarily in place. They will need to be drilled for the bulb wires, and have a styrene insert formed to hold the bulb centered,and provide a "reflector".
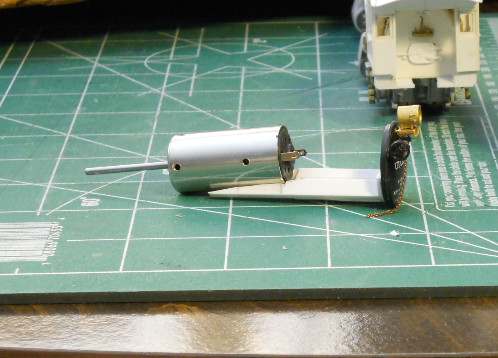
The motor "sled" is under construction ( which means that it will have to be rebuilt several times until it fits perfectly, and is easily removed, and replaced ).
It's beginning to look like a "locomotive", a n d it's beginning to look like I might have to take, and post some more pictures :o   Still
Still waiting for new gearboxes. (_______________  __________  ___ :o :o __  :o  ____)
We always learn far more from our own mistakes, than we will ever learn from another's advice.
The greatest place to live life, is on the sharp leading edge of a learning curve.
Lead me not into temptation.....I can find it myself!
Posts: 3,731
Threads: 44
Joined: Dec 2008
Mike
Sent from my pocket calculator using two tin cans and a string
Posts: 1,122
Threads: 85
Joined: Nov 2010
Sumpter250 Wrote:This way, changing the bulb will be easier. Remove motor assembly; change bulb and re-solder; re-install motor assembly; Done! Blubb? :?:
O.K. let me explain.
blub light:
![[Image: dsc055220auxq.jpg]](http://www.abload.de/img/dsc055220auxq.jpg)
Behind the smokebox front a bulb in an piece of brass tube soldered onto the inner side of the front.
A small bore and another one through the rear sie of the front light casing.
A light guide in form of an clear styrene rod should guide the light of the bulb into the front light.
That is all what was coming out at 15V.
Now the rebuilt with LED:
![[Image: dsc05524bwuyd.jpg]](http://www.abload.de/img/dsc05524bwuyd.jpg)
A wired warm white 0603 type LED with an 1kohm resitor at 12V.
Those LEDs are small enough to fit direct into the light casings. You will only pay attention to choose the correct resistor.
And if they are mounted properly and work, they will outlast any bulb. So changing is no more necessary.
There is also a wide variation of coulor tones and shades available, from 1800's kerosene lantern to modern incandescent light.
My 2 cent.
I read your articles with great interest, following the progress of this narrow gauge mallett 
Lutz
Posts: 1,122
Threads: 85
Joined: Nov 2010
Posts: 720
Threads: 53
Joined: Dec 2008
This is a good thread! I don't know how I missed it for 1.5 months.
An outside frame, NG 2-6-6-2 is a nice concept for a freelance locomotive! It is a sufficiently plausible concept (The D&RGW having received quotes for OF ng 2-8-8-2s), and effectively executed by not following a prototype's details too closely. Your work has been excellent on this project both on concept and execution! 
Michael
My primary goal is a large Oahu Railway layout in On3
My secondary interests are modeling the Denver, South Park, & Pacific in On3 and NKP in HO
<!-- m --><a class="postlink" href="http://thesouthparkline.blogspot.com/">http://thesouthparkline.blogspot.com/</a><!-- m -->
Posts: 4,553
Threads: 100
Joined: Dec 2008
nkp_174 Wrote:An outside frame, NG 2-6-6-2 is a nice concept for a freelance locomotive! It is a sufficiently plausible concept (The D&RGW having received quotes for OF ng 2-8-8-2s), and effectively executed by not following a prototype's details too closely. Your work has been excellent on this project both on concept and execution!   I wasn't aware of the D&RGW 2-8-8-2 quotes :o
I was partly driven by the fact that I have, in standard gauge, a 2-4-4-2, a 2-6-6-2, a 2-8-2, and a 2-8-0
I have built the 3' gauge 2-8-0, 2-8-2, and 2-4-4-2, all outside frame. The 2-6-6-2 OF is a long waiting project.
-------------------------------------
Lutz, I can use that idea for the lead engine !  BUT, I would have to change the style of the crosshead itself to do that. It is a legitimate "way out", and will have to see how much effort will be required to make it happen.
Many Thanks,   
Pete
-------------------------------------
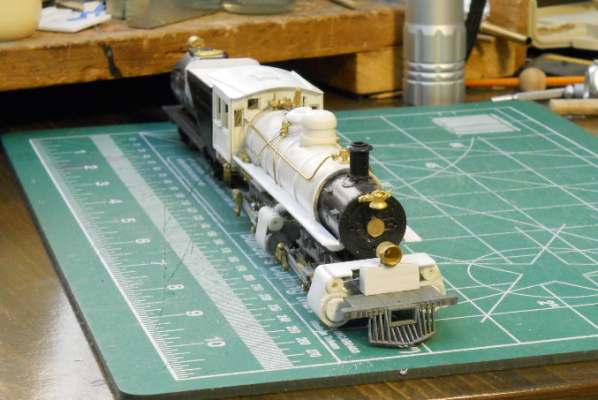
The headlight on the sand box on the pilot deck.

The Back-up light on the tender end cap.

The "sled" for the drive motor, with the tender end attached.
This will take a bit more "finessing" to get the motor supports right, and get the motor secured in place, with the universal drive cup on the shaft.

-------------------------------------
 Now that I think of it - - - - - has anyone ever seen an outside frame, 3' gauge, 2-8-8-8-2 Triplex ?       
( did I just hear the Star Trek theme playing ?? )
We always learn far more from our own mistakes, than we will ever learn from another's advice.
The greatest place to live life, is on the sharp leading edge of a learning curve.
Lead me not into temptation.....I can find it myself!
Posts: 3,731
Threads: 44
Joined: Dec 2008
How long would it take you to do one of those out in N scale Pete?
Mike
Sent from my pocket calculator using two tin cans and a string
Posts: 4,553
Threads: 100
Joined: Dec 2008
We always learn far more from our own mistakes, than we will ever learn from another's advice.
The greatest place to live life, is on the sharp leading edge of a learning curve.
Lead me not into temptation.....I can find it myself!
Posts: 11,766
Threads: 571
Joined: Nov 2008
Don (ezdays) Day
Board administrator and
founder of the CANYON STATE RAILROAD
Posts: 4,553
Threads: 100
Joined: Dec 2008
ezdays Wrote:I'm thinking there's little value in a 100X, maybe a microscope and some tiny robot fingers might be more in order.  I envy anyone that can do this at any scale. I envy anyone that can do this at any scale. 
Your timing is excellent ! Now, I remember! I saw an add for packages of 100ea, "T" scale R2-D2's, and the price wasn't too out of line.
Yessss, tiny robot fingers, that's the trick !        
I'm now at the point in construction where I have to disassemble both frames, and build the "articulation hinge". I did get the handrails on the boiler and found, and cured, one more of the binds in the main engine side rods. Also added gauge clusters to the backhead, so am very close to finally attaching the cab.
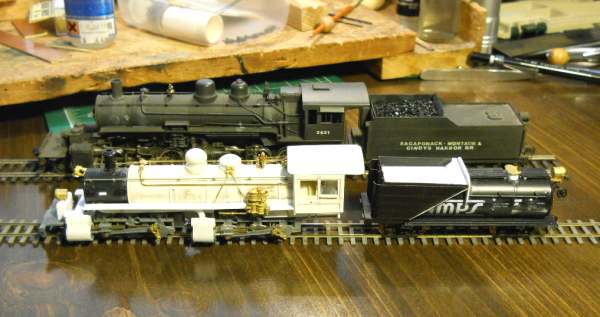
In this picture, a comparison: HO standard gauge 2-6-6-2, behind the HOn3 O/F, 2-6-6-2.

I will know that this project is coming close to being done when:
I no longer add another detail to the list, as I'm removing one that has just been installed.    
We always learn far more from our own mistakes, than we will ever learn from another's advice.
The greatest place to live life, is on the sharp leading edge of a learning curve.
Lead me not into temptation.....I can find it myself!
Posts: 720
Threads: 53
Joined: Dec 2008
That's sure looking fine.
The D&RGW had two different narrow gauge 2-8-8-2s drawn up. One was to be based around using two sets of running gear like the Class 125 locomotives (the K-27s as they were known for their first 20 years), and the other design was new...I can't recall if the second design was also to be OF.
The Tweetsie had a NG 2-8-8-2 proposed as well. I don't recall if they were to be IF or OF.
The Colorado & Southern had probably the best known of the proposed NG power, the 2-6-6-2s and 2-10-2s. Again, I don't recall if they were to be IF or OF.
I'm not aware of any other such plans. If you look around, you can find the folios.
Michael
My primary goal is a large Oahu Railway layout in On3
My secondary interests are modeling the Denver, South Park, & Pacific in On3 and NKP in HO
<!-- m --><a class="postlink" href="http://thesouthparkline.blogspot.com/">http://thesouthparkline.blogspot.com/</a><!-- m -->
Posts: 3,731
Threads: 44
Joined: Dec 2008
Mike
Sent from my pocket calculator using two tin cans and a string
|


Actually, I put the ' Bar '
, between the coaches and the observation car.


back at you !


 Can't miss a beat that way.


 hock: :oops:
  :o
:o 
![[Image: dsc055220auxq.jpg]](http://www.abload.de/img/dsc055220auxq.jpg)
![[Image: dsc05524bwuyd.jpg]](http://www.abload.de/img/dsc05524bwuyd.jpg)
![[Image: dsc0469286bjy.jpg]](http://www.abload.de/img/dsc0469286bjy.jpg)