06-09-2010, 05:05 PM
...for casting your own bridge piers and abutments.
I thought that I had previously brought this over from the old place, but, since I can't find it anywhere, I'll start afresh.
Here's a simple method for making your own bridge piers and abutments, and it will work for tunnel portals and retaining walls, too. With a little more work, you should also be able to create cast wall sections, which can be assembled into structures.
All of the bridge piers and abutments shown below were cast in Durabond 90 patching plaster, the same stuff as I used over screen for my scenery. It contains a catalyst, and will set in approximately 90 minutes, regardless of how thin or thick you mix it. When it first sets you can file or carve it fairly easily, but it becomes very hard when fully cured.
I made some simple 2- or 3-piece moulds from .060" sheet styrene, wiped the interior surfaces with some vegetable oil on a paper towel, assembled the moulds, then poured the plaster. For the piers shown in the first picture, I made only one mould, taller than the tallest pier, and designed to sit upside down for filling. Then, each pier was poured in succession to a height just a bit taller than what was needed in its final location. When removed from the mould, it was easy, using a mill file on the bottom surface, to bring it down to the proper height. On the piece that formed the bottom of the mould (which is the top of the finished pier), I cemented two small squares of .060" styrene, which left indentations in the top of the cast pier. I then cemented similar-size pieces on the bottom of the "steel" bridge supports, which fit into the indentations and keep the bridge in alignment. Like all of my bridges, they're removeable as a unit, simply by sliding the rail joiners clear at either end of the span. The abutments at either end of the bridge were cast in similar type moulds, but each one built to suit the site. When casting, by the way, the moulds were held together with elastic bands.
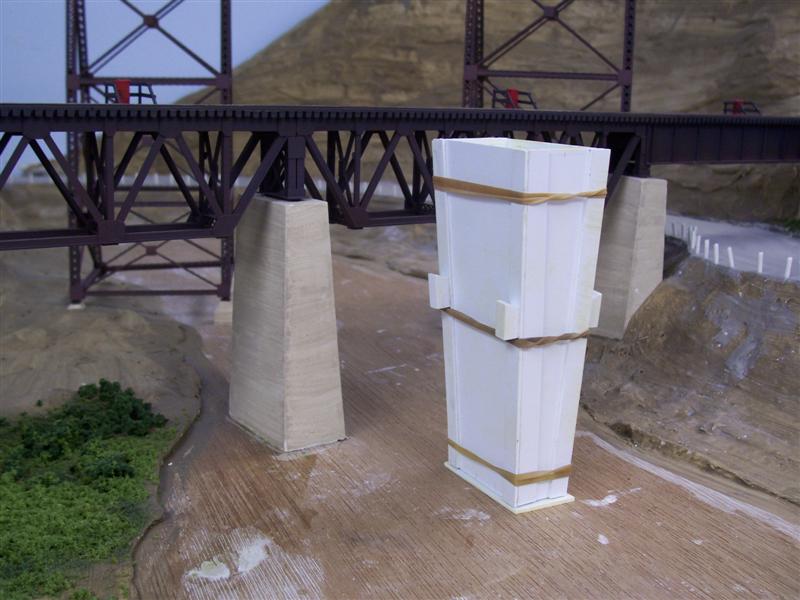
This is the mould for all of the piers of the bridge immediately behind the mould. As you can see, it's quite a bit taller than needed here, or indeed, for any of the piers on this bridge - you never can tell when it might come in handy for another, taller, bridge, though. I simply made a pencil mark inside of the mould to denote how high the plaster needed to be poured, allowing a little extra for trimming.
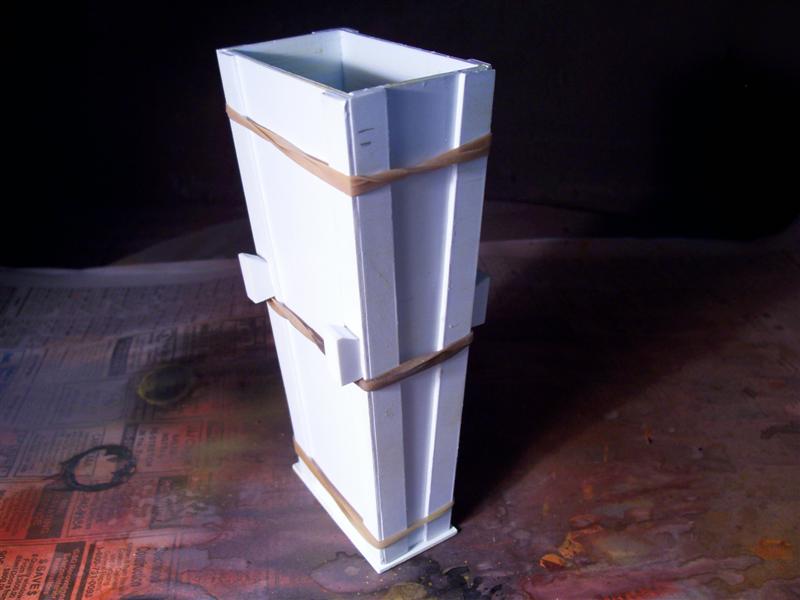
It's built of .060" sheet styrene, with more of the same material used as stiffeners along the edges. The mould walls and the stiffeners are stepped at the edges, so one face interlocks and overlaps with the adjoining pieces.
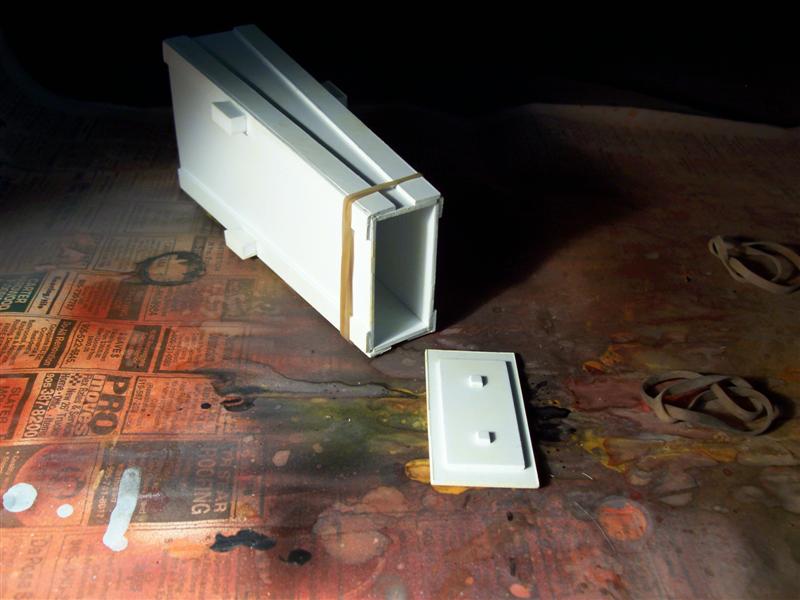
This is the bottom of the mould, which will be the top of the cast pier. Note how there's a larger piece upon which the mould sits while being filled with plaster, with a smaller piece which fits inside of the vertical parts of the mould. This is the form for the top surface of the pier. You can also see the two small squares of styrene cemented to this which will form the two bridge-locating indentations in the top of the pier.
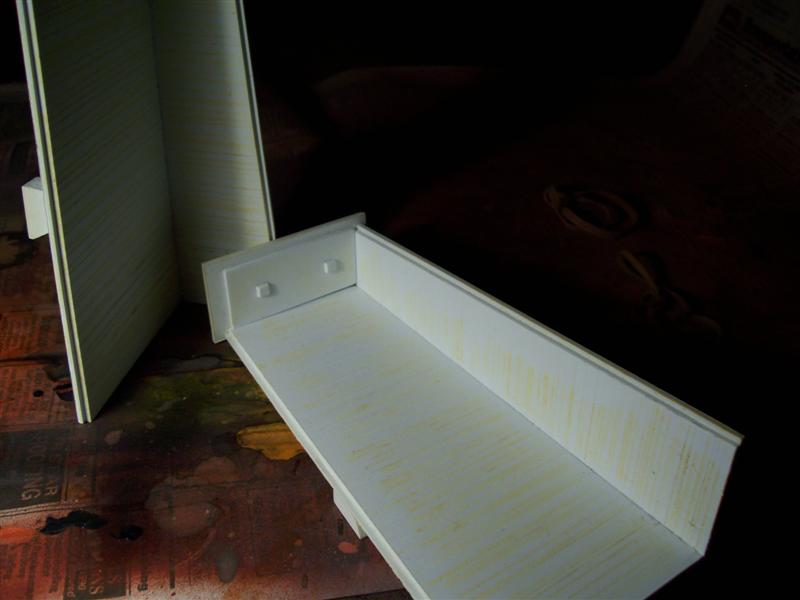
Here's the mould completely disassembled. I used an X-Acto knife to score and scrape lines to represent the form boards which often show on the prototype, although they're not very noticeable on the pier castings, especially under fluorescent lights. If you use Durabond for your castings and want to add carved-in stonework detail, do so immediately upon removing the part from the mould - as it cures, it becomes extremely hard and more and more difficult to work.
And a different view:
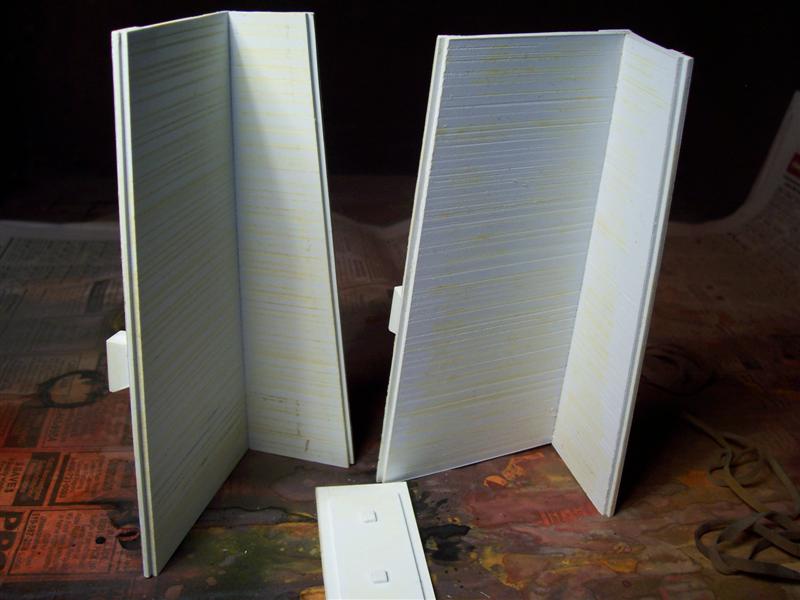
The large styrene blocks on the exterior of the mould are to keep the elastic from slipping out of place during the pouring process - in the first two pictures, the centre elastic should be above the blocks, not below.
The abutments for this bridge were somewhat complicated by the fact that the basic scenic landforms were in place, but a few judicious smacks with a hammer "adjusted" any protruding elements. I cast the abutment in the mould shown, then, after it was installed, used the flat pieces, propped and braced as required, to cast the wing walls "in situ".
Here's the mould for the support abutment:
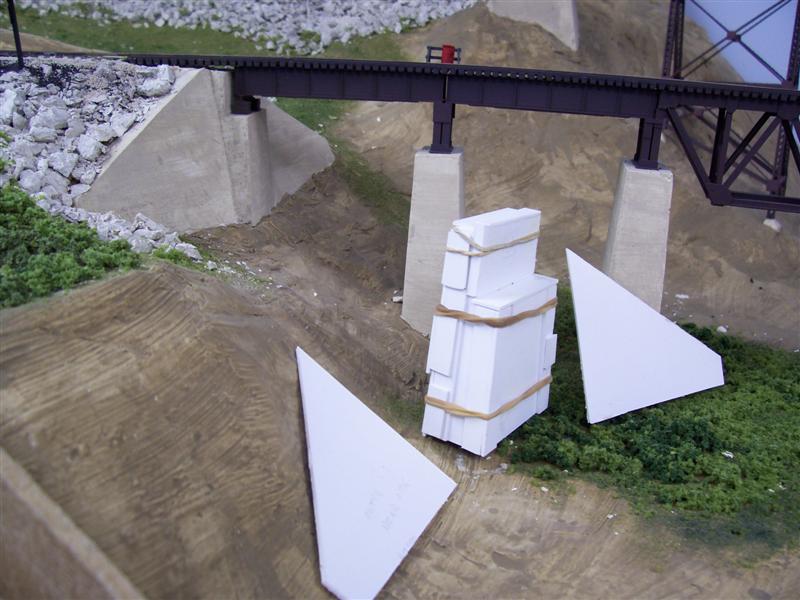
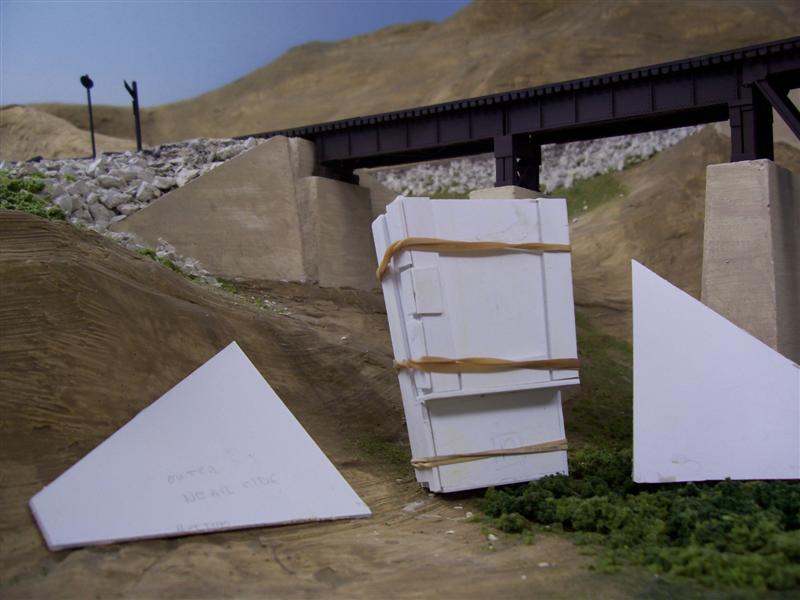
Of course, the mould would sit like this to be filled, propped up and supported by scraps of wood. The bottom of the freshly-cast abutment was trimmed with a knife to roughly match the contours of the "ground", then set in a thin bed of wet plaster to affix it in place.
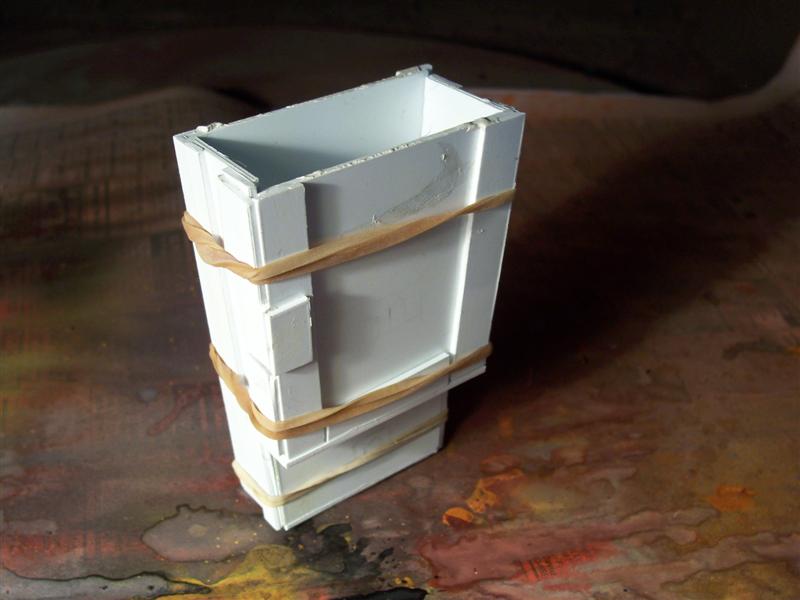
Because of the "step" required for the bridge support members, I had to make the bottom of the mould more complicated than that for the piers. Here it is partially separated (the "tab" protruding from below the lifted section is designed to slip over the outer face of the part below, sliding between the raised stiffeners on either side):
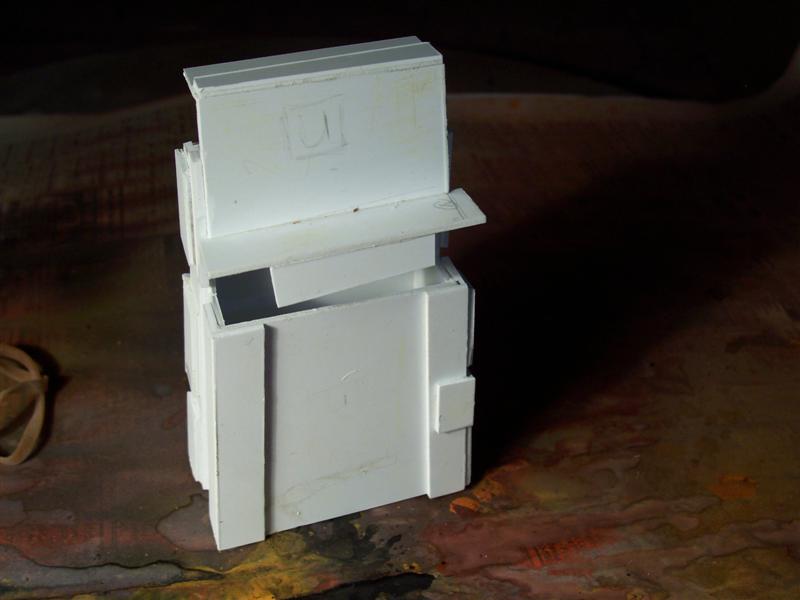
And from the opposite side - the narrow vertical piece on the lifted part fits over the outside face of the rear of the mould, and between the stiffeners on either side, effectively interlocking the parts of the mould together.
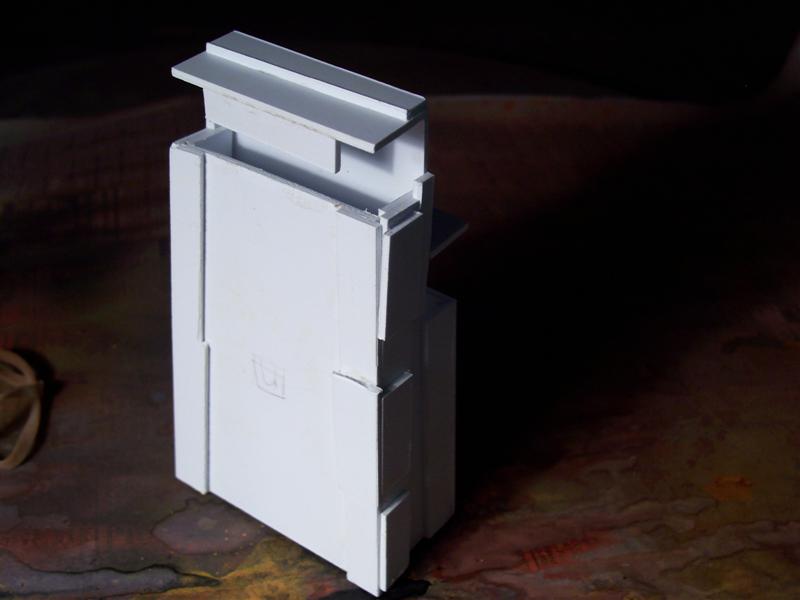
Here's the same mould completely disassembled. Note how the edges of the adjoining sections are stepped to lap one another, and the tabs that help to hold everything in alignment. Even with the tabs, use ample elastic bands to ensure that the mould stays together. The plaster is fairly heavy, and it's also a good idea to vibrate the freshly-filled mould to help remove any air bubbles, although any surface defects can be filled with a bit of fresh plaster applied after the mould is removed.

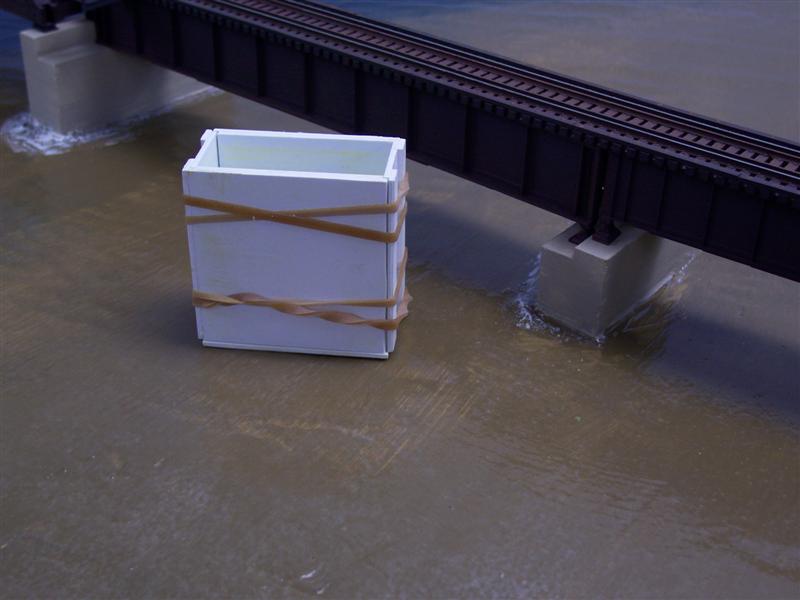
Here's a mould used for a different bridge, one where the spans are of different depths. Again, the mould is designed to be filled while upside down, as shown, and is quite a bit taller than required for this particular location.
And a view of the three pieces which comprise the mould. The sides sit atop the largest piece of the base, with the next smallest area forming the bottom of the mould (and what will be the top of the pier). The rectangular block will form the seat for the deeper of the two girders shown in the previous picture.
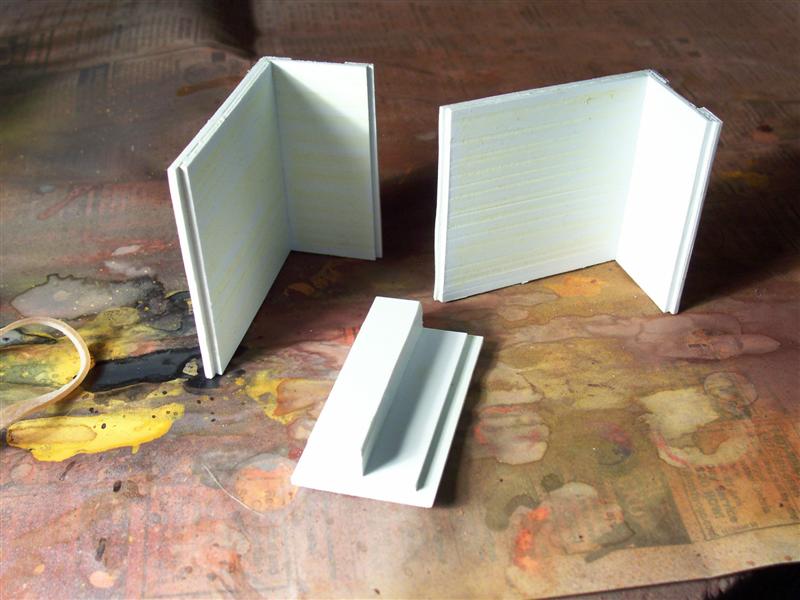
The sides of the mould were made perpendicular, as the finished pier is fairly short, but you could also do a taller one with tapered sides and a similar top. The "form" detail is visible on the inside face of the mould. I used a double thickness of material for the wide face, and narrow stiffeners on the end pieces to attain the required overlap at the corners.
After the plaster pieces were thoroughly hardened, I coloured them with a wash of thinned PollyScale paint, then glued them in place using yellow carpenter's glue. Even though they've been in place for a while, they've yet to be weathered.
I hope that some of this information will be of use when constructing your bridges.
Wayne
I thought that I had previously brought this over from the old place, but, since I can't find it anywhere, I'll start afresh.
Here's a simple method for making your own bridge piers and abutments, and it will work for tunnel portals and retaining walls, too. With a little more work, you should also be able to create cast wall sections, which can be assembled into structures.
All of the bridge piers and abutments shown below were cast in Durabond 90 patching plaster, the same stuff as I used over screen for my scenery. It contains a catalyst, and will set in approximately 90 minutes, regardless of how thin or thick you mix it. When it first sets you can file or carve it fairly easily, but it becomes very hard when fully cured.
I made some simple 2- or 3-piece moulds from .060" sheet styrene, wiped the interior surfaces with some vegetable oil on a paper towel, assembled the moulds, then poured the plaster. For the piers shown in the first picture, I made only one mould, taller than the tallest pier, and designed to sit upside down for filling. Then, each pier was poured in succession to a height just a bit taller than what was needed in its final location. When removed from the mould, it was easy, using a mill file on the bottom surface, to bring it down to the proper height. On the piece that formed the bottom of the mould (which is the top of the finished pier), I cemented two small squares of .060" styrene, which left indentations in the top of the cast pier. I then cemented similar-size pieces on the bottom of the "steel" bridge supports, which fit into the indentations and keep the bridge in alignment. Like all of my bridges, they're removeable as a unit, simply by sliding the rail joiners clear at either end of the span. The abutments at either end of the bridge were cast in similar type moulds, but each one built to suit the site. When casting, by the way, the moulds were held together with elastic bands.
This is the mould for all of the piers of the bridge immediately behind the mould. As you can see, it's quite a bit taller than needed here, or indeed, for any of the piers on this bridge - you never can tell when it might come in handy for another, taller, bridge, though. I simply made a pencil mark inside of the mould to denote how high the plaster needed to be poured, allowing a little extra for trimming.
It's built of .060" sheet styrene, with more of the same material used as stiffeners along the edges. The mould walls and the stiffeners are stepped at the edges, so one face interlocks and overlaps with the adjoining pieces.
This is the bottom of the mould, which will be the top of the cast pier. Note how there's a larger piece upon which the mould sits while being filled with plaster, with a smaller piece which fits inside of the vertical parts of the mould. This is the form for the top surface of the pier. You can also see the two small squares of styrene cemented to this which will form the two bridge-locating indentations in the top of the pier.
Here's the mould completely disassembled. I used an X-Acto knife to score and scrape lines to represent the form boards which often show on the prototype, although they're not very noticeable on the pier castings, especially under fluorescent lights. If you use Durabond for your castings and want to add carved-in stonework detail, do so immediately upon removing the part from the mould - as it cures, it becomes extremely hard and more and more difficult to work.
And a different view:
The large styrene blocks on the exterior of the mould are to keep the elastic from slipping out of place during the pouring process - in the first two pictures, the centre elastic should be above the blocks, not below.
The abutments for this bridge were somewhat complicated by the fact that the basic scenic landforms were in place, but a few judicious smacks with a hammer "adjusted" any protruding elements. I cast the abutment in the mould shown, then, after it was installed, used the flat pieces, propped and braced as required, to cast the wing walls "in situ".
Here's the mould for the support abutment:
Of course, the mould would sit like this to be filled, propped up and supported by scraps of wood. The bottom of the freshly-cast abutment was trimmed with a knife to roughly match the contours of the "ground", then set in a thin bed of wet plaster to affix it in place.
Because of the "step" required for the bridge support members, I had to make the bottom of the mould more complicated than that for the piers. Here it is partially separated (the "tab" protruding from below the lifted section is designed to slip over the outer face of the part below, sliding between the raised stiffeners on either side):
And from the opposite side - the narrow vertical piece on the lifted part fits over the outside face of the rear of the mould, and between the stiffeners on either side, effectively interlocking the parts of the mould together.
Here's the same mould completely disassembled. Note how the edges of the adjoining sections are stepped to lap one another, and the tabs that help to hold everything in alignment. Even with the tabs, use ample elastic bands to ensure that the mould stays together. The plaster is fairly heavy, and it's also a good idea to vibrate the freshly-filled mould to help remove any air bubbles, although any surface defects can be filled with a bit of fresh plaster applied after the mould is removed.
Here's a mould used for a different bridge, one where the spans are of different depths. Again, the mould is designed to be filled while upside down, as shown, and is quite a bit taller than required for this particular location.
And a view of the three pieces which comprise the mould. The sides sit atop the largest piece of the base, with the next smallest area forming the bottom of the mould (and what will be the top of the pier). The rectangular block will form the seat for the deeper of the two girders shown in the previous picture.
The sides of the mould were made perpendicular, as the finished pier is fairly short, but you could also do a taller one with tapered sides and a similar top. The "form" detail is visible on the inside face of the mould. I used a double thickness of material for the wide face, and narrow stiffeners on the end pieces to attain the required overlap at the corners.
After the plaster pieces were thoroughly hardened, I coloured them with a wash of thinned PollyScale paint, then glued them in place using yellow carpenter's glue. Even though they've been in place for a while, they've yet to be weathered.
I hope that some of this information will be of use when constructing your bridges.
Wayne


