11-10-2016, 02:10 PM
Hi Harry,
I'm glad that you like the plan. I think it offers a lot of operational potential, plus give some nice scenery options. As for switching the mine, it is pretty straight forward even with the track that is there, but I will try to explain my thinking using both words and graphics.

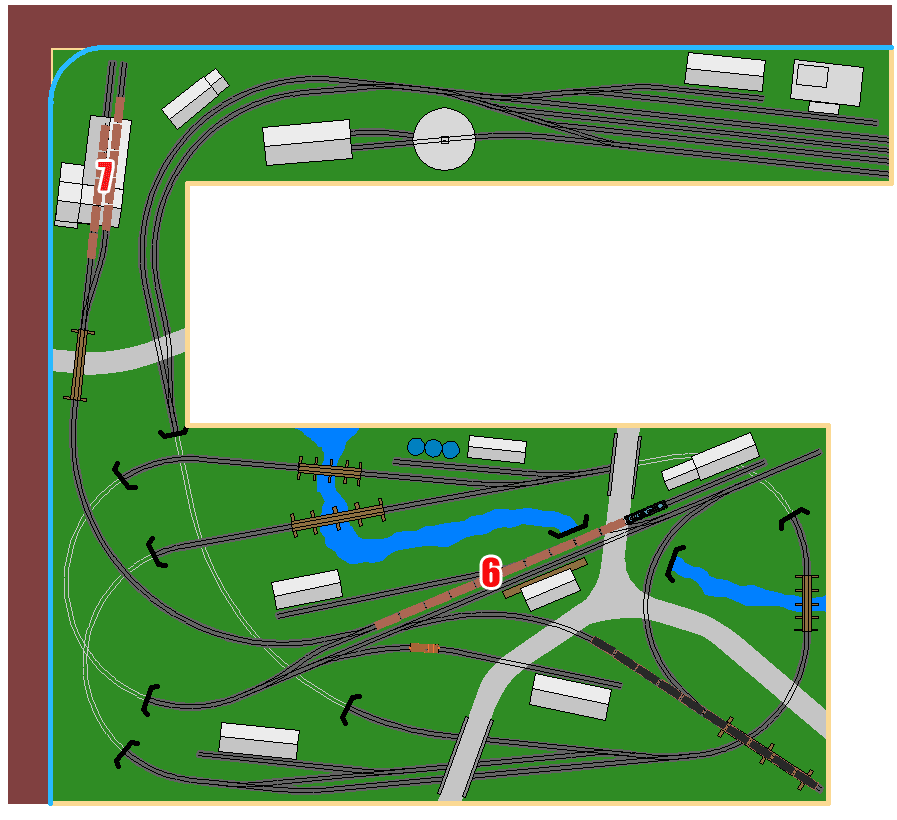
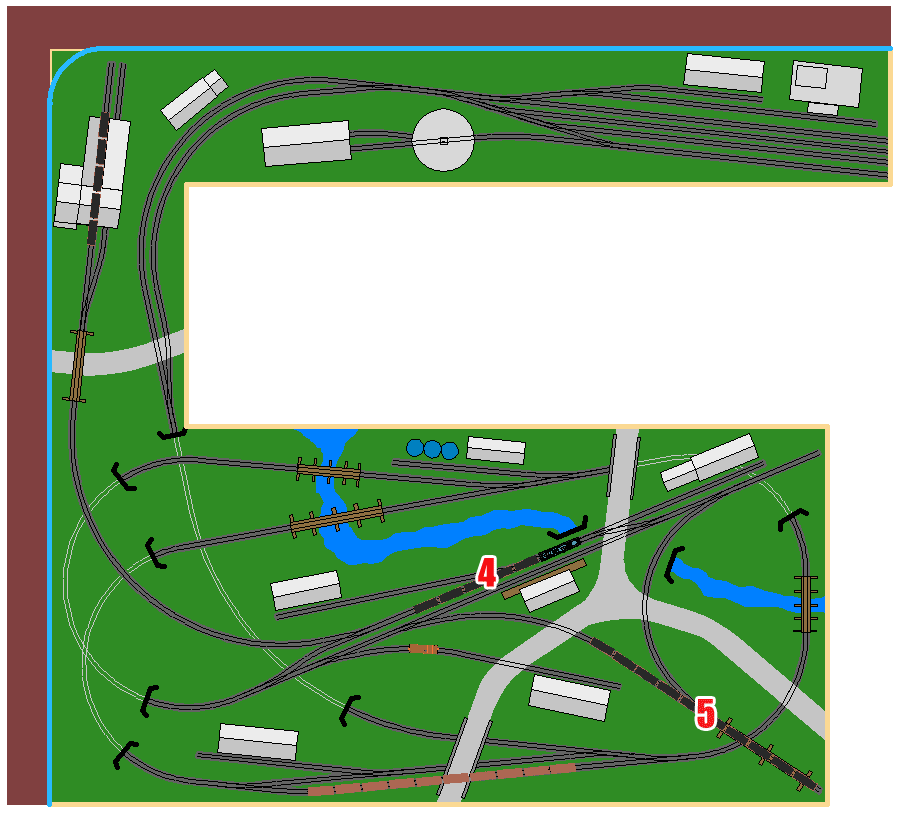
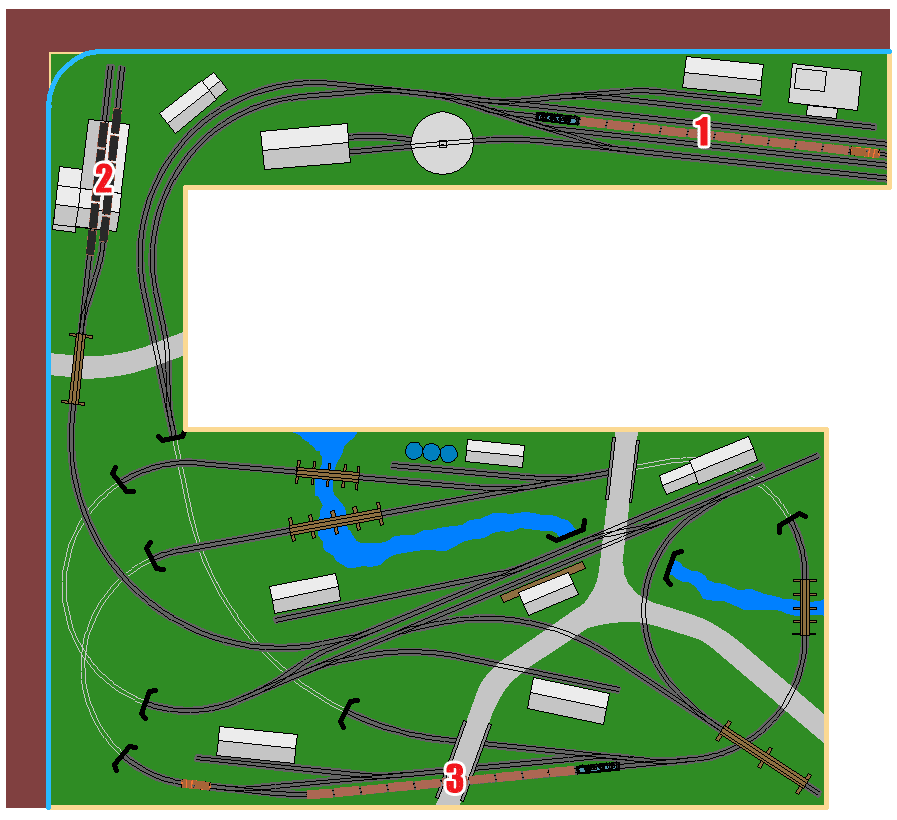
The graphic above shows the start of the day with a train of 10 empty 2-bay coal hoppers ready to leave the interchange yard depicted in position #1. There are also 10 loaded 2-bay coal hoppers waiting at the coal mine to be picked up depicted in position #2. The empty coal train leaves the yard, and makes a few laps around the mainline.
After making the laps, the caboose if cut from the train and left of the mainline. The crew then pulls forward and drops the 10 empty hoppers on the siding depicted by #3. The loco is then backed onto the caboose and taken into town and both turned on the wye. The caboose is then left on a siding while the mine is switched.

After dropping the caboose, the crew runs uphill to the mine and brings down just 5 loaded hoppers at a time to the position depicted as #4. The crew uncouples the loco, and runs around the 5 hoppers, and starts building the outbound loaded coal train on the wye depicted as #5. Once the outbound train is finished the crew takes just the loco down to pick up the 10 empties still at position #3.

The loco pulls the 10 empty hoppers back to town and stops in position #6. The crew then pushes the 10 empties up the hill, and splits them between the two tipple tracks at #7. The engine crew returns to town and backs onto the 10 loaded hoppers still on the wye in position #5. Before leaving town, the crew backs onto the caboose and then departs for the interchange yard where it started.
Take care,
Rob.
I'm glad that you like the plan. I think it offers a lot of operational potential, plus give some nice scenery options. As for switching the mine, it is pretty straight forward even with the track that is there, but I will try to explain my thinking using both words and graphics.
The graphic above shows the start of the day with a train of 10 empty 2-bay coal hoppers ready to leave the interchange yard depicted in position #1. There are also 10 loaded 2-bay coal hoppers waiting at the coal mine to be picked up depicted in position #2. The empty coal train leaves the yard, and makes a few laps around the mainline.
After making the laps, the caboose if cut from the train and left of the mainline. The crew then pulls forward and drops the 10 empty hoppers on the siding depicted by #3. The loco is then backed onto the caboose and taken into town and both turned on the wye. The caboose is then left on a siding while the mine is switched.
After dropping the caboose, the crew runs uphill to the mine and brings down just 5 loaded hoppers at a time to the position depicted as #4. The crew uncouples the loco, and runs around the 5 hoppers, and starts building the outbound loaded coal train on the wye depicted as #5. Once the outbound train is finished the crew takes just the loco down to pick up the 10 empties still at position #3.
The loco pulls the 10 empty hoppers back to town and stops in position #6. The crew then pushes the 10 empties up the hill, and splits them between the two tipple tracks at #7. The engine crew returns to town and backs onto the 10 loaded hoppers still on the wye in position #5. Before leaving town, the crew backs onto the caboose and then departs for the interchange yard where it started.
Take care,
Rob.


