Sand Tower - a la Good, Good Whole Wheat Shreddies!
#31
If you have a decent punch, you can punch discs out of suitable thicknesses of styrene or brass, then assemble a small one between two of slightly greater diameter. As another option, Grandt Line offers a selection of pulleys.

Wayne
Reply
#32
I'd love to give Grandt Line a try. I've placed a previous order through them for some bolt details and so far have not had much luck. After a handful of e-mails requesting when I can expect to receive my order, nothing. They have not charged my CC, however some kind of response would be nice. Nope
Reply
#33
On top of other projects on the go, I finally got around to getting some paint on this sucker. I swapped out the original door frames again for a pair from Grandt Line that I was able to get a hold of at my LHS.

(Still no luck with the mail order thing... Curse )

Same technique as with the Interlocking Tower. A couple of coats of gray primer with some light sanding in between. Followed by three light coats of the Tuscan Red and then a quick shot of box car red to lighten it up with some Rail Brown along the base for dust & dirt. I cannot express how happy I am I invested in an airbrush at this point. I never though painting a model could be so easy. I just wish I had one when I was kid and built a handful of plastic model car kits. I'll let this continue to dry overnight before I paint the windows and door frames to be then followed by the sand pipe installation and the clear styrene windows.

I was fooling around with the camera settings again. The light in the dinning room is not that great for taking photos of this stuff...next time I'll take them on the layout.

[Image: DSC03340.jpg]
[Image: DSC03341.jpg]
[Image: DSC03342.jpg]
[Image: DSC03343.jpg]
Reply
#34
Great job on this sand tower, Shane. You are not the only one to be glad to be in possession of an airbrush .. I hate painting with a paint brush and if it was not for my airbrush, a lot of my models would remain unpainted ... Goldth
Kurt
Reply
#35
Hahaha!!! Wholey Schmokes! I deserve the Procrastinator Award. I cannot believe that I have not done anything on this model since 2009!

Well, since I'm busy working on my article for RMC I decided I'd also complete some other things that I should get done as well. So I started work on this again. Simply enough I decided to add some tar paper roofing and a simple 1/4 base for the model to sit on. It doesn't look like much to start off with but its better then nothing. The tar paper roof is 600 grit wet/dry sandpaper. I've added some patches to it not seen in these pictures. The sand paper was stuck on the roof with some thin double sided tape. Going to figure out a way to tone it down a bit. Suggestions?

[Image: SAM_0633.jpg]

[Image: SAM_0636.jpg]

[Image: SAM_0639.jpg]

[Image: SAM_0641.jpg]

I've since painted the plywood a dirt brown colour. Things to do. Paint windows, add "glass" and scenic around the model base. I'm still deciding whether or not I'm going to light the model. It's still not too late as I can remove the roof from building to add some wires and fixtures to the exterior. Decisions, decisions...
Reply
#36
That is a very interesting little structure. I love it!
Reinhard
Reply
#37
Hey! Great thread revival! Thumbsup Looks great!
Reply
#38
When I first see a thread like this being revived, the thing that comes to mind is that some spammer has posted there in an old thread. This is like a miraculous recovery, and I'm glad to see you finishing up a long forgotten project. Nice job for sure... I'm also pleased that you're still working on your article. Good luck with that as well.. Thumbsup Thumbsup
Don (ezdays) Day
Board administrator and
founder of the CANYON STATE RAILROAD
Reply
#39
Thanks guys. I know if I need a shot in the arm I can always count on the folks around here. The article for RMC is a sum of many parts. I'm finishing up the paint on the car float and will have it detailed weathered and permanently installed within the week. I'll then start work on the Iris G tug to "complete" the scene. Once that is done, I'll install the facia for that section of the layout, make some final adjustments and touch-ups... then I'll pour the water.

In the meantime I feel like I've been neglecting my friends here and will revist a couple of other threads I've started and finish up some long forgotten projects.
Reply
#40
Did some more work last night. I painted the window trim and used some weathering powders. First time I've ever used them too. I found that I used some brighter colours to add some depth and then washed over them with greys and blacks. then I used some white to highlight the details. I think it turned out alright, however I will try to exercise a bit more restraint the next time as I don't want to over do it. Next step is to spray dullcoat on the model, add some landscaping and lastly I'll put the windows in.

[Image: SAM_0648.jpg]

[Image: SAM_0649.jpg]
Reply
#41
Thecontrasting trim and the weathering has really brought that little structure to life. Thumbsup Thumbsup It also appears that you've come up with some pulleys for the delivery spout.

Wayne
Reply
#42
Thanks Wayne! Goldth
Reply
#43
I like that you chose to modify, slightly, and in some ways "personalize" your model. It turned out quite well !
When you Dullcoat, a lot of your powder weathering will become less noticeable. Using weathering powders takes a bit of learning to be able to find that happy medium of just enough powder, to look good after the clear coat is applied.

I notice that you didn't model the louvered vent on the roof of the drying shed, or the coal bin ( fuel for the dryer ) Goldth
I didn't either Wink Thumbsup
When I built my version, it was meant to sit on a hill, with the tower separated from the bin and shed. That "hill" is history now, and the tower, shed, and bin, look like this.
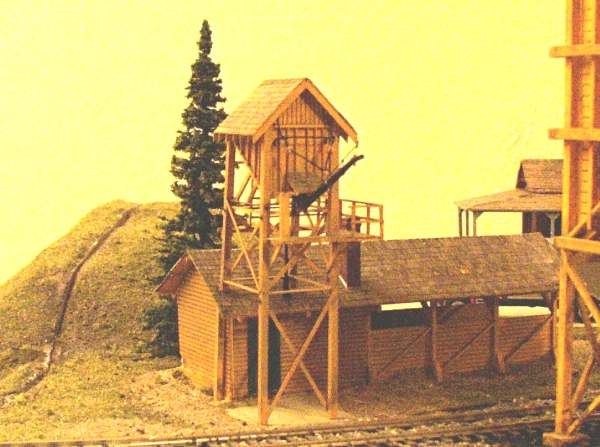
   

Seeing yours, brings back good memories. Very nicely done!!!

" The sand, is transferred to the dry house for drying over a small coal fired burner. Coal is stored in a bin behind the dry house. The dried sand is screened of its impurities and then forced by compressed air through the two inch iron pipe to the storage hopper of the tower where it awaits dispensing through the long movable spout. "
I never thought about that, but.........where's the air compressor ?? Big Grin I guess I'll have to sit down one day, and build a "compressor shed". There isn't a whole lot of room inside the dry house.
We always learn far more from our own mistakes, than we will ever learn from another's advice.
The greatest place to live life, is on the sharp leading edge of a learning curve.
Lead me not into temptation.....I can find it myself!
Reply
#44
Hey Tetters, that turned out really nice. The weathering is A1! Good to see the project being completed Thumbsup
Reply
#45
First I have to say WOW what a great model 2285_ Worship 2285_

If you like the working in card stock and using material from cereal boxes and the like check out this site below, click on stumpy stones how to articales all though written for S gaugers they work in other scales as well.

<!-- m --><a class="postlink" href="http://MyFlyerTrains.org">http://MyFlyerTrains.org</a><!-- m -->

I have made 2 train cars from wood and card board and I have been experimenting with building some structures built from layers of card board to make 3D windows, I have a way to go before I attain the skill you have shown but am having fun with the scratch building.

Again wow nice job Thumbsup
Reply


Forum Jump:


Users browsing this thread: 2 Guest(s)