Posts: 2,418
Threads: 63
Joined: Dec 2008
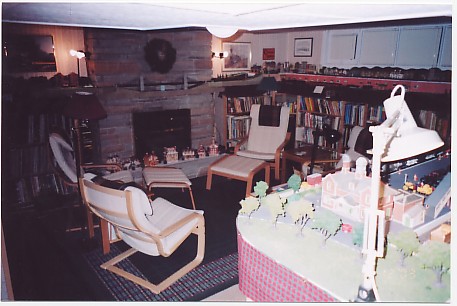
Russ: I used Ivar for my layout. We figured that it looked better than my carpentry  and it went together faster. I do have a couple of sections where I had to make custom shelves to make the dimensions come out right.
You may be able to make it out in this pic:

David
Moderato ma non troppo
Perth & Exeter Railway Company
Esquesing & Chinguacousy Radial Railway
In model railroading, there are between six and two hundred ways of performing a given task.
Most modellers can get two of them to work.
Posts: 1,897
Threads: 40
Joined: Dec 2008
tetters Wrote:Triplex Wrote:How about this one?
One of the weirdest things I've ever seen.
Agreed. How in the bejeebus does that work?!?
Is that thing on a barge? It looks like it serves as a locomotive escape. The loco would drag a cut of cars on one track, uncouple, and move to the turn table and be turned around and exit off the other track. It appears that the locomotive then rides the barge to the destination with another cut of cars.
Posts: 1,229
Threads: 23
Joined: Dec 2008
Triplex Wrote:How about this one?
<!-- m --><a class="postlink" href="http://www.girr.org/vacation_diaries/mexico_panama_2006/turntable.jpg">http://www.girr.org/vacation_diaries/me ... ntable.jpg</a><!-- m -->
One of the weirdest things I've ever seen.
Now that's a micro-layout just waiting to happen. VERY cool.  hock:
Galen
I may not be a rivet counter, but I sure do like rivets!
Posts: 1,229
Threads: 23
Joined: Dec 2008
David - looks like a very comfortable living room. Propped up in one of those chairs with a cold beverage and a modeling mag next to a glowing fire...very nice.
Gary - whatever I use, it will be on a wall stud. Fabricating brackets is what I'd have to do if I didn't purchase a shelf system.
Nolatron - I wondered if that was possible, but didn't want to invest heavily in the tracks until I'd done a bit more research. I was afraid mounting the bracket on the rail at such a low point would put undue stress on one spot...but if that stress is spread up the full height of the rail it makes sense. Hmmm...and a low valance would go further to hide the brackets... Also, how do you like the sheet metal for a backdrop?
Wayne - what's a Sonotube?
Still thinking about where to put the turntable, or how to incorporate a wye into the corner. A wye could also provide a possible connection to the Big Tujunga Lumber Company, if properly oriented. But that's less likely than fitting the turntable in. I'm sketching tonight.
Galen
I may not be a rivet counter, but I sure do like rivets!
Posts: 1,229
Threads: 23
Joined: Dec 2008
[albumimg]2076[/albumimg]
I'm setting up a workbench in this closet. The nice thing is being able to shut the door on the mess, like the computer cabinet.
Galen
I may not be a rivet counter, but I sure do like rivets!
Posts: 5,859
Threads: 175
Joined: Dec 2008
ocalicreek Wrote:I'm setting up a workbench in this closet. The nice thing is being able to shut the door on the mess, like the computer cabinet.
Galen
I had my shop in a closet once - it was alright until the day my wife closed and locked the door to hide the mess. I was almost out of oxygen before I was able to scratchbuild a tunnel to freedom, and even then, she deducted points 'cause I used commercial stripwood.  
Galen, a Sonotube is a cardboard form for pouring concrete, usually used in holes in the ground to create support footings. Probably not the best suggestion, I suppose: the cats would not likely have cooperated.  
Wayne
Posts: 5,859
Threads: 175
Joined: Dec 2008
Galen, if your shelves are 24" deep on both sides of the corner where you want to place the wye, you should be able to squeeze one in if you can add a curved section onto the area where the faces of the two shelves intersect. In the picture below, the layout depth to the left is 36" and towards the top right of the photo 42". However, since the wye tracks are those with the light-coloured ballast, not all of the depth would be required.
![[Image: BarneySecordfliestheGrandValley-Eri.jpg]](http://i23.photobucket.com/albums/b399/doctorwayne/Some%20scenery%20stuff/BarneySecordfliestheGrandValley-Eri.jpg)
If the interlocking tower is the point where the faces of the two shelves meet, a roughly 2' layout depth would be represented by the straight red lines. The curved red line in front of the tower is the additional section that would be required: the bigger you make it, the further you can move the mainline to the layout's edge, which will increase the length of the tail track.
![[Image: BarneySecordfliestheGrandValley--2.jpg]](http://i23.photobucket.com/albums/b399/doctorwayne/Some%20scenery%20stuff/BarneySecordfliestheGrandValley--2.jpg)
All of the radii of the wye shown are 30", giving approximately 10" of tail track beyond the switch (under the bridge) within the 2' layout depth. This is long enough to accommodate a Bachmann 2-8-0 or a geep. By using smaller radii, and a larger added segment at the front corner, you should be able to increase the length of the tail track, although it'd probably be best to lay out some track on the floor to get a better idea of how much space is actually needed.
For a turntable, I'd place it very close to the corner, then add a multiple-stall falsefront roundhouse in the corner itself - basically just the walls facing the turntable, with shortened sidewalls and a roof covering right to the walls of the room. From eye-level, it should make a convincing scene, and you could even open a door or two, with the rear of a shortened tender or diesel showing.
Wayne
Posts: 3,683
Threads: 118
Joined: Jan 2009
doctorwayne Wrote:I had my shop in a closet once - it was alright until the day my wife closed and locked the door to hide the mess. I was almost out of oxygen before I was able to scratchbuild a tunnel to freedom, and even then, she deducted points 'cause I used commercial stripwood.
DocWayne, that is too funny! Thanks for the mirth you bring to the forum. 
Three Foot Rule In Effect At All Times
Posts: 1,229
Threads: 23
Joined: Dec 2008
Wayne - thanks for all the great ideas!
The reason I'm considering a wye (vs. turntable) is that there probably wouldn't have been a full engine servicing facility at this end of the line beyond what was necessary to maintain the switch engine for the wharf/river landing. A turnable, if included at all, would simply be there to turn road engines for the return trip back up the branch. So a large-medium sized roundhouse is probably too big but a small two-stall shed might suffice...although the turntable/roundhouse combo is just so nice to look at. We'll see how the sketches come out.
As for the cats, well, the one would probably have cooperated just fine (she's not all there sometimes) and the other would have complained about it the whole time. But I love 'em so they earn a reprieve today. On the day I find they've sent an engine tumbling 55" to the floor, well, I may be sending you a PM. 
Galen
I may not be a rivet counter, but I sure do like rivets!
Posts: 159
Threads: 12
Joined: Dec 2008
ocalicreek Wrote:Nolatron - I wondered if that was possible, but didn't want to invest heavily in the tracks until I'd done a bit more research. I was afraid mounting the bracket on the rail at such a low point would put undue stress on one spot...but if that stress is spread up the full height of the rail it makes sense. Hmmm...and a low valance would go further to hide the brackets... Also, how do you like the sheet metal for a backdrop?
Yeah, I had the same worries about the stress initially but it worked really well. The heavy duty standards and brackets I used had weight limit with a 12" bracket was something like 200-300 pounds. More than enough for a shelf layout. You can but a single track the height you want for the layout then put on bracket on the very bottom for the layout itself and fascia, then add on to the very top for the valance fascia and lighting. Works and looks great!
I really liked using the flashing for the backdrop because it was a pretty easy setup and gave a very smooth backdrop surface. I've others using vinyl floor sheets (or scraps) in the same manner, using the *back* side of the flooring as the painting
Posts: 1,229
Threads: 23
Joined: Dec 2008
Shaun - my wife like the look of your shelving solution, as did I, once she realized the backdrop and framing would hide the uprights. She also liked the idea of an upper shelf above the lighting valance to hold decorative train items.
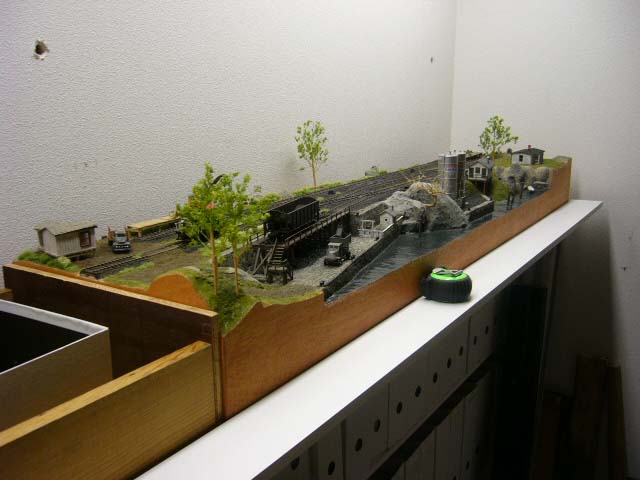
Here's a picture of the wharf/landing end of the railroad in our previous home, in the garage back in Kelso. You can see the 4" shelf in front of the layout. The layout is 14" deep, so an 18" bracket worked very well in this case. The narrow shelf was attached with screws up from beneath the brackets to overhang by an inch or so, which kept the layout from resting against the wall (room for a backdrop...someday that never came). Made a nice place to set uncoupling devices, beverages, tape measure - as you can see.

Got a good plan...putting it into XtrkCad is a challenge, but fun. I'll post when it's worth sharing.
Galen
I may not be a rivet counter, but I sure do like rivets!
Posts: 1,229
Threads: 23
Joined: Dec 2008
OH, and forgot to mention, if you look below the layout you can see the two shelves of magazines. I knew these shelves were strong - but these were less than 12" deep and set in the middle of the uprights. Only the layout was near the top, and it is light.
Galen
I may not be a rivet counter, but I sure do like rivets!
Posts: 1,229
Threads: 23
Joined: Dec 2008
No pics or plans this post, but an update on the process. Like I said, don't get too excited.
I have to say, I brought tears to my wife's eyes (laughing) when I spoke with her about my dilemma to stick with a point-to-point scheme or try and work in a connection for 'roundy-roundy' operation. She got to laughing and so did I. 
Ten minutes later when we'd recovered our composure, she agreed that a removable section bridging the gap between walls would be useful and do-able. Since this is shared space I'd be foolish to develop a plan with that sort of change without consulting the rest of the family.
That's where the planning is now. I've been gone for a week of vacation and am now back and chomping at the bit to get a layout going in there. While on vacation I attended my old club meeting (got to see Russ B. face-to-face again :o ) and picked up 4 Ulrich hopper kits  . Got me thinking that perhaps I should join the NMRA up here and get involved with some local group.
That's the latest, such as it is. Barring any major catastrophe, I'll post a plan soon.
Galen
I may not be a rivet counter, but I sure do like rivets!
Posts: 1,897
Threads: 40
Joined: Dec 2008
It was good to see you again Galen! It was funny when the club president asked if anybody knew how to get in touch with you without realizing that you were sitting in the back of the room!
Posts: 1,229
Threads: 23
Joined: Dec 2008

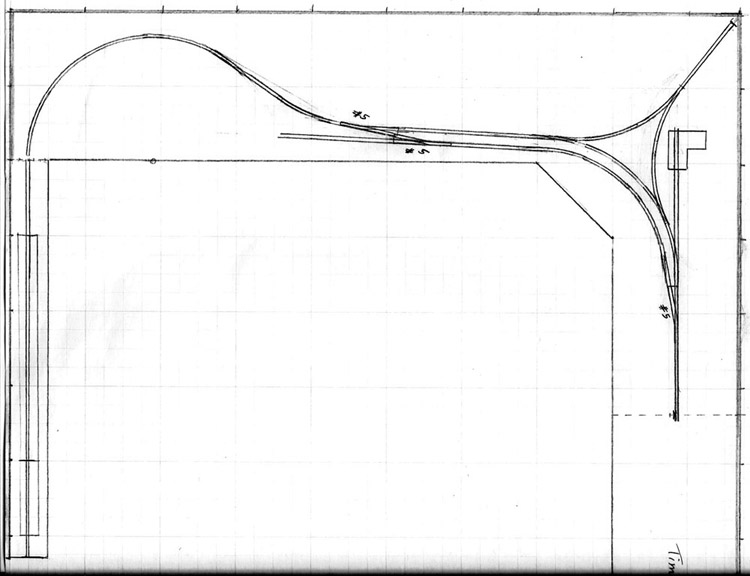
Here's a rough initial plan of the mainline & sidings. Lemme 'splain.
On the left is the staging area. This will be a shelf for "cassettes". I decided to go this route rather than trying to work in a turntable. I run steam, so being able to turn engines in staging is important. A short cassette (1 ft.) for the engines and a 3' cassette for the rest of the train, with a foot or so extra for longer trains (up to 5' length). The layout really can't handle trains longer than 3'-4' anyway so that's fine.
Following the track around the curve on the left brings you to the runaround track & wye. Minimum radius = 20". Three turnouts are marked #5 and the remaining turnouts are custom built to fit the wye. The area inside the curve on the left of the plan (where the siding kinda dead-ends abruptly) is for an industry of some sorts. I have a diorama that may fit there, but it may be more fun to make it possible to swap out scenes in order to vary the traffic on the line.
The area at the top of the plan between the runaround and the wall is for the town. There will be a station based on a structure in Silver Springs, FL, and the town will be on a hillside above. I'll post pics to show what I'm thinking later.
The small structure on the little spur right up next to the wye is an enginehouse for the switcher to serve Murdock's Landing (the timesaver). The timesaver is located at the dashed line on the right side of the plan.
Scenically this will be a river town nestled in the Blue Ridge mountains. Not much arrives there if it doesn't get there by train or up the river. Roads aren't that great yet. It will have a backwoodsy feel, but not too rundown. Times are still somewhat prosperous.
Any thoughts on the plan?
Galen
I may not be a rivet counter, but I sure do like rivets!
|
 and it went together faster. I do have a couple of sections where I had to make custom shelves to make the dimensions come out right.


 hock:
hock: 

![[Image: BarneySecordfliestheGrandValley-Eri.jpg]](http://i23.photobucket.com/albums/b399/doctorwayne/Some%20scenery%20stuff/BarneySecordfliestheGrandValley-Eri.jpg)
![[Image: BarneySecordfliestheGrandValley--2.jpg]](http://i23.photobucket.com/albums/b399/doctorwayne/Some%20scenery%20stuff/BarneySecordfliestheGrandValley--2.jpg)

 . Got me thinking that perhaps I should join the NMRA up here and get involved with some local group.