Posts: 5,263
Threads: 195
Joined: Apr 2009
I used Detail MU-266 MU hoses all the time in the past but I did not really like them. They look over sized and clumpsy compared with P2K and Atlas MU hoses. Today, I gave it a try and ordered bunch of Atlas spare part MU hose sets of the MP15DC. They are at a price of 50 Cent a bargain compared to Details.
I am looking for ditch lights again. This time they should be made of plastic because they shall become populated with SMD LED. Ths shape shall be like a little cube with a lense on one side. They are going on the Athearn CF7. This photo http://www.rrpicturearchives.net/picture...3%5C15.jpg shows the cube shape of the ditch lights very well. Do you know a HO spare part that might be a good fit?
Reinhard
Posts: 100
Threads: 8
Joined: Sep 2010
Reinhard, I conducted this same search a few months ago for my CF7. I'll post my findings with some pics when I get back to my computer.
Posts: 100
Threads: 8
Joined: Sep 2010
OK, my CF7 ditch lights mount on the pilot so I got a different kit, but Railflyer's 6631 EMD deck-mounted ditchlight kit probably covers your design (it offers a number of options). This kit is an etched metal box with a plastic light fixture, and is designed to accept LEDs. The link below has some photos and a pdf of the etchings.
<!-- m --><a class="postlink" href="https://sites.google.com/a/railflyermodelprototypes.com/building-resources/detail-parts/dp-6631">https://sites.google.com/a/railflyermod ... ts/dp-6631</a><!-- m -->
BTW, what are you using for the MU stand? I picked up Detail Associate's MU Receptacle kits (1507 and 1509) and figured I'd glue the plug on the front of a styrene block, but am wondering if there is a better option. I also haven't found an accurate detail kit for the coupler bars. Unless I missed something, those will have to be scratchbuilt. Searching for good photos of detail parts can certainly be an adventure!
Posts: 5,263
Threads: 195
Joined: Apr 2009
Paul, thank you for the link. They are the most beautiful I did see. I am afraid that very fine ditch light design does not match my clumsy hands and poor eye sight very well... I should drop the plan of working ditch lights.
I intent to use old spare P2K MU stands on the CF7. The lower plugs needs to be cut off.
![[Image: Img_0502.jpg?t=1293814154]](http://i966.photobucket.com/albums/ae149/faraway52/Misc-1/Img_0502.jpg?t=1293814154)
Reinhard
Posts: 32
Threads: 1
Joined: Dec 2010
Hi Reinhard,
P2K SD60 Ditch Lights seem to be the correct size and shape. Not sure if they are available seperatly through Walthers though. Will try to post some pictures later.
Jez
Posts: 32
Threads: 1
Joined: Dec 2010
As promised, a couple of pictures. Please excuse the poor quality, no proper lighting in the conservatory.


Hope this may be of help.
Jez
Posts: 5,263
Threads: 195
Joined: Apr 2009
Jez, thank you. The photos are very helpful. We go hinting ditch lights:-)
Is the CF7 on the photos an Athern RTR CF7...? At least did you do lots of enhancements. I need to have the wipers, they make a face.
Reinhard
Posts: 1,797
Threads: 81
Joined: Dec 2008
I thought I remember reading an article a while back about a gent who used fiber optic wires to simulate ditch lights. I'll have to poke around the net and see if I can find it... 
Posts: 5,263
Threads: 195
Joined: Apr 2009
tetters Wrote:I thought I remember reading an article a while back about a gent who used fiber optic wires to simulate ditch lights. I'll have to poke around the net and see if I can find it...  I have got some fibers but did never use them. A think the CF7 would be a bad choice for fibers because the lights are very visible mounted on top. Fibers would be great if the lights hang and you can route the fibers straight from behind. The Atlas Genset has that design.
Reinhard
Posts: 100
Threads: 8
Joined: Sep 2010
Thanks for posting your MU collection, Reinhard; looks like you're set on that front. And you're right, that Railflyer kit will require some delicate modeling!
Your CF7 is looking sharp, Jez. And I see what detail part you used for the coupler lift bar; I was looking for a detail set that was in multiple parts. Looks like I could use that as a baseline and trim the extra bits off the ends for my version (as well as add the two brackets the MU hoses tuck behind).
![[Image: p1010047s.jpg]](http://img253.imageshack.us/img253/8333/p1010047s.jpg)
Posts: 5,263
Threads: 195
Joined: Apr 2009
I gave it a try to build ditch lights from what is available now.
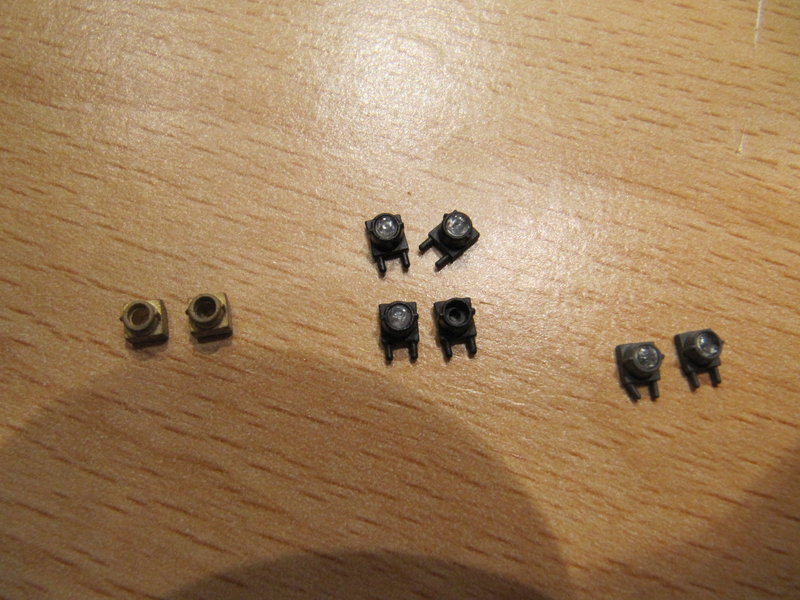
I used DL-228 from Details West. Drilled a hole 1,8mm diameter (left) from the front through the light. From the back the hole became widened with a 3,0mm drill (right). Finally the hole is extended as far as possible with a small mill (still in the machine) from the back. The top of the light is cut of to form a shape more like a box. You see a ruined light in the center (the 1,8mm drill did run out of the hole and ruined the front).
The prewired SMD LED gets a coat of CA glue as an isolation. It is than glued with a special CA glue made of a white filler powder and the glue itself into the back of the light. The LED is connected to a multimeter during that operation to make sure none or only one side gets in contact with the light body.
The glue has to set and I will proceed in the morning with painting and adding the plastic lense to the front.
![[Image: Img_0503.jpg?t=1293838939]](http://i966.photobucket.com/albums/ae149/faraway52/Misc-1/Img_0503.jpg?t=1293838939)
Reinhard
Posts: 5,263
Threads: 195
Joined: Apr 2009
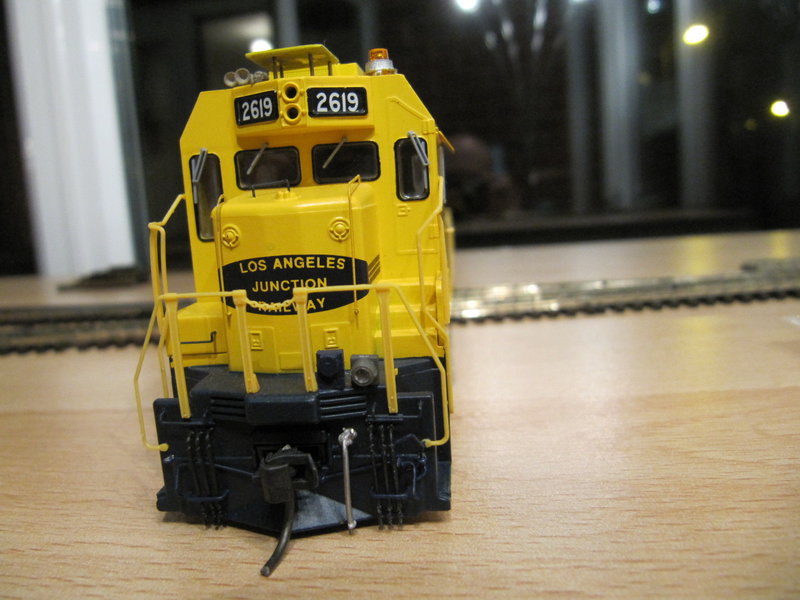
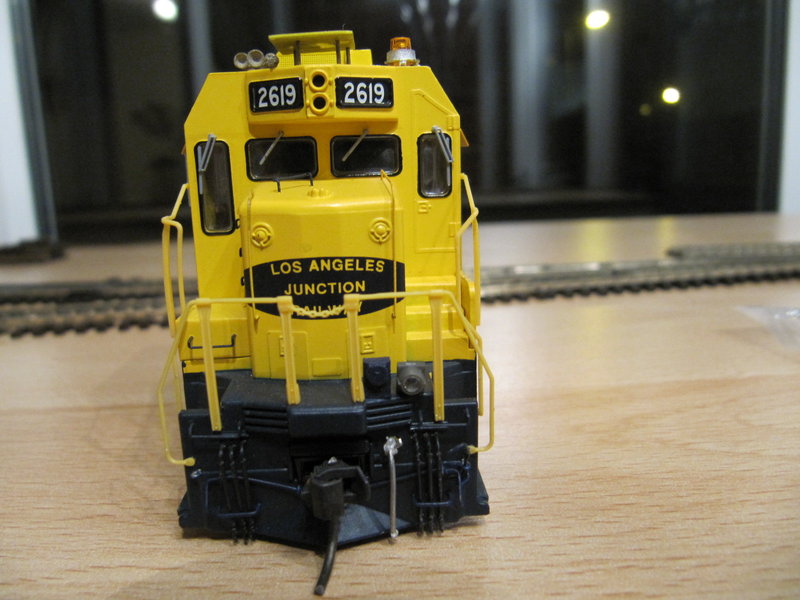
Four ditch lights are completed and installed. The ESU loksound decoder will activate them according to the direction if the bell is ring.
The front left one is dead, no wiring failure. Looks like the SMD LED got a failure sometime after installation in the housing 
![[Image: Img_0504.jpg?t=1293910695]](http://i966.photobucket.com/albums/ae149/faraway52/Misc-1/Img_0504.jpg?t=1293910695)
I prefer the SF paint scheme over the LAJ for the CF7. May be I stay with the SF scheme at about 1990...
Reinhard
Posts: 1,897
Threads: 40
Joined: Dec 2008
I don't think there were any Cf7s left on the Santa Fe by 1990. The four that they had on the LAJ were the last Cf7s owned by the company. I think it was sometime before the aborted SP SF merger that the Santa Fe sold off all of the Cf7's except those used by the LAJ.
Posts: 5,263
Threads: 195
Joined: Apr 2009
Russ Bellinis Wrote:I don't think there were any Cf7s left on the Santa Fe by 1990. The four that they had on the LAJ were the last Cf7s owned by the company. I think it was sometime before the aborted SP SF merger that the Santa Fe sold off all of the Cf7's except those used by the LAJ. I am sorry, I ment about 1980. I summarized it ones in the West Coast Forum http://www.westcoastrailforums.com/thread-3722.html but did not mention the transition date from the temporary assigned SF CF7 to the LAJ owned and painted CF7.
Did just remove (break off!) the defect left front ditch light, milled out the old LED, glued in a new one, painted again and glued it again on the engine. The light is attached to a temporary power source and lights constantly! And it works on the layout too!
Reinhard
Posts: 1,992
Threads: 81
Joined: Dec 2008
I used to buy atlas parts for my models, but part of the problem i was having was that things like MU hoses didn't last very long, they were to "stiff", and snapped away easily. I don't know how they stick on my Atlas engines out of the box, but i had a lot of problems on my E60 electrics and others with them.
I really want to try out those "Hi-tech" details rubber ones for myself. they seem to have be able to better handle handling 
tetters Wrote:I thought I remember reading an article a while back about a gent who used fiber optic wires to simulate ditch lights. I'll have to poke around the net and see if I can find it... 
I would also like if you can find that. I plan on lighting my MU car fleet with fiber optics. I've had the whole thing drilled out and ready for years, i already have a bunch of fiber optics ready to go, more than i need in fact. I just can't figure out how to install it so that it works properly. I've seen some people just glue the fiber optics right to the LED, and i suppose i could do that, but then i'm not sure how to light an MV lense properly. I tried drilling into the back of one, but it didn't make a clean hole ("whited out" the plastic).
Modeling New Jersey Under the Wire 1978-1979.
![[Image: logosmall.png]](http://i543.photobucket.com/albums/gg445/CAB_IV/Model%20Trains%202013/logosmall.png)
|


![[Image: Img_0502.jpg?t=1293814154]](http://i966.photobucket.com/albums/ae149/faraway52/Misc-1/Img_0502.jpg?t=1293814154)

![[Image: p1010047s.jpg]](http://img253.imageshack.us/img253/8333/p1010047s.jpg)
![[Image: Img_0503.jpg?t=1293838939]](http://i966.photobucket.com/albums/ae149/faraway52/Misc-1/Img_0503.jpg?t=1293838939)

![[Image: Img_0504.jpg?t=1293910695]](http://i966.photobucket.com/albums/ae149/faraway52/Misc-1/Img_0504.jpg?t=1293910695)
![[Image: logosmall.png]](http://i543.photobucket.com/albums/gg445/CAB_IV/Model%20Trains%202013/logosmall.png)