Posts: 990
Threads: 47
Joined: Jan 2009
Gerd,
wonderful pictures and a very good documenting of your work! I love your Shay and hope to see it personally in future!
Cheers, Bernd
Please visit also my website www.us-modelsof1900.de.
You can read some more about my model projects and interests in my chronicle of facebook.
Posts: 221
Threads: 17
Joined: Jan 2011
Hi Bernd,
as I live on the other end of Germany, it will be a challenge to arrange a meet, but I'm sure we'll find a way :-) Maybe at Rodgau 2013?
I made some more progress over the last days. First of all - the steam engine chapter is finished by installing the reverse gear.
![[Image: Rev_11.jpg]](http://www.gerds-modellbahn.de/shay/Engine/Reverse/Rev_11.jpg)
Further I made the rear mountings for the boiler...
![[Image: Fuss_3.jpg]](http://www.gerds-modellbahn.de/shay/Boiler/Boiler/Fuss_3.jpg)
...and started work on the ash pan.
![[Image: Ash_2.jpg]](http://www.gerds-modellbahn.de/shay/Boiler/Ash/Ash_2.jpg)
I'll continue with the ash pan an grate the next week.
Cheers, Gerd
Posts: 4,553
Threads: 100
Joined: Dec 2008
We always learn far more from our own mistakes, than we will ever learn from another's advice.
The greatest place to live life, is on the sharp leading edge of a learning curve.
Lead me not into temptation.....I can find it myself!
Posts: 221
Threads: 17
Joined: Jan 2011
Thanks for your comment :-)
Here're some moving pictures of the new stuff.
<!-- m --><a class="postlink" href="http://www.youtube.com/watch?v=eMyyrAn2lUk&feature=youtu.be">http://www.youtube.com/watch?v=eMyyrAn2 ... e=youtu.be</a><!-- m -->
I look forward to get the ash pan done next week and to start with the smoke stack next.
I've to return the boiler to the boiler maker for some approvements and I look forward to get the boiler back in 2 weeks.
Cheers, Gerd
Posts: 221
Threads: 17
Joined: Jan 2011
Godd morning,
did some fine progress the last days.
First, I finished the ash pan except for some special features regarded to the grate retainer. But This has to be fitted when all the parts are finally installed at the boiler and the boiler was returned to the boiler maker for some adjustments.
The brass part on the right holds a spring loaded bolt, which is used to hold the ash pan underneath the boiler. There's a fixed bolt on the opposite side.
![[Image: Ash_11.jpg]](http://www.gerds-shay.de/Boiler/Ash/Ash_11.jpg)
The grate was also pre-made from flatbar and spacers. The grate isn't finished yet. I need some support parts to hold the grate inside the firebox.
![[Image: Grate_4.jpg]](http://www.gerds-shay.de/Boiler/Ash/Grate_4.jpg)
Another missing part is also mostly done. The stack.
I started with the diamond stle spark arrestor, made from sheet metal and steel rings. I used real rivets to hold the parts together.
![[Image: Stack_14.jpg]](http://www.gerds-shay.de/Boiler/Stack/Stack_14.jpg)
The stack saddle is also far done by now. I've to round up the lower section and the saddle is the only part on a steam locomotive, I hate to model 
But I look forward to get this challenge solved too 8-)
![[Image: fuss_5.jpg]](http://www.gerds-shay.de/Boiler/Stack/fuss_5.jpg)
That's all for today. I hope to get the boiler back this week...
Getting closer to her first maiden run 
Cheers, Gerd
Posts: 3,732
Threads: 44
Joined: Dec 2008
Mike
Sent from my pocket calculator using two tin cans and a string
Posts: 4,553
Threads: 100
Joined: Dec 2008
We always learn far more from our own mistakes, than we will ever learn from another's advice.
The greatest place to live life, is on the sharp leading edge of a learning curve.
Lead me not into temptation.....I can find it myself!
Posts: 221
Threads: 17
Joined: Jan 2011
Hi,
I don't know how this pirat is... he never answered any of my questions. Maybe they cut his tongue out 
Here's a new update:
The stack is finished except for the peticoat and some screw holes.
![[Image: fuss_8.jpg]](http://www.gerds-modellbahn.de/shay/Boiler/Stack/fuss_8.jpg)
And I made the blower nozzle support for the smoke box from brass.
![[Image: Blow_3.jpg]](http://www.gerds-modellbahn.de/shay/Boiler/Blower/Blow_3.jpg)
![[Image: Blow_10.jpg]](http://www.gerds-modellbahn.de/shay/Boiler/Blower/Blow_10.jpg)
![[Image: Blow_21.jpg]](http://www.gerds-modellbahn.de/shay/Boiler/Blower/Blow_21.jpg)
Next to come is the smoke box itself.
Cheers, Gerd
Posts: 221
Threads: 17
Joined: Jan 2011
Good morning,
finished the smoke box yesterday except for some small details. The copper tube was bored to take all the parts. There's some rivet details, the stack and head light as well as the manufacturer plates and the front door cover.
![[Image: Box_9.jpg]](http://www.gerds-shay.de/Boiler/box/Box_9.jpg)
Cheers, Gerd
Posts: 6,198
Threads: 1,126
Joined: Nov 2008
Posts: 221
Threads: 17
Joined: Jan 2011
Hi.
In this scale, details are no problem. The rivet heads have 3.5mm in diameter (20mm in full scale). 8-)
Here are some close ups from earlier date. The plates are photo etched brass.
The cn# 782 is borrowed from a similar Shay that is reported to be lost in a quarry flood in 1914.
In my little world, the Shay survived the flood and came to the Bear Creek in 1915 where the loco was rebuild with a new cab and came back into service 8-)
![[Image: Plates_2.jpg]](http://www.gerds-modellbahn.de/shay/Aufbauten/Kleinkram/Plates_2.jpg)
![[Image: door_13.jpg]](http://www.gerds-modellbahn.de/shay/Aufbauten/Door/door_13.jpg)
Cheers, Gerd
Posts: 1,682
Threads: 101
Joined: Dec 2011
Gerd, your craftman skills are impressives. I have great respect for people build "working" model like this. Continue your excellent work!
Matt
Posts: 6,198
Threads: 1,126
Joined: Nov 2008
Wow!! Thanks for the pics.. The plates look as great as the engine does  Being a Baldwin fan (I live across the street from the Eddystone plant). I wanted to see the "Sister manufacturer's" plate   Great Work!!  
Nice story about the engine "surviving" too! 
Posts: 221
Threads: 17
Joined: Jan 2011
Good morning,
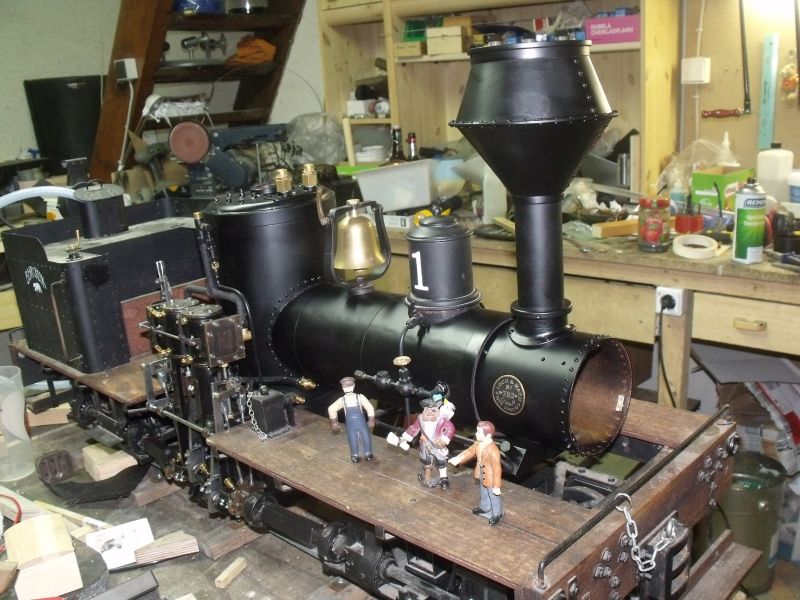
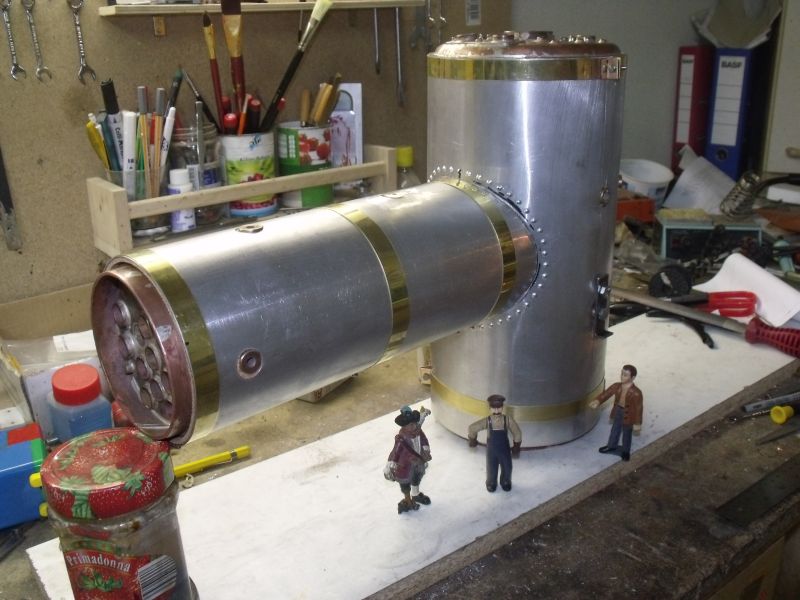
thanks guys, here's the next update. Big thinks happened last weekend. On Friday, the boiler returned from the boiler maker and the issues were fixed, so I could start to get the boiler wrapped with cork sheets and aluminum sheets.

I use brass bands to hold the boiler jacket in place. I did a lot of small work around the boiler too like installing the grate and ash pan, safety valves, water gauge, and the smoke box. Finally, I add some paint and placed the boiler assembly on top of the Shay frame.

The front boiler mounts are still missing and some additional parts. Once this tasks are finished, I can finally install the boiler, followed by plumbing, mounting steam valves and all the other small parts that are missig to get the Shay ready for her maiden run.

BTW, I didn't had time to update my website and will do this later this week.
Cheers, Gerd
Posts: 6,198
Threads: 1,126
Joined: Nov 2008
|


![[Image: Rev_11.jpg]](http://www.gerds-modellbahn.de/shay/Engine/Reverse/Rev_11.jpg)
![[Image: Fuss_3.jpg]](http://www.gerds-modellbahn.de/shay/Boiler/Boiler/Fuss_3.jpg)
![[Image: Ash_2.jpg]](http://www.gerds-modellbahn.de/shay/Boiler/Ash/Ash_2.jpg)


![[Image: Ash_11.jpg]](http://www.gerds-shay.de/Boiler/Ash/Ash_11.jpg)
![[Image: Grate_4.jpg]](http://www.gerds-shay.de/Boiler/Ash/Grate_4.jpg)
![[Image: Stack_14.jpg]](http://www.gerds-shay.de/Boiler/Stack/Stack_14.jpg)

![[Image: fuss_5.jpg]](http://www.gerds-shay.de/Boiler/Stack/fuss_5.jpg)


![[Image: fuss_8.jpg]](http://www.gerds-modellbahn.de/shay/Boiler/Stack/fuss_8.jpg)
![[Image: Blow_3.jpg]](http://www.gerds-modellbahn.de/shay/Boiler/Blower/Blow_3.jpg)
![[Image: Blow_10.jpg]](http://www.gerds-modellbahn.de/shay/Boiler/Blower/Blow_10.jpg)
![[Image: Blow_21.jpg]](http://www.gerds-modellbahn.de/shay/Boiler/Blower/Blow_21.jpg)
![[Image: Box_9.jpg]](http://www.gerds-shay.de/Boiler/box/Box_9.jpg)
![[Image: Plates_2.jpg]](http://www.gerds-modellbahn.de/shay/Aufbauten/Kleinkram/Plates_2.jpg)
![[Image: door_13.jpg]](http://www.gerds-modellbahn.de/shay/Aufbauten/Door/door_13.jpg)
 Being a Baldwin fan (I live across the street from the Eddystone plant). I wanted to see the "Sister manufacturer's" plate
