Posts: 255
Threads: 4
Joined: May 2010
Gerd,
I really like your layout. It looks very well planned and executed. I look forward to more photos.
Larry
Posts: 221
Threads: 17
Joined: Jan 2011
Thanks guys.
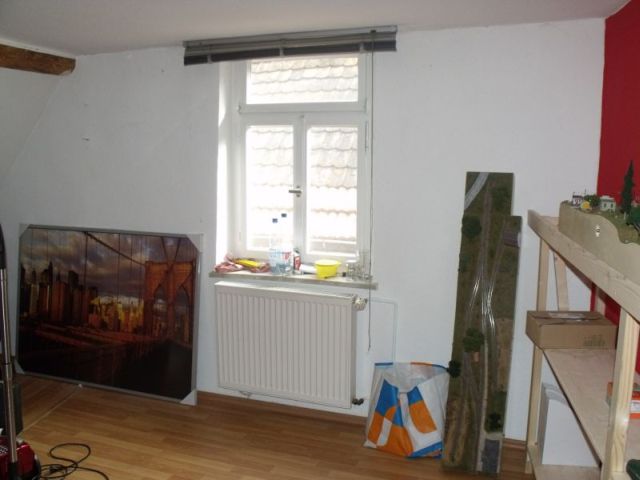
With the new hobby room, it's not a very big one, but it will work for my planed layout, new photos are no problem.
Last year, I had to set up the layout in my work shop for photo sessions, now I'll be able to work and play on the layout when ever I like.
I look forward to get the first part done this evening to show you some more photos the next days.
Bye, Gerd
Posts: 221
Threads: 17
Joined: Jan 2011
Here we are - the first section of my home layout is done 
Yesterday, I finsihed the benchwork for the first section. The 3.6m version of my modular layout fits with just 5mm space - That's some kind of good planing... well, and a much bigger part of luck 
![[Image: super_4i.jpg]](http://www.gerds-modellbahn.de/SOU/Room/super_4i.jpg) ![[Image: super_5i.jpg]](http://www.gerds-modellbahn.de/SOU/Room/super_5i.jpg) ![[Image: super_6i.jpg]](http://www.gerds-modellbahn.de/SOU/Room/super_6i.jpg)
Click on thumbs to enlarge
The next step will be to extend the layout to an L shape in front of the window. I'm not sure how to solve this section, as I like to have access to the window too... Once the end station "Topton" has moved to the new section, I've room to place the Graham County Interchange and I can add this subdivision too. But this will be the 3. section...
Cheers, Gerd
Posts: 5,263
Threads: 195
Joined: Apr 2009
A great room for a fast growing layout. The intense red background is a very individual touch 
Reinhard
Posts: 221
Threads: 17
Joined: Jan 2011
Yeah, but I didn't like to paint it again in a different color...
Be sure that is much better than the original wall paper that was on this wall 
I'll add background to the modules later and then it will work for me.
Bye, Gerd
Posts: 46
Threads: 1
Joined: Jun 2010
Hi Gerd:
I have been watching your progress of this neat layout and must say everything is done well:
benchwork, trackwork, scenery etc.. I have a question. Is this HO or N scale? It appears to be
HO but not sure. looking forward to seeing your rendition of Robbinsville yard and industries.
Keep up the good work and thanks for sharing.
Barry
Posts: 221
Threads: 17
Joined: Jan 2011
Hi Barry,
the hints for the scale are a little bit hidden in the first posts. I'm sorry for this.
It's N-scale
You'll find photos of the modules on my website or in the N-scale section of the forum.
<!-- m --><a class="postlink" href="http://www.gerds-modellbahn.de/SOU/Bilder/220811/Bilder_1.htm">http://www.gerds-modellbahn.de/SOU/Bild ... lder_1.htm</a><!-- m -->
The final layout will be differend from the first design that I posted at the beginning, but the operation concept will be the same.
Cheers, Gerd
Posts: 221
Threads: 17
Joined: Jan 2011
Hello,
let's plan phase 2 of the home layout.
It will be an extension to the left to move the terminus to this area. Only problem is the window... actually, there are 2 options :
1. Place the terminus modules right in front of the window as lift off.
2. Place the terminus modules to the left of the window and add a lift off bridge between the layout parts.
I'm not sure, which option will be the better one, but I'm going more and more familliar with the second one...
Cheers, Gerd

Posts: 46
Threads: 1
Joined: Jun 2010
Good Morning Gerd:
Thanks, for the update on your layout in Nscale it really works nicely.
I also watched your video which is great.
I have been a railroader for now going on 45 years, mostly as engineer/conductor
sometimes a manager and your scenes reflect what I've seen from the cab on many runs.
Keep up the good work.
Barry
Posts: 221
Threads: 17
Joined: Jan 2011
Many thanks for your comment Barry 
I'll get the phase 1 version to operational status tonight and will run some trains.
Fot phase to with the L extension, I'll build the curved module first, but this will wait for a couple of month.
For a model train show in March, I've to build a 180 degrees module for the setup and some more legs for the modules. This will keep me busy for a while.
Bye, Gerd
Posts: 5,263
Threads: 195
Joined: Apr 2009
Waldbahner Wrote:...
2. Place the terminus modules to the left of the window and add a lift off bridge between the layout parts.
I'm not sure, which option will be the better one, but I'm going more and more familliar with the second one...]
Gerd, that window is not too wide. I assume a hatch would be very well doable. A hatch would be also an easy way to ensure electric connection to the very left part. You should have a protection section in the tracks on both sides to stop all engines approaching the open hatch. I did omit it ones and payed the penalty of one engine 
Reinhard
Posts: 221
Threads: 17
Joined: Jan 2011
Posts: 63
Threads: 2
Joined: Feb 2012
Posts: 221
Threads: 17
Joined: Jan 2011
Yeah, I know... my ex girlfriend painted the wall in red and I'm to lazy to get it painted in another color. Maybe I'll do so some day...
But thanks for the backdrop comment 
Bye, Gerd
Posts: 3,732
Threads: 44
Joined: Dec 2008
Nice work on the backdrop!
Mike
Sent from my pocket calculator using two tin cans and a string
|


![[Image: super_4i.jpg]](http://www.gerds-modellbahn.de/SOU/Room/super_4i.jpg)
![[Image: super_5i.jpg]](http://www.gerds-modellbahn.de/SOU/Room/super_5i.jpg)
![[Image: super_6i.jpg]](http://www.gerds-modellbahn.de/SOU/Room/super_6i.jpg)


