Making a pantograph
#1
In this thread I will demonstrate how I fabricated pantographs for a Pennline GG1.
The materials needed are:

.020" steel or brass wire
.010" brass sheet
1/2" length of 3/32" brass tubing
2 small springs


Materials for the jigs are:

a block of wood
straight pins
two 1/16" dia. roll pins (or 1/16" dia. rod)
1 popsicle stick


Tools needed:

needlenose pliers
fingernail clippers
soldering iron
solder
flux
small alligator clips
spring type clothes-pin
small file
ruler
pencil
scissors (to cut brass sheet)
tubing cutter (or razer saw)
1/16", 3/32", 1/8" drill bits and hand drill
small hammer
magnifier glass


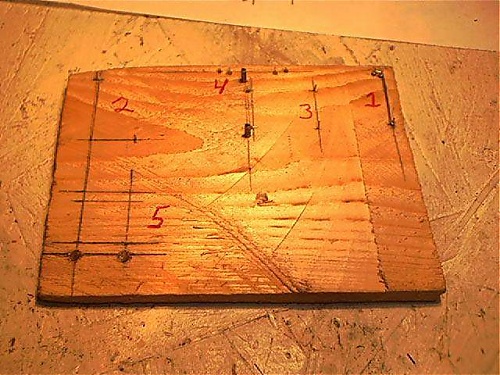
This is a photo of the jigs
   
Ray Marinaccio
#2
These are the dimensions for the jigs.
Jigs #1, #2, and #3 are made by driving straight pins into the wood at the positions marked in the drawings and cutting off the heads.
Jig #4 is made by drilling four 1/16" holes at the dimensions shown and pressing 1/16" pins in the outer holes.
The drawing of jig #1 is backwards. Use the dimensions and build it as it is shown on the jig.
   

These are the dimensions for the collector parts and equalizer arms. Make two of each.
   

Once the jigs are constructed begin by forming a small hook on the end of a piece of .020" wire.
   

Then form it into a loop around one of the pins.
   

The loop should look similar to this.
   
Ray Marinaccio
#3
Place the loop in jig #1 as shown with the arm on the left side of the bottom pin in the photo.
Then wrap it counterclockwise around the upper right pin.
Then counterclockwise around the upper left pin.
   

Remove it from the jig.
You will notice that it will spring out of shape. You will need to bend it a bit untill it fits easily onto the jig.
I don't cut the part from the wire untill this is done, it's easier to handle.
   

Once the part is cut from the wire I reinstall it on the jig and reshape the last loop.
This part will go on the left side of jig #5.
Two of these are required for each pantograph.
   

The next part will basically be the opposite of the first.
Start by forming the first loop as before.
Place it into jig #1 with the arm on the right hand side of the bottom pin.
Wrap it clockwise on the upper right pin.
Then counterclockwise on the upper left pin.
Complete the part as you did with the first one.
This part will go on the right side of jig #5.
Two of these are required for each pantograph
   

This is a comparison of the two.
Set these aside until later.
   
Ray Marinaccio
#4
Bend some wire around jig #2 as shown.
Four of these are required for each pantograph.
   

To form the mount brackets, Start by forming a loop on jig #3 as shown .
   

Then form another loop around the second pin.
   

Place the part into jig #4 as shown.
   

Form the loops on the ends as shown and cut the wires so they meet.
Two of these are required for each pantograph.
It is important that these two parts match perfectly.
   
Ray Marinaccio
#5
Clamp the bracket to a Popsicle stick and solder it together.
Try to get the solder to flow into all the gaps.
I found that adding a piece of wire as a filler and lots of flux helps.
   

Use a small file to remove the excess solder.
   

Form the lower cross braces as shown using jig #5 as a pattern.
   

The lower arm assembly will be fabricated in jig #5 by inserting two peices of wire through the arms fabricated earlier.
The equalizer lever of the arm on the left will be inserted into the hole in the jig.
The equalizer lever of the arm on the right will be pointing upward.
Use pins to hold the assembly in position.
   

Clamp the assembly, apply flux to the two arms where the bottom wire is inserted and touch it with a tinned soldering iron.
   
Ray Marinaccio
#6
Clamp the cross brace in position and solder it into place.
It is important that this assembly is square and dimensions accurate.
   

The completed assembly.
Two of these are required for each pantograph.
   

Take two of the triangles formed on jig #2 and insert them through the end loops of the lower assembly as shown.
Sorry about the poor quality of the photo
   

Cross the two triangles, hold them in jig #2 and solder the ends.
Set these assemblies aside.
   

Cut out the collector peices from .010" brass.
Form the bends where indicated to look like this.
   
Ray Marinaccio
#7
Cut out the collector pieces from .010" brass.
Form the bends where indicated to look like this.
   

Remove the excess solder with a small file.
Cut a 1/2" long piece of 3/32"dia. brass tube.
Insert the tube through the holes in the brackets.
Clamp the assembly to the Popsicle stick and solder the tube in place.
   

Fabricate the two equalizer arms from .020" wire as shown in the drawings.
To install them you must install the first one then turn the two assemblies 90 degrees as shown to get the other one to install.
Both arms must face the inside to give clearance for the locking tabs on the collector.
   

Install the mount brackets and temporarily mount the assembly to a piece of wood.
Trim the extra wire where the lower arm assemblies pivot.
The equalizer levers may need to be adjusted to make the ends of the lower arm assemblies lay on the wood block evenly.
At this point you will find out how accurate the mount brackets and lower arm assemblies are.
   

Install the collector.
You may need to file the ends that insert into the collector tube for it to operate smoothly.
I had to do a little tweaking to get it straight.
Don't be afraid to twist it a bit, it may look fragile, but it's amazingly strong.
Adjust the locking tabs so they will latch onto the mount brackets.
In the photo I have one spring installed to show where they attach.
   
Ray Marinaccio
#8
This photo shows the pantograph in the locked position.
   
Ray Marinaccio
#9
This thread is a duplicate of one that we have over at our old forum's Academy. We've been wanting to do something we feel is important for quite a while. In the event anything were to happen to the old threads, we would lose a valuable resource, which in some cases would be lost forever, so we want to duplicate the old Academy here.

We have asked permission of all those responsible, for their content to recreate these threads in our New Academy. This and many other threads are being worked on by both our staff and the originators of these threads. Some threads show as being posted by, "Academy Staff". In these cases, the original poster is not registered on Big Blue but we have permission to recreate the thread here.

All threads in the New Academy are locked so if you want to comment on them, please do so in the proper forum, or PM the originator if he is registered here.
Don (ezdays) Day
Board administrator and
founder of the CANYON STATE RAILROAD


Forum Jump:


Users browsing this thread: 1 Guest(s)