Posts: 1,682
Threads: 101
Joined: Dec 2011
The guys at Montmorency Locomotive Works don't have a break these times, cars keep up entering and rolling out for overhaul, repairs and repainting.
As requested by jwb, here are my humble attempts to improve MDC/Roundhouse boxcars. I mostly model CN, but the fun part of North american railroads are the variety of roadnames you can encounter everywhere. Most of these cars aren't exactly prototype, but the paint schemes are attractive and quite correct so I'll keep them.
I got the shell as a bundle on Ebay few years ago, they came with Accurail underframe and trucks. They seem to be a retooling of MDC boxcars because details are sharper and doors don't open (big deal!). These shells don't have stirrups.
I'm actually in the process of weathering and repainting many cars from the club roster whom I'm the main provider. Watching Doctorwayne excellent projects, I decided to add a few details more to make them better.
My philosophy is to imrprove details that counts and makes differences from an operation point of view. It includes replacing roofwalks, adding wire grabs and improving the brake end.
Using an X-Acto chisel type blade, I scrapped off all grabirons, handbrake platform brackets and roofwalk bracket (not all). Second step, I removed the stock roofwalks. I'll replace them with Tichy see-through steel and wood plank roofwalk. Stirrups are A-Line and choosen according to prototype pictures (when available). Brakewheels are Ajax from Kadee. Other parts are A-lIne and Tichy.
2 cars had reweight/reshopped dates beyond 1959, so I replaced them with leftover decals.
I used 0.5mm sheet styrene to make platform brackets under brakewheel and roofwalks.
Here you can see the cars before any work.
![[Image: Boxcars001b.jpg]](http://i603.photobucket.com/albums/tt111/sailormatlac/Hedley%20Junction/Boxcars001b.jpg)
A typical reworked car brake end.
![[Image: Boxcars002b.jpg]](http://i603.photobucket.com/albums/tt111/sailormatlac/Hedley%20Junction/Boxcars002b.jpg)
After some painting. I had to mix a specific color for each car. Some were exact match, other less. It doesn't bother. From experience, I know this can be blended together with weathering. The Ann Arbor car was reshopped so the different roof color will be a good excuse to represent that. They all received a flat finish after painting to be ready to received their oil paint washes and pastel chalk.
![[Image: Boxcars007b.jpg]](http://i603.photobucket.com/albums/tt111/sailormatlac/Hedley%20Junction/Boxcars007b.jpg)
![[Image: Boxcars008b.jpg]](http://i603.photobucket.com/albums/tt111/sailormatlac/Hedley%20Junction/Boxcars008b.jpg)
![[Image: Boxcars006b.jpg]](http://i603.photobucket.com/albums/tt111/sailormatlac/Hedley%20Junction/Boxcars006b.jpg)
![[Image: Boxcars005b.jpg]](http://i603.photobucket.com/albums/tt111/sailormatlac/Hedley%20Junction/Boxcars005b.jpg)
![[Image: Boxcars003b.jpg]](http://i603.photobucket.com/albums/tt111/sailormatlac/Hedley%20Junction/Boxcars003b.jpg)
Most of them were built in the 50's and they will receive a light weathering. Others from the 40's will be a little bit abused, not too much.
Matt
Thanks for the info -- looking forward to more. My approach has been a little more broad-brush -- I have a LOT of boxcars and don't envision changing to wire grabs. I do replace the stirrups with A-Line and weather, though I try to get all my effects with an airbrush:

I make a weathered or unpainted roof on maybe 25% of my boxcars.
Posts: 1,682
Threads: 101
Joined: Dec 2011
JWB, I think a good weathering job is often enough to make a car much more realistic. This boxcar looks pretty good to me! I find weathering roofs the hardest part. While dealing with more recent rolling stock, I find it easier. Old cars top views are harder to get.
Wire grab is a fancy thing I recently redecovered (drillings hundred holes with a .80 bit and a pinvise isn't particularly the part of this hobby I enjoy the most!). Boxcar are easy to do, but hoppers aren't. I keep them as much as I can when they looks OK. But Walthers cars have thick details that always looks bad. I much prefer Bowser and Accurail on this respect.
Matt
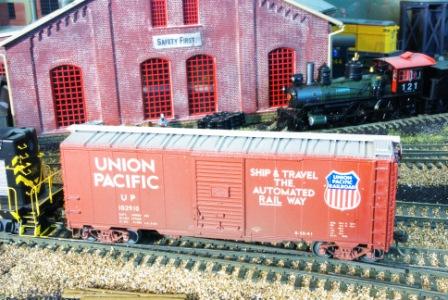
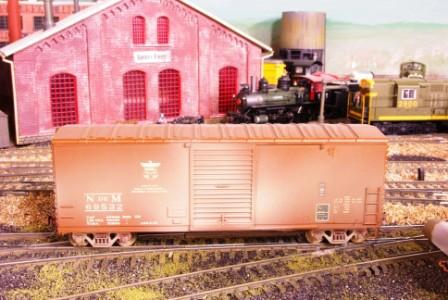
Here are a few more that I've weathered. I read a French book once that said "epatiner toujours", or maybe it was "toujours epatiner", and that's one of the few French phrases I can remember. Here's one I did the other day:

I've tried weathering with Polly Scale colors diluted in water and applied with a brush, but it's never appealed to me, though other guys get good results. I prefer solvent Floquil weathering colors diluted in Flat Finish and airbrushed on. The N de M car was first done with diluted Rail Brown, and after that, because it's lettered for cement service, diluted Floquil Aged Concrete. Mexican cars seem to get and stay pretty dirty.
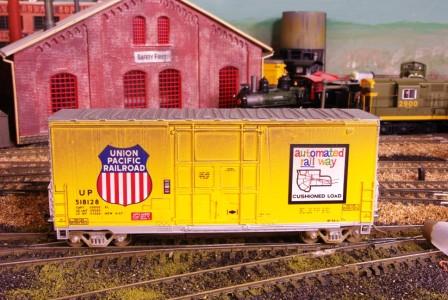
Here's a UP appliance car that I did with diluted Grimy Black:

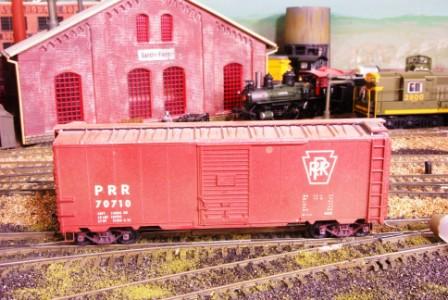
And an Accurail sorta-kinda PRR X43C with my usual roof treatment: half-and-half Floquil Old Silver and SP Lettering Gray airbrushed on, then dusted with rust colored chalk:

Posts: 1,682
Threads: 101
Joined: Dec 2011
Thanks for sharing your work! The funny thing about weathering is that each person as his/her own prefered method. Personnaly, I often start by airbrushing a dfew washes to tne done the color and fade it. Then, I use oil paint with mineral spirit and work out most details. When this step is done, I airbrush an other layer of thinned paint to represent dirt and grine on the bottom of the car. After, I finish with a touch of pastel chalk just like you do. It can take a lot of time. I spent about 3 hours this evening and I still have some work to do.
I always felt "patine" word didn't convey the same feeling as weathering. The French word is more about the action of time (just like copper turns green after a while) while the English word means directly the atmospheric elements action. ;-) One feels like the gentle passage of time... the other one is agressive and destructive!
Matt
Posts: 1,682
Threads: 101
Joined: Dec 2011
Here's a few pictures. Oil paint isn't completely dry on a few roof, but it still gives you a general idea. Next step is to add road grime and dust. That will be tomorrow.
I went easy with the rust effects. Most cars were built or repainted in 1952 or after and I'm modelling the late 50's.
![[Image: Boxcars017b.jpg]](http://i603.photobucket.com/albums/tt111/sailormatlac/Hedley%20Junction/Boxcars017b.jpg)
![[Image: Boxcars018b.jpg]](http://i603.photobucket.com/albums/tt111/sailormatlac/Hedley%20Junction/Boxcars018b.jpg)
![[Image: Boxcars019b.jpg]](http://i603.photobucket.com/albums/tt111/sailormatlac/Hedley%20Junction/Boxcars019b.jpg)
![[Image: Boxcars020b.jpg]](http://i603.photobucket.com/albums/tt111/sailormatlac/Hedley%20Junction/Boxcars020b.jpg)
Matt
Posts: 1,682
Threads: 101
Joined: Dec 2011
Finally, I decided to finish them this evening. I used Doctorwayne's weathering mask for the first time. I must admit it is a incredible tool that speed up the weathering process and make it more realistic. The Rutland car is done with this method.
![[Image: Boxcars021b.jpg]](http://i603.photobucket.com/albums/tt111/sailormatlac/Hedley%20Junction/Boxcars021b.jpg)
![[Image: Boxcars022b.jpg]](http://i603.photobucket.com/albums/tt111/sailormatlac/Hedley%20Junction/Boxcars022b.jpg)
![[Image: Boxcars024b.jpg]](http://i603.photobucket.com/albums/tt111/sailormatlac/Hedley%20Junction/Boxcars024b.jpg)
![[Image: Boxcars025b.jpg]](http://i603.photobucket.com/albums/tt111/sailormatlac/Hedley%20Junction/Boxcars025b.jpg)
The Orange Blossom scheme is one of my favorite.
Now is the time to move on the next freight cars projects. There's about 50 cars (if not more) to do, most of them need to be bashed, painted and decalled.
Matt
Posts: 5,859
Threads: 175
Joined: Dec 2008
Very nice-looking results, Matt, and a good demonstration of how weathering can really bring a car to life. 
Wayne
Posts: 1,682
Threads: 101
Joined: Dec 2011
Thank you Wayne,
Here are the last three cars. Lightning conditions aren't the best, so the truck and lower body dusting doesn't show that much. I'll try to get better shot on the club layout when I deliver them.
![[Image: IMG_1688b.jpg]](http://i603.photobucket.com/albums/tt111/sailormatlac/Hedley%20Junction/IMG_1688b.jpg)
![[Image: IMG_1689b.jpg]](http://i603.photobucket.com/albums/tt111/sailormatlac/Hedley%20Junction/IMG_1689b.jpg)
![[Image: IMG_1690b.jpg]](http://i603.photobucket.com/albums/tt111/sailormatlac/Hedley%20Junction/IMG_1690b.jpg)
Matt
Posts: 1,897
Threads: 40
Joined: Dec 2008
They look really great. By the way have you seen these grab iron drill templates from BLMA.
<!-- m --><a class="postlink" href="http://www.blmamodels.com/cgi-bin/webstore/shop.cgi?ud=BgQGBwsPDgYCBxQUEBEcHAcBAwUGAwUFCQkTEQAA&t=main.blue.htm&storeid=1&cols=1&categories=01001-00010&&c=detail.blue.htm&t=main.blue.htm&itemid=4500">http://www.blmamodels.com/cgi-bin/webst ... temid=4500</a><!-- m -->
I noticed that many of your cars have different shaped steps on each corner. Did the prototype have a habit of doing that sort of thing when they replaced a step on a freight car?
Posts: 1,682
Threads: 101
Joined: Dec 2011
Russ Bellinis Wrote:They look really great. By the way have you seen these grab iron drill templates from BLMA.
<!-- m --><a class="postlink" href="http://www.blmamodels.com/cgi-bin/webstore/shop.cgi?ud=BgQGBwsPDgYCBxQUEBEcHAcBAwUGAwUFCQkTEQAA&t=main.blue.htm&storeid=1&cols=1&categories=01001-00010&&c=detail.blue.htm&t=main.blue.htm&itemid=4500">http://www.blmamodels.com/cgi-bin/webst ... temid=4500</a><!-- m -->
I noticed that many of your cars have different shaped steps on each corner. Did the prototype have a habit of doing that sort of thing when they replaced a step on a freight car?
Hi Russ,
Thanks for the link. Templates will be particularly useful when I'll work on my double-sheated boxcars. I was thinking about making mine from a thin aluminium plate.
Different stirrup steps are effectively modelled according to prototype practices. When I could, I used prototype pictures to check out stirrup steps shape. It varied from railroad to railroad and from manufacturers too. As you pointed out, we can also assume that they could be changed when cars we reshopped. A canadian practice was to have angled steps on the ladder side, many american roads had also there own standards.
When I had no picture, I just used similar shapes for both ends. It's an easy way to personnalized similar looking boxcars without overking yourself.
Matt
Posts: 1,682
Threads: 101
Joined: Dec 2011
The next Roundhouse victims have been selected.
An outside braced compositive car from the WW2. It will be modified and repainted according to a ATSF prototype.
![[Image: Boxcars026b.jpg]](http://i603.photobucket.com/albums/tt111/sailormatlac/Hedley%20Junction/Boxcars026b.jpg)
![[Image: 38234759.gVLwFDmj.jpg]](http://ic2.pbase.com/g5/36/318336/2/38234759.gVLwFDmj.jpg)
![[Image: 38234759.gVLwFDmj.jpg]](http://ic2.pbase.com/g5/36/318336/2/38234759.gVLwFDmj.jpg)
No, I won't model the steel roof extension!
A 36' Swift reefer that will get wire grabs, a Tichy brake mecanism and a scratchbuilt steel underframe.
![[Image: Boxcars029b.jpg]](http://i603.photobucket.com/albums/tt111/sailormatlac/Hedley%20Junction/Boxcars029b.jpg)
Matt
Posts: 5,859
Threads: 175
Joined: Dec 2008
Matt. I found the discussion on that MDC single sheathed boxcar. Evidently it's a quite accurate model of the 1923 ARA "Recommended Design" (the Train Miniature car, which I've been using, is a good stand-in for the 1923 "Alternate Recommended Design"). The TM car's height is also accurate, while the MDC car's sides are too high. Supposedly, MDC used the same roof and ends as they did for their steel car and made the car's sides higher to match the ends. Fortunately, if you want a model of the 1923 Recommended Design, all you need to do is remove the strips above and below the bracing on the car's sides, yielding a side of the correct height. Of course, the sides need to be separated from the roof in order to perform the surgery, which will also result in the ends being too high. 
Here's the "Alternate" version, the main difference being the direction of the angled bracing, a Howe truss on the L&N car and a Pratt truss on yours.
![[Image: NewYearsChallengePhotos100.jpg]](http://i23.photobucket.com/albums/b399/doctorwayne/Freight%20Cars%20-%20Part%20II/NewYearsChallengePhotos100.jpg)
The bracing on your car is also more correct than that on the TM car, as the design used the hat-section shown, while TM modelled it as angle iron. I added a strip to that to make it into "Z" bracing, another type in common useage. Incidentally, my L&N car, to be more prototypical, should have been done with an MDC car, as they purchased the Recommended Design, not the Alternate. I have no intention of re-doing mine, but I am going to keep my eyes open for the MDC cars, as they can be made into good representations of Seaboard, Bangor & Aroostook, Boston & Maine, Chicago Great Western, M&StL, Rock Island and Southern Pacific cars.
The Santa Fe cars were somewhat modified from the Recommended Design, mostly roofs, ends, and other details. They were in three classes: Bx-11, -12, and -13, with 2,000 Bx-11s, 3,500 -12s, and 1,000 -13s. All of the -11s and most of the -12s were rebuilt during WWII, with their roofs raised 6" or 12". The prototype car in the photos is a Bx-12
Wayne
Posts: 1,682
Threads: 101
Joined: Dec 2011
Thanks Wayne,
I thought about this surgery too. As you stated, braces aren't Z-bar. They reminded me braces that were found in composite hopper later. Anyway, the model, as it is, doing the ATSF car is much more easy. I'll save the surgery for later.
Do you think these cars (I still have 4 others) could be made into CNR 40' single-sheated boxcar or it is pushing my luck too far?
Thank you.
Matt
Posts: 1,682
Threads: 101
Joined: Dec 2011
Wayne, you've made my brain think too much!
Using them for CNR may be a little bit far fetched, I'll probably use recently acquired TM cars for that purpose. (I'm curious, are the Accurail single-sheated cars useful for canadian prototype? CN and CP boxcars were lower than Accurail it seems.) Let say I used them for the ARA Recommended Practice (didn't find pictures of them, only the all steel boxcar), I guess I would have to gave up the ends and roof. What end type were used back then? Murphy? I'm thinking in a way to make the process easy and straightforward! 
Also, my fruitless searches turn out information about a interesting Boston & Maine car, type XM-1 50-ton boxcar (is it the code for the Recommended Practice?). Sunshine Models made one that as exactly the same arrangement. The interesting feature is that roofs, ends and doors varied considerably. And many were own by North Eastern railways, which is alaway a plus to me.
http://www.sunshinekits.com/sunimages/sun91c.pdf
http://www.sunshinekits.com/sunimages/sun91b.pdf
This is a Yankee Clipper kit:
![[Image: bm72480.jpeg]](http://www.faracresfarm.com/jbvb/rr/bmrr/bm_pics/bm72480.jpeg)
The MDC car also looks like Westerfield 4701 BX-12 SS BOX CAR SANTA FE to me.... They were built in 1930. And for this one, I could reuse the MDC ends albeit some modifications. I could also try my luck and model one with the extended roof... Some interesting infos here:
http://www.protocraft.com/category.cfm?I...egoryid=20
Anyway, looks like there is are interesting projects to do with the MDC car. What was a generic car tweaked to fit MDC tooling seems to wield a tremendous potential!!! 
I think the Sunshine & Photocraft infos are a good starting point. I'm just a little bit lost with many ends and roofs design... 
Matt
|
![[Image: Boxcars001b.jpg]](http://i603.photobucket.com/albums/tt111/sailormatlac/Hedley%20Junction/Boxcars001b.jpg)
![[Image: Boxcars002b.jpg]](http://i603.photobucket.com/albums/tt111/sailormatlac/Hedley%20Junction/Boxcars002b.jpg)
![[Image: Boxcars007b.jpg]](http://i603.photobucket.com/albums/tt111/sailormatlac/Hedley%20Junction/Boxcars007b.jpg)
![[Image: Boxcars008b.jpg]](http://i603.photobucket.com/albums/tt111/sailormatlac/Hedley%20Junction/Boxcars008b.jpg)
![[Image: Boxcars006b.jpg]](http://i603.photobucket.com/albums/tt111/sailormatlac/Hedley%20Junction/Boxcars006b.jpg)
![[Image: Boxcars005b.jpg]](http://i603.photobucket.com/albums/tt111/sailormatlac/Hedley%20Junction/Boxcars005b.jpg)
![[Image: Boxcars003b.jpg]](http://i603.photobucket.com/albums/tt111/sailormatlac/Hedley%20Junction/Boxcars003b.jpg)


![[Image: Boxcars017b.jpg]](http://i603.photobucket.com/albums/tt111/sailormatlac/Hedley%20Junction/Boxcars017b.jpg)
![[Image: Boxcars018b.jpg]](http://i603.photobucket.com/albums/tt111/sailormatlac/Hedley%20Junction/Boxcars018b.jpg)
![[Image: Boxcars019b.jpg]](http://i603.photobucket.com/albums/tt111/sailormatlac/Hedley%20Junction/Boxcars019b.jpg)
![[Image: Boxcars020b.jpg]](http://i603.photobucket.com/albums/tt111/sailormatlac/Hedley%20Junction/Boxcars020b.jpg)
![[Image: Boxcars021b.jpg]](http://i603.photobucket.com/albums/tt111/sailormatlac/Hedley%20Junction/Boxcars021b.jpg)
![[Image: Boxcars022b.jpg]](http://i603.photobucket.com/albums/tt111/sailormatlac/Hedley%20Junction/Boxcars022b.jpg)
![[Image: Boxcars024b.jpg]](http://i603.photobucket.com/albums/tt111/sailormatlac/Hedley%20Junction/Boxcars024b.jpg)
![[Image: Boxcars025b.jpg]](http://i603.photobucket.com/albums/tt111/sailormatlac/Hedley%20Junction/Boxcars025b.jpg)

![[Image: IMG_1688b.jpg]](http://i603.photobucket.com/albums/tt111/sailormatlac/Hedley%20Junction/IMG_1688b.jpg)
![[Image: IMG_1689b.jpg]](http://i603.photobucket.com/albums/tt111/sailormatlac/Hedley%20Junction/IMG_1689b.jpg)
![[Image: IMG_1690b.jpg]](http://i603.photobucket.com/albums/tt111/sailormatlac/Hedley%20Junction/IMG_1690b.jpg)
![[Image: Boxcars026b.jpg]](http://i603.photobucket.com/albums/tt111/sailormatlac/Hedley%20Junction/Boxcars026b.jpg)
![[Image: 38234759.gVLwFDmj.jpg]](http://ic2.pbase.com/g5/36/318336/2/38234759.gVLwFDmj.jpg)
![[Image: Boxcars029b.jpg]](http://i603.photobucket.com/albums/tt111/sailormatlac/Hedley%20Junction/Boxcars029b.jpg)

![[Image: NewYearsChallengePhotos100.jpg]](http://i23.photobucket.com/albums/b399/doctorwayne/Freight%20Cars%20-%20Part%20II/NewYearsChallengePhotos100.jpg)

![[Image: bm72480.jpeg]](http://www.faracresfarm.com/jbvb/rr/bmrr/bm_pics/bm72480.jpeg)
