Posts: 3,733
Threads: 44
Joined: Dec 2008
Wayne you do awesome work, if we could just break you from working in the wrong scale ! 
Mike
Sent from my pocket calculator using two tin cans and a string
Posts: 11,782
Threads: 571
Joined: Nov 2008
Don (ezdays) Day
Board administrator and
founder of the CANYON STATE RAILROAD
Posts: 3,733
Threads: 44
Joined: Dec 2008
Can I see trying this in N scale? Sure ! Of course trying is one thing, actually getting er' done is something else ! 
Mike
Sent from my pocket calculator using two tin cans and a string
Posts: 5,859
Threads: 175
Joined: Dec 2008
Thanks for the generous appraisals, guys. :oops:
I can't imagine that this kind of stuff would be that difficult to do in N scale, although I'm not aware of what N scale detail parts are available. The other difficulty for an HO modeller attempting to do N scale is letting go of trying to include details which would be lost on the viewer - I'm sure that it's possible to detail an N scale car as well as any HO scale car, but for a layout model, it wouldn't be necessary.
Another thing to keep in mind is that this is a layout model, so the underbody is merely a representation, and not really well-detailed at all. Likewise for the roof and those bland looking ribs. Adding ice hatches, corner grabs and a roofwalk will dress it up enough, I hope, to make it look detailed. All I'm after is a car which will look believable on the layout.  
Wayne
Posts: 4,553
Threads: 100
Joined: Dec 2008
Having "Tried this in N"
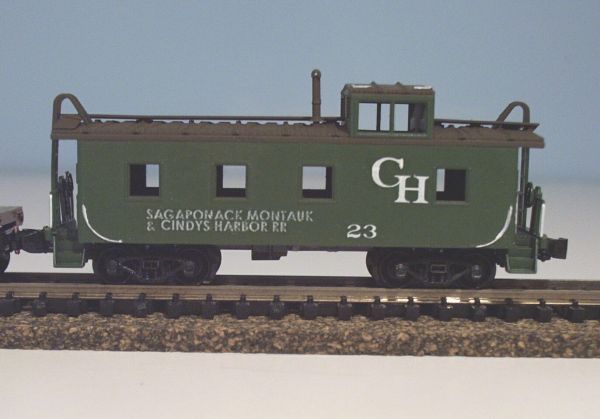
SM&CH Caboose in N scale:

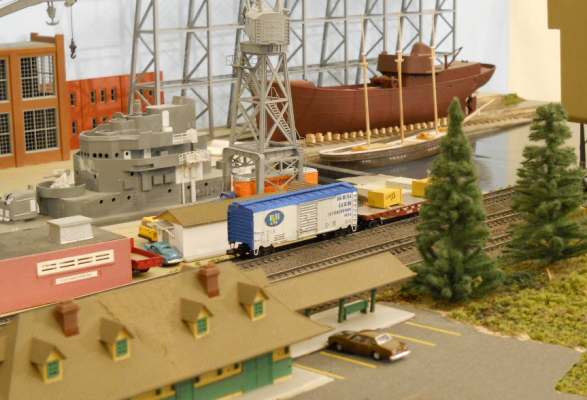
N scale Tour car, and Shipyard module:

N scale is not the most forgiving scale, but nowhere as tedious as 1/700 scale.
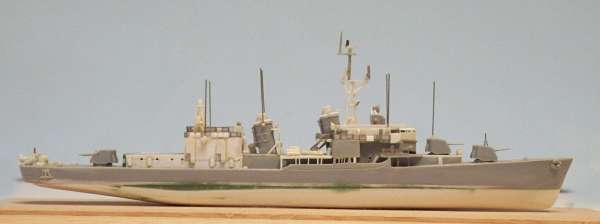
everything that's white, is scratch built:

I use the following criteria:
1. If it will be packed/unpacked, put on the rails/taken off the rails, or in any other way subject to direct handling, the detail is as minimal as visually acceptable. Wayne, this is where the " lack of underbody detail " rule comes into play.
2. If it will have minimal handling, and represents a prototype, the detail level is higher.
3. If is is a cased display model, it get the highest possible detail. ( DD-770, above, will eventually be displayed in a closed case. ) That model is 6-1/4" long.
Wayne, I have long admired your work, and your photography skills. I would imagine you could build a beautiful layout, even in Z scale ! ( but like me, you'd probably need a 5X Optivisor, to do that   )
We always learn far more from our own mistakes, than we will ever learn from another's advice.
The greatest place to live life, is on the sharp leading edge of a learning curve.
Lead me not into temptation.....I can find it myself!
Posts: 5,859
Threads: 175
Joined: Dec 2008
Those are some really nice examples of N scale work, Pete, and the ship is a good demonstration of your versatility and talent.  
Your kind words are much appreciated, but I'm not sure my hands have the dexterity needed to work in the really small scales. As for the Optivisor, it's been a necessity for quite a few years. 
Wayne
Posts: 3,733
Threads: 44
Joined: Dec 2008
I would compliment Pete on his fine work but then he already knows that I know that he knows that I know that he does darn fine work in all scales!
Mike
Sent from my pocket calculator using two tin cans and a string
Posts: 4,553
Threads: 100
Joined: Dec 2008
" As for the Optivisor, it's been a necessity for quite a few years. "
I'm on my second one, bought the first in 1968.
"he already knows that I know that he knows that I know that he does darn fine work "
:oops: :oops:  Thanks Mike!    
We always learn far more from our own mistakes, than we will ever learn from another's advice.
The greatest place to live life, is on the sharp leading edge of a learning curve.
Lead me not into temptation.....I can find it myself!
Posts: 5,859
Threads: 175
Joined: Dec 2008
Rather than make curved hatches to match the arc of the roof, or use hatch platforms, I decided to construct hatch pedestals to change the arc of the radial roof to the slope of a regular car roof.
First, I layed out the dimensions on a sheet of .060" styrene,, then scribed the sheet along the cut lines, leaving excess material between each pair of pedestals. I wanted to create a single unit for each end of the roof, which would span the width. To facilitate sanding the arc in the bottom of the sheet, I added a stiffener of .060" sheet styrene along the centreline, then braced it laterally with more of the same material. Here's what it looked like:
![[Image: 2013PHOTOS-DUFFCHALLENGE2026-1.jpg]](http://i23.photobucket.com/albums/b399/doctorwayne/Freight%20Cars%20-%20Part%20II/2013PHOTOS-DUFFCHALLENGE2026-1.jpg)
Using the same can which was used to trace the curve in the top of the car ends, I taped a sheet of sandpaper around it and began sanding:
![[Image: 2013PHOTOS-DUFFCHALLENGE2027.jpg]](http://i23.photobucket.com/albums/b399/doctorwayne/Freight%20Cars%20-%20Part%20II/2013PHOTOS-DUFFCHALLENGE2027.jpg)
However, the short height of the can left little room for effective sanding, and I was fortunate to find a taller container with the same circumference. The motion here is up and down, with the edges hopefully equidistant from the sandpaper. This isn't a very precise way to work, which wasn't too important at the beginning, but as
the arc was formed into the surface, it was difficult to maintain even pressure.
![[Image: 2013PHOTOS-DUFFCHALLENGE2029.jpg]](http://i23.photobucket.com/albums/b399/doctorwayne/Freight%20Cars%20-%20Part%20II/2013PHOTOS-DUFFCHALLENGE2029.jpg)
I continued sanding until the material along the centreline was removed right through to the stiffener, effectively separating the intended joined pairs which were each to do one end of a car. This was necessary because the arc didn't extend outward to what were intended to be the outside edges of the pedestals. Intead, after removing the stiffeners, I trimmed the outer edges to remove the unsanded portion, then cut apart all of the pieces.
Here's an end view of them installed:
![[Image: 2013PHOTOS-DUFFCHALLENGE2030.jpg]](http://i23.photobucket.com/albums/b399/doctorwayne/Freight%20Cars%20-%20Part%20II/2013PHOTOS-DUFFCHALLENGE2030.jpg)
As you can see, the roofwalk supports are also in place. They're simply short lengths of the same .020"x.040" strip as was used for the roof ribs. I put a bit of a curve in each, using my fingers, then cemented them along the centreline of the roof, atop the ribs. The next day, once the cement had fully cured, the roofs were rubbed over a sheet of sandpaper laying face-up on the workbench, and it took only a few passes to create a flat surface onto which the roofwalk boards could be cemented.
I added the hatches (leftovers from Accurail cars built with Tichy hatch platforms), roofwalks built-up from pre-distressed HO scale 2"x6"s, hatch rests (loops of .010"x.018" strip brass), "B" end brake gear (Tichy) and end ladders (also from Tichy).
![[Image: 2013PHOTOS-DUFFCHALLENGE2032.jpg]](http://i23.photobucket.com/albums/b399/doctorwayne/Freight%20Cars%20-%20Part%20II/2013PHOTOS-DUFFCHALLENGE2032.jpg)
![[Image: 2013PHOTOS-DUFFCHALLENGE2031.jpg]](http://i23.photobucket.com/albums/b399/doctorwayne/Freight%20Cars%20-%20Part%20II/2013PHOTOS-DUFFCHALLENGE2031.jpg)
I left the side grabirons and ladders separate for now, as they'll be a contrasting colour to the cars' yellow sides and will be easier to paint before installation.
The next task is to cast some lead weights for these cars, then they'll be ready for paint.
Wayne
Posts: 3,733
Threads: 44
Joined: Dec 2008
Mike
Sent from my pocket calculator using two tin cans and a string
Posts: 11,782
Threads: 571
Joined: Nov 2008
Don (ezdays) Day
Board administrator and
founder of the CANYON STATE RAILROAD
Posts: 9,763
Threads: 234
Joined: Dec 2008
Wayne, I will forever be amazed with your creativity. I wish you had been a volunteer for me, we could have worked wonders with the prototypes.
Great work. Mr. Beck and Bonnie like it too. 
Charlie
Posts: 5,859
Threads: 175
Joined: Dec 2008
Well, just to let everyone know that I haven't forgotten about the Challenge, here are a few photos showing the cars as they look today. They'll need Dullcoting, of course, then weathering, then some re-weigh data, and possibly more weathering, as they represent cars built in 1914.
![[Image: 2013PHOTOS-DUFFCHALLENGE2034.jpg]](http://i23.photobucket.com/albums/b399/doctorwayne/Freight%20Cars%20-%20Part%20II/2013PHOTOS-DUFFCHALLENGE2034.jpg)
![[Image: 2013PHOTOS-DUFFCHALLENGE2039.jpg]](http://i23.photobucket.com/albums/b399/doctorwayne/Freight%20Cars%20-%20Part%20II/2013PHOTOS-DUFFCHALLENGE2039.jpg)
![[Image: 2013PHOTOS-DUFFCHALLENGE2040.jpg]](http://i23.photobucket.com/albums/b399/doctorwayne/Freight%20Cars%20-%20Part%20II/2013PHOTOS-DUFFCHALLENGE2040.jpg)
Work also continues on the ice service reefers in Part 1 of my Challenge, but no new photos of them quite yet.
Wayne
Posts: 11,782
Threads: 571
Joined: Nov 2008
Looking really, really good....  
Don (ezdays) Day
Board administrator and
founder of the CANYON STATE RAILROAD
Posts: 9,763
Threads: 234
Joined: Dec 2008
Wayne, those cars are great. They look ready to roll into the future. Very nice work indeed.
Charlie
|


![[Image: 2013PHOTOS-DUFFCHALLENGE2026-1.jpg]](http://i23.photobucket.com/albums/b399/doctorwayne/Freight%20Cars%20-%20Part%20II/2013PHOTOS-DUFFCHALLENGE2026-1.jpg)
![[Image: 2013PHOTOS-DUFFCHALLENGE2027.jpg]](http://i23.photobucket.com/albums/b399/doctorwayne/Freight%20Cars%20-%20Part%20II/2013PHOTOS-DUFFCHALLENGE2027.jpg)
![[Image: 2013PHOTOS-DUFFCHALLENGE2029.jpg]](http://i23.photobucket.com/albums/b399/doctorwayne/Freight%20Cars%20-%20Part%20II/2013PHOTOS-DUFFCHALLENGE2029.jpg)
![[Image: 2013PHOTOS-DUFFCHALLENGE2030.jpg]](http://i23.photobucket.com/albums/b399/doctorwayne/Freight%20Cars%20-%20Part%20II/2013PHOTOS-DUFFCHALLENGE2030.jpg)
![[Image: 2013PHOTOS-DUFFCHALLENGE2032.jpg]](http://i23.photobucket.com/albums/b399/doctorwayne/Freight%20Cars%20-%20Part%20II/2013PHOTOS-DUFFCHALLENGE2032.jpg)
![[Image: 2013PHOTOS-DUFFCHALLENGE2031.jpg]](http://i23.photobucket.com/albums/b399/doctorwayne/Freight%20Cars%20-%20Part%20II/2013PHOTOS-DUFFCHALLENGE2031.jpg)

![[Image: 2013PHOTOS-DUFFCHALLENGE2034.jpg]](http://i23.photobucket.com/albums/b399/doctorwayne/Freight%20Cars%20-%20Part%20II/2013PHOTOS-DUFFCHALLENGE2034.jpg)
![[Image: 2013PHOTOS-DUFFCHALLENGE2039.jpg]](http://i23.photobucket.com/albums/b399/doctorwayne/Freight%20Cars%20-%20Part%20II/2013PHOTOS-DUFFCHALLENGE2039.jpg)
![[Image: 2013PHOTOS-DUFFCHALLENGE2040.jpg]](http://i23.photobucket.com/albums/b399/doctorwayne/Freight%20Cars%20-%20Part%20II/2013PHOTOS-DUFFCHALLENGE2040.jpg)
