02-07-2009, 03:58 PM
...or, how to make moulds, and cast your own weights.
It’s easy to make simple moulds for casting your own weights to bring too-light rolling stock up to NMRA specs, or to add weight to a loco, to increase its pulling power.
While there’s been a lot of alarmist talk about the dangers of lead, proper handling will allow you to take advantage of some of the useful properties of this material without jeopardising your health.
One of the useful properties of lead is its low melting point.
In discussions with workers at a factory producing lead castings, it was noted that the Ontario Ministry of Labour does not require the use of breathing apparatus for those engaged in such work.
At higher temperatures, though, lead can vapourise - the steel plant where I worked occasionally rolled a grade of steel with a high lead content, and employees were advised to wear two-stage respirators during this operation, as inhalation of the vapours can be harmful. The melting point of lead is only 621.5ºF., while the rolling temperature for steel is in the range of 2300-2350ºF.
The other main source of lead poisoning is through ingestion. When working with lead, do not eat, drink, smoke, pick your nose or engage in any activity which will result in lead entering your body. After handling lead, thoroughly wash your hands before engaging in any of these activities. Don’t leave lead, including scraps, filings, or trimmings laying around anywhere that a child or pet can gain access to them - it takes a lot less lead to poison a child, and they’re much more apt to place things, including lead-contaminated hands, into their mouth.
To cast your own lead weights, you’ll need only a few simple tools, including:
- hand-held propane torch, as used by plumbers
- pencil
- straightedge
- utility knife
- tin snips
- pliers
- channel-locks ( required only if you’re pouring into tall moulds, which might otherwise tip)
- a metal container, preferably with a non-metal handle, and a pouring spout
- flat blade screwdriver (doesn’t have to be in good condition - used to lift impurities out of the molten lead)
- a bench vise is handy for sitting the container upon during the melting operation - open the jaws so that the container is supported only slightly by the vise, allowing little heat loss through the vise.
- a non-flammable surface on which to fill your moulds - I use a sheet of steel atop my workbench
- a two-stage respirator (same type cartridges as used for airbrushing - this item is actually optional, as lead at or even somewhat above its melting point is not a breathing hazard.)
For materials:
- lead - I use old wheel balancing weights, usually available free from any tire shop or garage
- sheet aluminum for moulds - .015”-.030” thickness works well (scraps from aluminum siding work well, too (the painted side should go on the outside when bending the mould)
- soft iron or copper wire, if you’re making cylindrical moulds
Decide on the size and shape of the weight required, then use your pencil and straightedge to lay out the pattern on the aluminum. If you require one side of the weight to be flat, and don’t want to have to do any filing, plan your mould so that this side will be on the bottom of the mould. When the mould is filled, the molten lead forms a meniscus similar to that of mercury, with the centre higher than the edges.
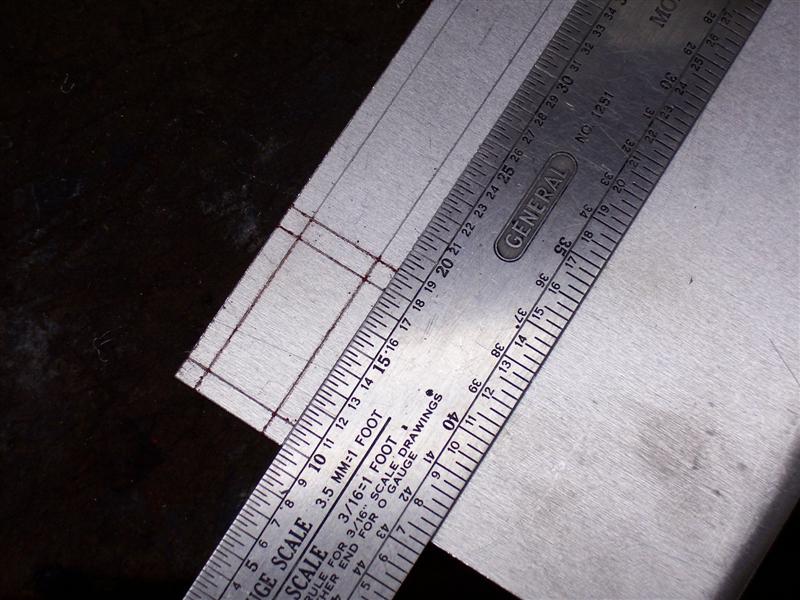
In the photo below, I’m making a number of similar moulds, which will extend, end-to-end, along the edge of the sheet. After all pencil lines are completed, use your utility knife to score all lines where a bend will be made - one or two light-to-medium passes with the knife will be sufficient.
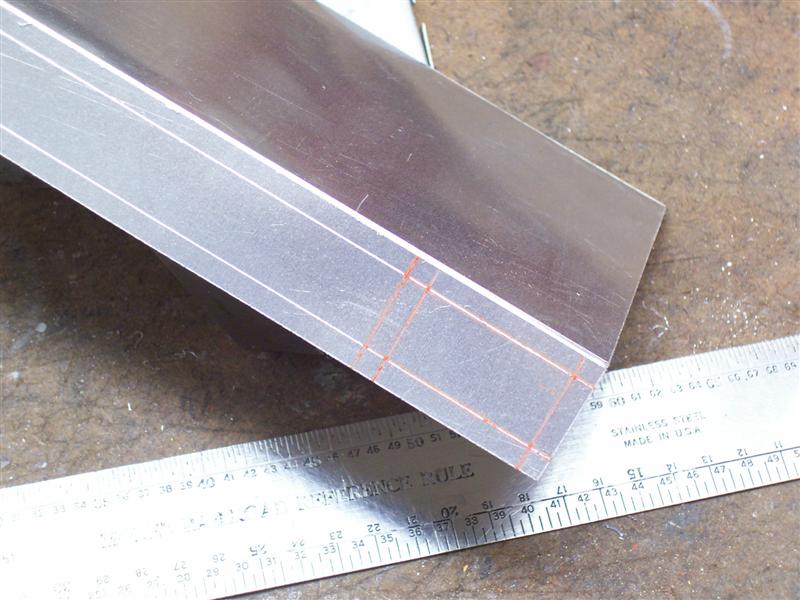
Next, use the knife to make two or three heavy passes along all lines where the moulds will be separated from one another, as shown below, then flex the sheets back and forth a couple of times along the score lines, separating the pieces.
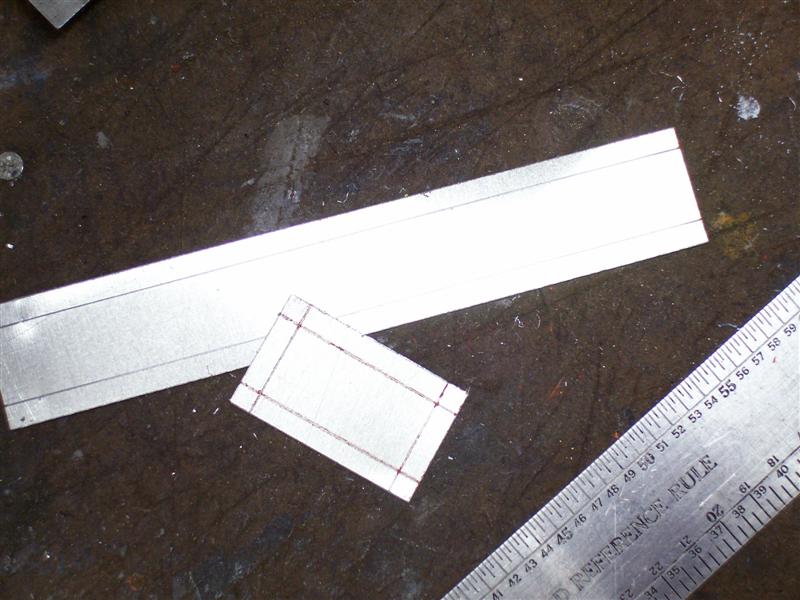
Use your tin snips, as shown below, to cut the edges to create tabs, which will help hold the mould together during the pouring operation
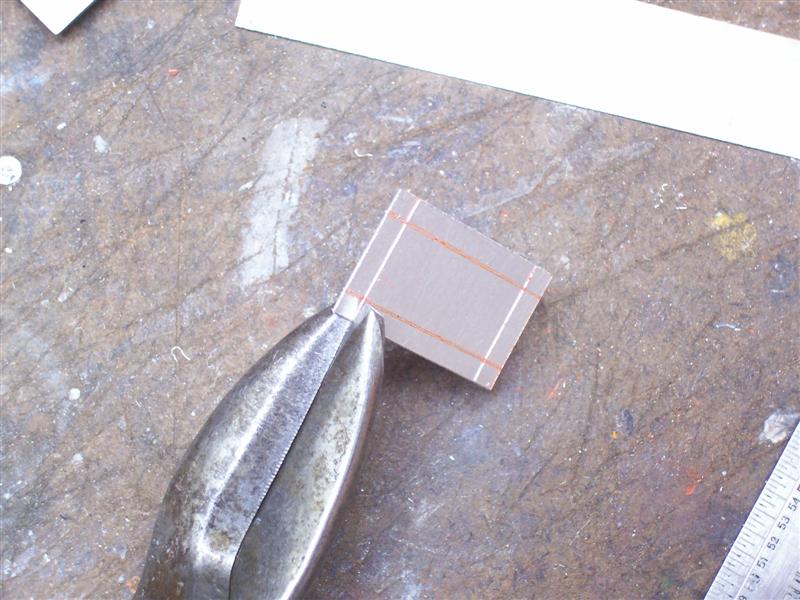
I’ve found it best to pick any one side on which to make the first two cuts, then to make the other two on the side opposite the first.
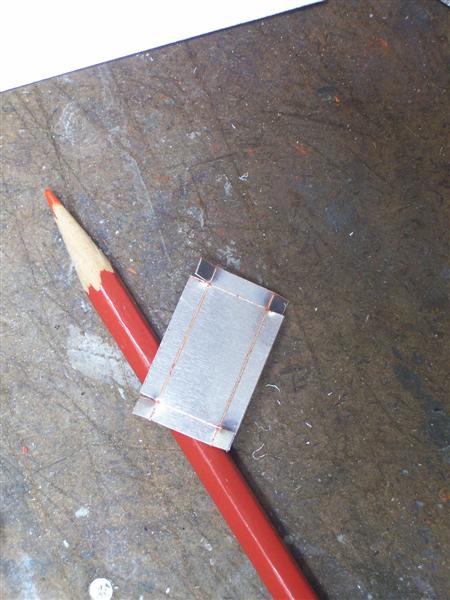
Next, using pliers, or your fingers, or even a solid, straight corner surface, bend the non-tabbed sides of the mould along the scored lines. It doesn’t seem to make much difference if the score lines end up on the inside or outside of the mould.
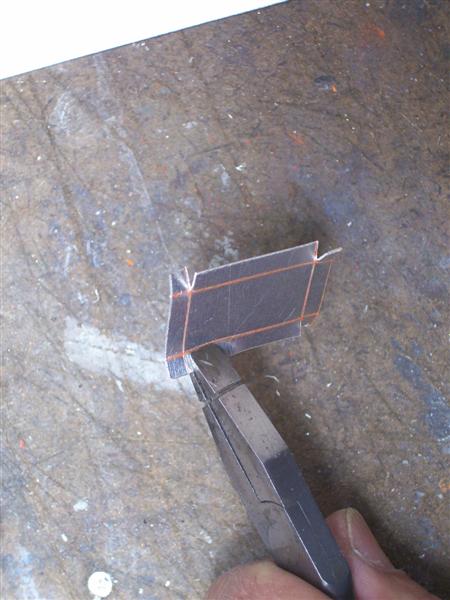
Now bend the tabbed ends into position.

Because of the thickness of the already-bent sides, the score lines for bending the tabs around the sides will be in not quite the proper place - use the pliers to fold the tabs around the outside of the sides, as required.

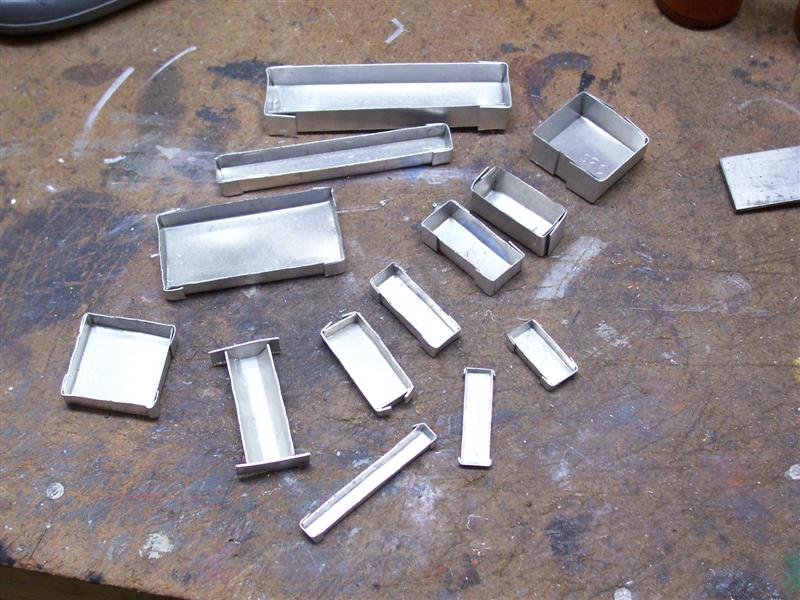
Here are some examples of simple moulds made in this manner.
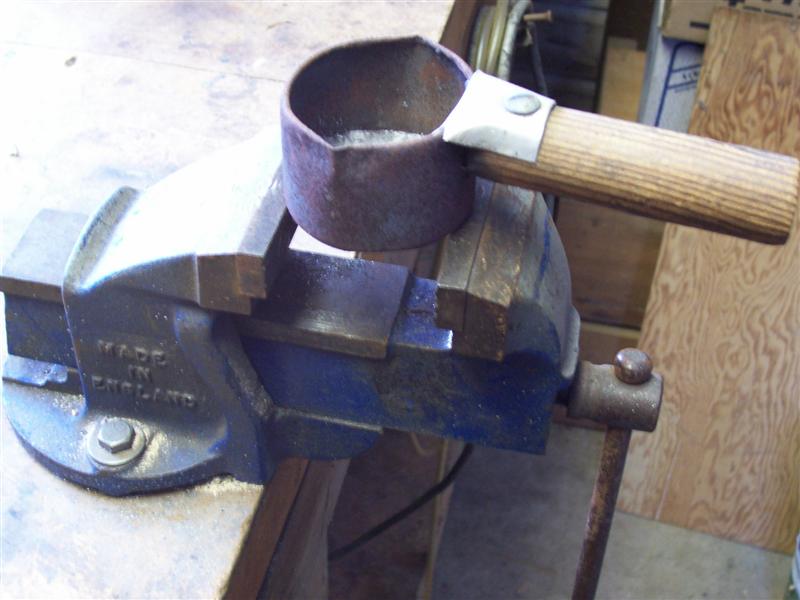
I made my melting pot from the steel cap of a large spray paint can, using pliers to crimp the edge to create a pouring spout. The handle is a short length of broomstick, secured with a couple of screws and a bit of spare aluminum.
To melt the lead, place some used wheel balancing weights in your melting pot, then place it on the vise, as shown below, and apply heat with your propane torch. The hottest part of the flame is the tip of the visible flame.
...and the torch:
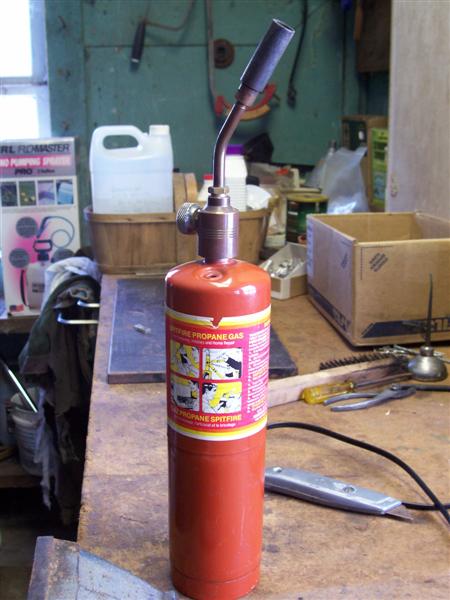
I sometimes use pliers to grasp the steel clip used to attach the weight to the wheel rim, then heat the lead directly while holding it over the pot - the lead will partially melt, dropping into the pot, and the clip can be discarded. Either way, continue heating the bottom of the pot until all of the lead has liquefied. Dirt and impurities (and the steel clips, if they weren’t removed earlier) will float to the top of the molten lead. Use the tip of the screwdriver to lift these out - the clips separately, while the impurities will clump together and can be scooped out with the screwdriver blade. Continue heating while you do this - all of the lead, including that immediately atop the vise jaws, should be in a liquid state.
With your moulds sitting atop the metal sheet, simply tilt the pot and pour molten lead into each mould. Fill or over-fill the moulds, and don’t worry if some slops over the top. If you’re making a large weight, try to ensure that you have enough lead to cast it as a single pour, to avoid a fault line between separate pours. If you must make a second pour, first note the top level of the first pour, then, when the second pour has been made (and before it has solidified), heat the outside of the mould with the torch flame, concentrating on the area where the two pours meet. This will eliminate the fault line.
The molten lead is very shiny, but dulls quickly as it cools - the centre of the cast weight solidifies last, so avoid jarring it until all material has solidified.
For those moulds where you’ve got excess lead dripped down the outside of the mould, or heaped too high above the mould sides, simply play the flame of the torch over these areas - as the lead heats up, it will become shiny again, then drop away, forming into beads as it hits the metal pouring surface.. If you’ve under-filled a mould, use pliers to place some of these suitably-sized beads atop the lead in the mould, then re-heat the whole works - the partial weight will melt, with the melted beads blending into it. Any excess beads and spillage, along with filings and pieces trimmed from weights can go back into the melting pot for the next batch.
After the weights have cooled (the bigger they are, the longer the cooling process) they can be removed from the moulds. Some will simply drop out when the mould is inverted, while others may require one side of the mould to be opened slightly. A knife blade, inserted between the mould wall and the weight works well for this. Most moulds can be used several times before the aluminum fatigues sufficiently for a flexed side to break off.
Pictured below are a couple of “stock” weights and their moulds.
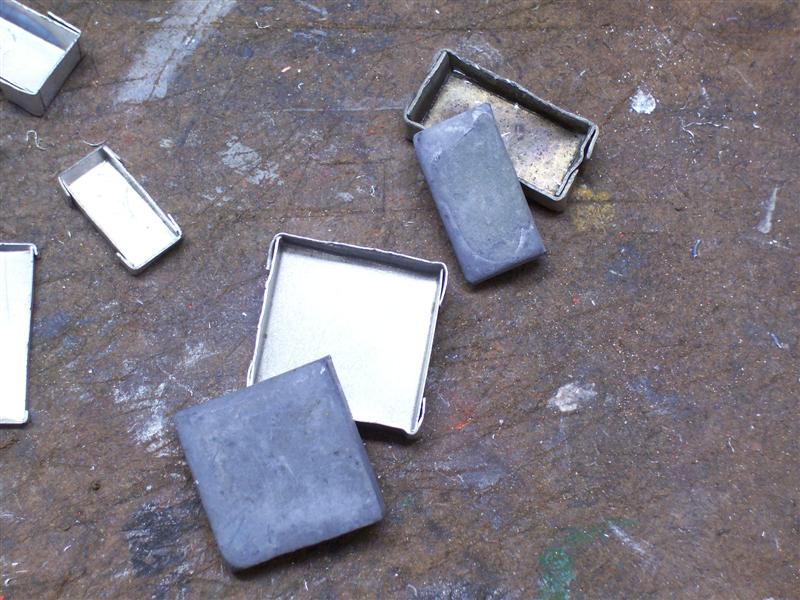
I use my scale ruler when doing the layout work for these moulds, and have found that a weight from a mould measuring (in HO scale) 3’x8’x2’high weighs about one ounce - the centre of the weight is higher than 2’ because of the meniscus, and this height will vary depending on how much you fill (or overfill) the mould.
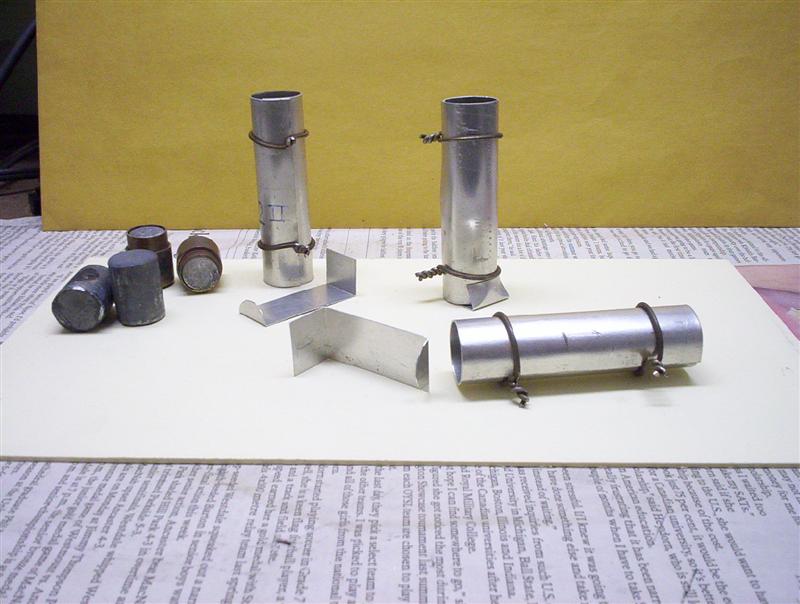
You can also cast cylindrical weights by forming the aluminum into a tube, then wrapping soft wire around the tube, as shown below. I generally don’t bother to put a bottom on the tube, as the molten lead solidifies when it hits the metal work-surface. I do use a pair of channel-locks to stabilise the tube during the pouring operation, though.
Lead is also available in sheets of various thicknesses - check roofing or plumbing supply stores. This type of lead is useful in situations where you need weights thinner than would be practical to cast. You can cut it with a utility knife or tin snips.
I hope that you'll find this simple casting procedure useful.
Wayne
It’s easy to make simple moulds for casting your own weights to bring too-light rolling stock up to NMRA specs, or to add weight to a loco, to increase its pulling power.
While there’s been a lot of alarmist talk about the dangers of lead, proper handling will allow you to take advantage of some of the useful properties of this material without jeopardising your health.
One of the useful properties of lead is its low melting point.
In discussions with workers at a factory producing lead castings, it was noted that the Ontario Ministry of Labour does not require the use of breathing apparatus for those engaged in such work.
At higher temperatures, though, lead can vapourise - the steel plant where I worked occasionally rolled a grade of steel with a high lead content, and employees were advised to wear two-stage respirators during this operation, as inhalation of the vapours can be harmful. The melting point of lead is only 621.5ºF., while the rolling temperature for steel is in the range of 2300-2350ºF.

The other main source of lead poisoning is through ingestion. When working with lead, do not eat, drink, smoke, pick your nose or engage in any activity which will result in lead entering your body. After handling lead, thoroughly wash your hands before engaging in any of these activities. Don’t leave lead, including scraps, filings, or trimmings laying around anywhere that a child or pet can gain access to them - it takes a lot less lead to poison a child, and they’re much more apt to place things, including lead-contaminated hands, into their mouth.
To cast your own lead weights, you’ll need only a few simple tools, including:
- hand-held propane torch, as used by plumbers
- pencil
- straightedge
- utility knife
- tin snips
- pliers
- channel-locks ( required only if you’re pouring into tall moulds, which might otherwise tip)
- a metal container, preferably with a non-metal handle, and a pouring spout
- flat blade screwdriver (doesn’t have to be in good condition - used to lift impurities out of the molten lead)
- a bench vise is handy for sitting the container upon during the melting operation - open the jaws so that the container is supported only slightly by the vise, allowing little heat loss through the vise.
- a non-flammable surface on which to fill your moulds - I use a sheet of steel atop my workbench
- a two-stage respirator (same type cartridges as used for airbrushing - this item is actually optional, as lead at or even somewhat above its melting point is not a breathing hazard.)
For materials:
- lead - I use old wheel balancing weights, usually available free from any tire shop or garage
- sheet aluminum for moulds - .015”-.030” thickness works well (scraps from aluminum siding work well, too (the painted side should go on the outside when bending the mould)
- soft iron or copper wire, if you’re making cylindrical moulds
Decide on the size and shape of the weight required, then use your pencil and straightedge to lay out the pattern on the aluminum. If you require one side of the weight to be flat, and don’t want to have to do any filing, plan your mould so that this side will be on the bottom of the mould. When the mould is filled, the molten lead forms a meniscus similar to that of mercury, with the centre higher than the edges.
In the photo below, I’m making a number of similar moulds, which will extend, end-to-end, along the edge of the sheet. After all pencil lines are completed, use your utility knife to score all lines where a bend will be made - one or two light-to-medium passes with the knife will be sufficient.
Next, use the knife to make two or three heavy passes along all lines where the moulds will be separated from one another, as shown below, then flex the sheets back and forth a couple of times along the score lines, separating the pieces.
Use your tin snips, as shown below, to cut the edges to create tabs, which will help hold the mould together during the pouring operation
I’ve found it best to pick any one side on which to make the first two cuts, then to make the other two on the side opposite the first.
Next, using pliers, or your fingers, or even a solid, straight corner surface, bend the non-tabbed sides of the mould along the scored lines. It doesn’t seem to make much difference if the score lines end up on the inside or outside of the mould.
Now bend the tabbed ends into position.
Because of the thickness of the already-bent sides, the score lines for bending the tabs around the sides will be in not quite the proper place - use the pliers to fold the tabs around the outside of the sides, as required.
Here are some examples of simple moulds made in this manner.
I made my melting pot from the steel cap of a large spray paint can, using pliers to crimp the edge to create a pouring spout. The handle is a short length of broomstick, secured with a couple of screws and a bit of spare aluminum.
To melt the lead, place some used wheel balancing weights in your melting pot, then place it on the vise, as shown below, and apply heat with your propane torch. The hottest part of the flame is the tip of the visible flame.
...and the torch:
I sometimes use pliers to grasp the steel clip used to attach the weight to the wheel rim, then heat the lead directly while holding it over the pot - the lead will partially melt, dropping into the pot, and the clip can be discarded. Either way, continue heating the bottom of the pot until all of the lead has liquefied. Dirt and impurities (and the steel clips, if they weren’t removed earlier) will float to the top of the molten lead. Use the tip of the screwdriver to lift these out - the clips separately, while the impurities will clump together and can be scooped out with the screwdriver blade. Continue heating while you do this - all of the lead, including that immediately atop the vise jaws, should be in a liquid state.
With your moulds sitting atop the metal sheet, simply tilt the pot and pour molten lead into each mould. Fill or over-fill the moulds, and don’t worry if some slops over the top. If you’re making a large weight, try to ensure that you have enough lead to cast it as a single pour, to avoid a fault line between separate pours. If you must make a second pour, first note the top level of the first pour, then, when the second pour has been made (and before it has solidified), heat the outside of the mould with the torch flame, concentrating on the area where the two pours meet. This will eliminate the fault line.
The molten lead is very shiny, but dulls quickly as it cools - the centre of the cast weight solidifies last, so avoid jarring it until all material has solidified.
For those moulds where you’ve got excess lead dripped down the outside of the mould, or heaped too high above the mould sides, simply play the flame of the torch over these areas - as the lead heats up, it will become shiny again, then drop away, forming into beads as it hits the metal pouring surface.. If you’ve under-filled a mould, use pliers to place some of these suitably-sized beads atop the lead in the mould, then re-heat the whole works - the partial weight will melt, with the melted beads blending into it. Any excess beads and spillage, along with filings and pieces trimmed from weights can go back into the melting pot for the next batch.
After the weights have cooled (the bigger they are, the longer the cooling process) they can be removed from the moulds. Some will simply drop out when the mould is inverted, while others may require one side of the mould to be opened slightly. A knife blade, inserted between the mould wall and the weight works well for this. Most moulds can be used several times before the aluminum fatigues sufficiently for a flexed side to break off.
Pictured below are a couple of “stock” weights and their moulds.
I use my scale ruler when doing the layout work for these moulds, and have found that a weight from a mould measuring (in HO scale) 3’x8’x2’high weighs about one ounce - the centre of the weight is higher than 2’ because of the meniscus, and this height will vary depending on how much you fill (or overfill) the mould.
You can also cast cylindrical weights by forming the aluminum into a tube, then wrapping soft wire around the tube, as shown below. I generally don’t bother to put a bottom on the tube, as the molten lead solidifies when it hits the metal work-surface. I do use a pair of channel-locks to stabilise the tube during the pouring operation, though.
Lead is also available in sheets of various thicknesses - check roofing or plumbing supply stores. This type of lead is useful in situations where you need weights thinner than would be practical to cast. You can cut it with a utility knife or tin snips.
I hope that you'll find this simple casting procedure useful.
Wayne


![[Image: logosmall.png]](http://i543.photobucket.com/albums/gg445/CAB_IV/Model%20Trains%202013/logosmall.png)


 tutorial, and to Russ for recommending it for inclusion in The NEW Academy.