Posts: 5,859
Threads: 175
Joined: Dec 2008
Once I learned how to airbrush Pollyscale (by going to their website) I'd rate it as my all-time and all-purpose favourite paint...great for airbrushing and brush painting, fast drying, and very durable, and excellent shelf-life, too. I never cared for Model Masters - Testors made a mistake when they discontinued Pollyscale, and Rustoleum seems to want to get out of the model-paint business altogether.
I believe that the Tru-Scale paint is a slightly revised version of SMP's Accupaint, a very nice paint for airbrushing, but not so useful for brushwork.
I have a bunch of Scalecoat I, and while it's okay, I'm not overly fond of it. I'll likely use it for the dozen or-so steam locomotives I have left to paint, but that'll be it, I hope. Using it for the multiple colours needed for steam makes it a multi-day painting process, due to its long drying time, while I could do an entire loco and tender in one session, with no masking needed (maybe a bit of cardstock acting as a shield for fussy areas) using Pollyscale, and all of the paint would be dry-to-the-touch by the time the airbrush had been cleaned...a two minute job, at most.
Wayne
Posts: 888
Threads: 56
Joined: Mar 2015
I painted all four cars yesterday:
![[Image: 2020810205748_DSCF8836.JPG]](http://www.railroad-line.com/forum/data/Glen%20Haasdyk/2020810205748_DSCF8836.JPG)
I used Model master Oxide Red which is a match to Polly-S Light Freightcar Red.
I have decals for 3 of the four. I am looking for the CDS dry transfer set for this car P# HO-560.
In the back of the photo is a Roundhouse covered hopper that I'm working on, inspired by Dr Wayne's work.
Posts: 888
Threads: 56
Joined: Mar 2015
I finished of the Cn single sheathed boxcar this morning
![[Image: 2020815203010_DSCF8840.JPG]](http://www.railroad-line.com/forum/data/Glen%20Haasdyk/2020815203010_DSCF8840.JPG)
I used a set of cds dry transfers on it and toned everything down a bit with an overspray of Polly-s dirt, as well as weathering with some rust and grimey black.
I had a near disaster with the USRA boxcar when I put a decal on in the wrong place. I was able to remove it using some isopropyl alcohol but now I'm looking for yet another set of decals for that car. In the meantime I can start to decal the wood reefer.
Posts: 5,859
Threads: 175
Joined: Dec 2008
Obviously, the C-D-S 560 set is for that CNR twin hopper.
There's at least one dealer at the Ancaster Train Show, in November, that carries a fairly good supply of C-D-S stuff, but there's no guarantee that there'll even be a train show this year. If there is a show, I can look for that set, and mail it to you...if you're not in a rush, of course.
However, desperate times call for desperate measures, so if you don't mind juggling some of the numbers (governments and gangsters do it all the time) you could use almost any C-D-S CNR set meant for a boxcar-red piece of rolling stock, as most of those sets had the spelled-out roadname in the same size, and enough numerals to put together for an appropriate hopper number.
Fudging the dimensional data is a little more work, but not terrible if you don't worry about being completely prototypical.
A bit easier, regarding car numbers (especially on the ends, and small-print dimensional data) is to assemble the required dry transfer numerals on clear decal paper, and then apply it as one-piece decals, much like we used to get from Champ.
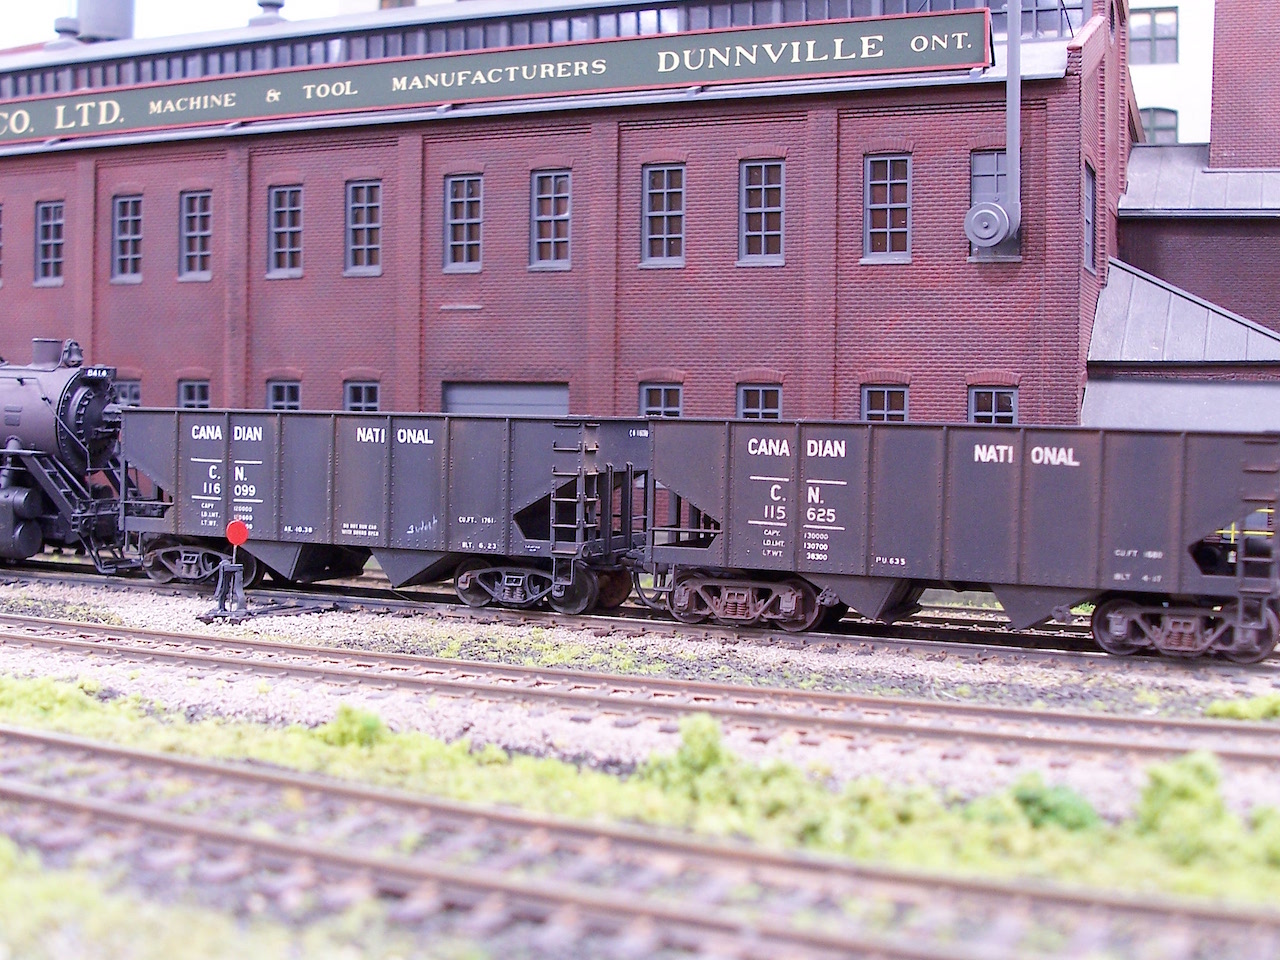
I have only a couple of CNR hoppers, and they're in the pre-war black paint scheme. I'd offer a photo, but I'd have to find it in my disorganised disc collection, as Big Blue will not show images from the "new" version of photobucket...I've tried, but all that shows-up is this...
undefined
I did try to find a photo on-disc, and actually found the one I wanted, on the first disc that I viewed. However, when enlarged, or "copied", to transfer to my desktop for re-sizing as an attachment, it enlarges as a totally different picture of a N&W hopper...talk about juggling numbers!
Anyway, here's the two hoppers in a just-taken-a-minute-ago picture...

...not that it'll be much help in finding that C-D-S set.
Glen, those parts that I got from Bowser, from their very nicely-done ACF covered hoppers, may have been available only because I was in their store in Montoursville, and was picking-up a fairly large (several hundred dollars) pre-order. It probably wouldn't hurt, though, if you contacted the retail Sales Manager, Richard Cox, as he was the one with whom I dealt in-store. I simply asked if I could buy the parts that I wanted, and he wrote-down the part numbers, went into the back room where the pad printing is done, and came back with the parts I needed. (I can provide an e-mail address if you wish to contact him.)
EDIT: Glen, I just now saw your post in Swap Meet, and wanted to mention that Black Cat Publishing do offer some decals suitable for your boxcar.
Wayne
Posts: 888
Threads: 56
Joined: Mar 2015
Thanks Wayne, about two hours after I made that post I checked Black Cat and found all my needed decals there.
Now I feel a bit of a dope not checking there first.
Posts: 888
Threads: 56
Joined: Mar 2015
While waiting for my Black Cat order to come I've been doing some decal work on the Reefer:
![[Image: 202082002540_DSCF8841.JPG]](http://www.railroad-line.com/forum/data/Glen%20Haasdyk/202082002540_DSCF8841.JPG)
I'm using a set of decals from Black Cat. The car still has the other side to be done before the final coats of clear will be added.
One thing I would like to add to this car in an underbody charcoal heater. I just wish I could either find a casting or figure out how to scratchbuild one.
Posts: 5,859
Threads: 175
Joined: Dec 2008
Lookin' good, Glen.   
(08-19-2020, 10:29 PM)cnrglen Wrote: ...One thing I would like to add to this car in an underbody charcoal heater. I just wish I could either find a casting or figure out how to scratchbuild one.
I sorta semi-faked this one....

...from a multi-part feature in the Dec. '95 and Jan./Feb. '96 issues of RMC, covering the development of the 8 hatch reefers of the CNR, CPR, PGE, and GTW.
The heater was charcoal-fired, but unlike the ones use in end-type ice bunkers (the bunkers were usually fitted with a small hinged side-door) the underfloor type was developed around 1936 by CN and CP, in cooperation with the National Research Council.
It used an anti-freeze solution in copper coils, with the coils above the floor, but below the interior floor racks. The solution moved through the coils and back to the heater by convection, while the heater was fed automatically from a 60lb. charcoal magazine.
Mine was made from a piece of Evergreen (or perhaps Plastruct) 3/8" square tubing, with a .010" piece of sheet styrene to cover the front and rear of the heater box, which sits on a square of .060" sheet styrene (to allow it to project further below the car's sidesill. I then added a few more bits of styrene on the face of the box to represent whatever was shown in the photos (probably a door for the charcoal magazine...my guess, anyway).
The straps, supposedly holding the heater in place, are Detail Associates flat brass bar (.010"x.030")(if you don't have any flat brass bar, strip styrene should work, too) and I used what appears to be some .030" or .040" brass wire for the pipes leading to- and from- the coils.
A couple of photos....


I faked the liquidometer using a square of .010" sheet styrene, with a .010"x.020" strip of styrene on its top edge. The "dials" are the top portion from a couple of dry transfer "0"s
Wayne
Posts: 888
Threads: 56
Joined: Mar 2015
Thanks Wayne. I have everything I need except the 3/8" tube, which I'll be picking up tomorrow after work.
Your tip with the liquidometer will come in handy too.
Posts: 888
Threads: 56
Joined: Mar 2015
Thanks to Wayne's instructions, I scatchbuilt the heater. At first I was a bit taken aback by how large 3/8 is compared to the car but I opened an unbuilt resin kit of a CN 8 hatch reefer to check it's casting and it's about the same size.
![[Image: 2020822232717_DSCF8851.JPG]](http://www.railroad-line.com/forum/data/Glen%20Haasdyk/2020822232717_DSCF8851.JPG)
![[Image: 2020822232755_DSCF8852.JPG]](http://www.railroad-line.com/forum/data/Glen%20Haasdyk/2020822232755_DSCF8852.JPG)
and while I was building one, why not build three:
![[Image: 2020822232851_DSCF8853.JPG]](http://www.railroad-line.com/forum/data/Glen%20Haasdyk/2020822232851_DSCF8853.JPG)
The three units were sprayed with primer this evening and I'll be airbrushing them in boxcar red shortly.
Now it's starting to look 'Canadian'
As well yesterday my new decals from Black Cat arrived:
![[Image: 2020822233039_DSCF8854.JPG]](http://www.railroad-line.com/forum/data/Glen%20Haasdyk/2020822233039_DSCF8854.JPG)
Posts: 5,859
Threads: 175
Joined: Dec 2008
(08-22-2020, 09:36 PM)cnrglen Wrote: .....and while I was building one, why not build three:
![[Image: 2020822232851_DSCF8853.JPG]](http://www.railroad-line.com/forum/data/Glen%20Haasdyk/2020822232851_DSCF8853.JPG)
I agree....once I get into a project, I find that it's a good choice to make as many similar items as I think will be needed. If I put it off, the next session for me is trying to remember how I built those items, so more time wasted.
(08-22-2020, 09:36 PM)cnrglen Wrote: As well yesterday my new decals from Black Cat arrived:
![[Image: 2020822233039_DSCF8854.JPG]](http://www.railroad-line.com/forum/data/Glen%20Haasdyk/2020822233039_DSCF8854.JPG)
I'm sure that I've read more than once that the CNR's open cars (gondolas, hoppers and flatcars) were black up until WWII, and then brown/freight car red, afterwards, which seems contrary to the labelling on the decal's envelope. Since I'm modelling the late '30s, most of my CNR hoppers and gondolas are black, although I do have some Intermountain CNR gondolas in boxcar red/brown, dating from an earlier layout set in a later timeframe. I don't have any CNR flatcars.
I doubt that Al Ferguson would be wrong, though, as he's been offering very nicely-done decals for some time.
Wayne
Posts: 888
Threads: 56
Joined: Mar 2015
08-23-2020, 07:14 PM
(This post was last modified: 08-23-2020, 07:16 PM by cnrglen.)
I have read that too, especially reading the older CDS decal catalogue that I have. I am fortunate that I have a fair large library of model and prototype magazines to help me with research. I am modelling the late fifties so my layout is a sea of boxcar/light freight car red.
In my order from Black cat I also got a set of CN caboose decals for a project that I'm finishing after the previous owner passed away and a set of CN depressed flatcar decals for a Walthers model that I picked up last year.
The nice thing that I found with black cat is the shipping for the four sets was only 2$, which makes them cheaper buying them for the source than getting them from fleabay
Posts: 888
Threads: 56
Joined: Mar 2015
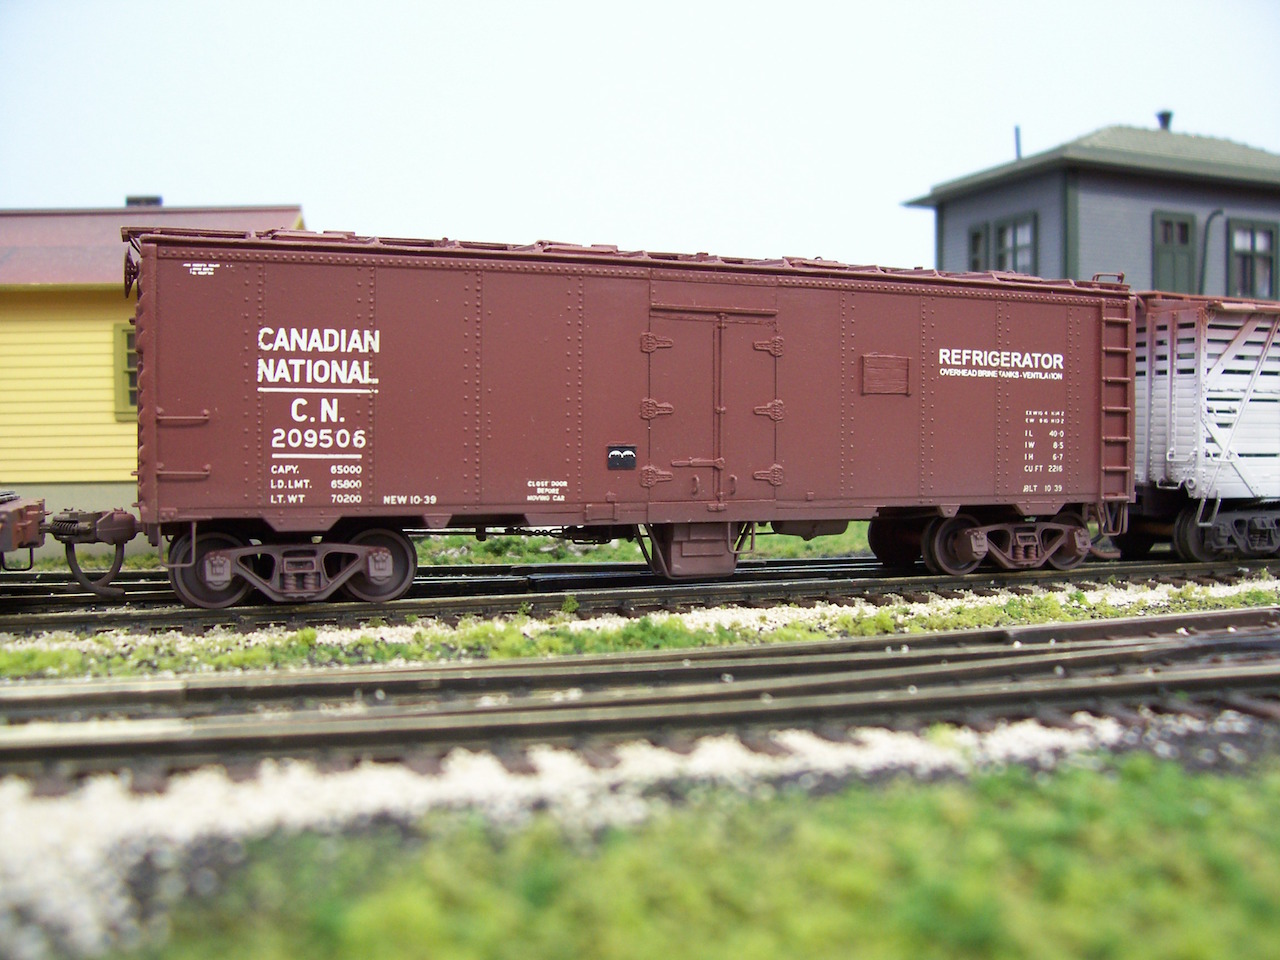
I finished off the decal work on my Cn reefer:
![[Image: 202083019415_DSCF8855.JPG]](http://www.railroad-line.com/forum/data/Glen%20Haasdyk/202083019415_DSCF8855.JPG)
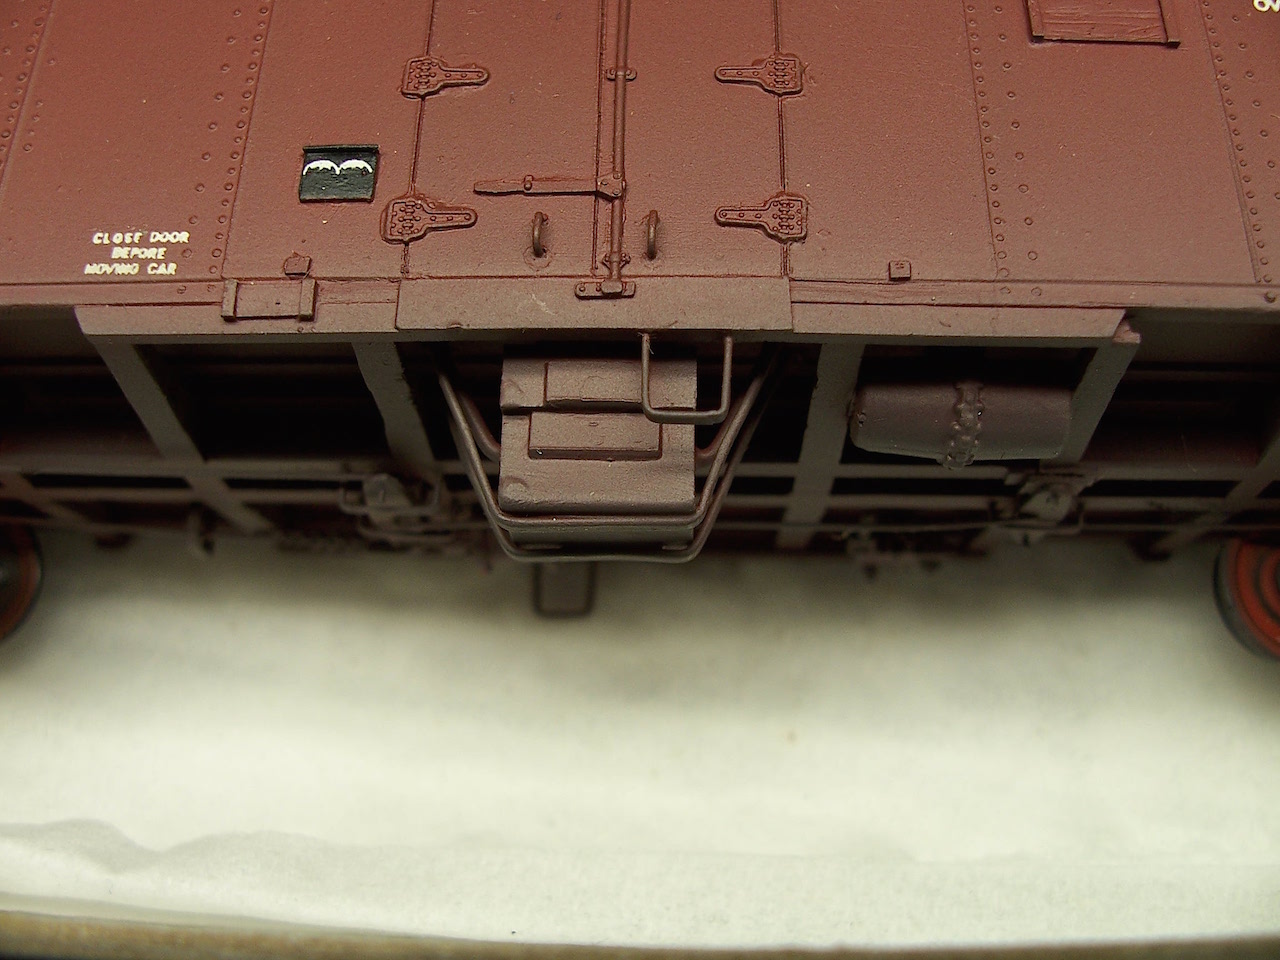
I think I might have gotten some earlier decals from Black cat because I didn't seem to manage to make the decal edges completely disappear. I've have better luck with other decals of theirs. I also added the charcoal heater and the liquidometer gauges
![[Image: 2020830194339_DSCF8862.JPG]](http://www.railroad-line.com/forum/data/Glen%20Haasdyk/2020830194339_DSCF8862.JPG)
I made the liquidometer panel as per Wayne's instructions but I added gauges with the top 3/4 of the zeroes of the dimensional data decals. I found it easier to use waterslide decals here instead of dry transfers.
I still have to weather the car. I'm not sure how heavy I would go the weather it. Seeing as it's 1958-59 I would figure that a wood car would have quite a few miles and years on it. But then CN kept these cars in pretty decent shape right through their careers.
![[Image: 202083019480_DSCF8857.JPG]](http://www.railroad-line.com/forum/data/Glen%20Haasdyk/202083019480_DSCF8857.JPG)
I also added the heaters and liquidometer gauges to the other two CP steel reefers.
Posts: 5,859
Threads: 175
Joined: Dec 2008
Those cars look great, Glen!   
Wayne
Posts: 888
Threads: 56
Joined: Mar 2015
I finished decalling the other two cars. The USRA boxcar turned out pretty good.
![[Image: 202096224440_DSCF8866.JPG]](http://www.railroad-line.com/forum/data/Glen%20Haasdyk/202096224440_DSCF8866.JPG)
After the decals dried I gave it another coat of testors glosscote to seal it. When that dries I'll finish it off with dulcote and then weathering.
I'm quite impressed by the Black Cat decals.
![[Image: 202096224657_DSCF8863.JPG]](http://www.railroad-line.com/forum/data/Glen%20Haasdyk/202096224657_DSCF8863.JPG)
They include a number of extra decals to 'modernize' the car with newer reporting marks. Since this was a rather unique car that I was modelling, I had to change the car number and the build dates, which were also included in the decal set.
I did find a photo of the prototype in a book that I have but I don't think copywrite rules would allow me to post it here. I did also have the diagram from CDS:
![[Image: 202096231139_DSCF8864.JPG]](http://www.railroad-line.com/forum/data/Glen%20Haasdyk/202096231139_DSCF8864.JPG)
Which was a big help as well.
I also finished the decal job on my CN USRA hopper:
![[Image: 202096231238_DSCF8867.JPG]](http://www.railroad-line.com/forum/data/Glen%20Haasdyk/202096231238_DSCF8867.JPG)
In this case I just copied what I had done on my previous cars that I built a few years ago except those were done using CDS dry transfers. I'll have to try to weather the finished car to match the other pair.
Posts: 1,797
Threads: 81
Joined: Dec 2008
Wow!!! Fantastic work Glen. All the added details and the charcoal heaters look great to boot!
|


