3 PGE diesel projects
#1
I have three Diesels given to me to paint , well two and this:
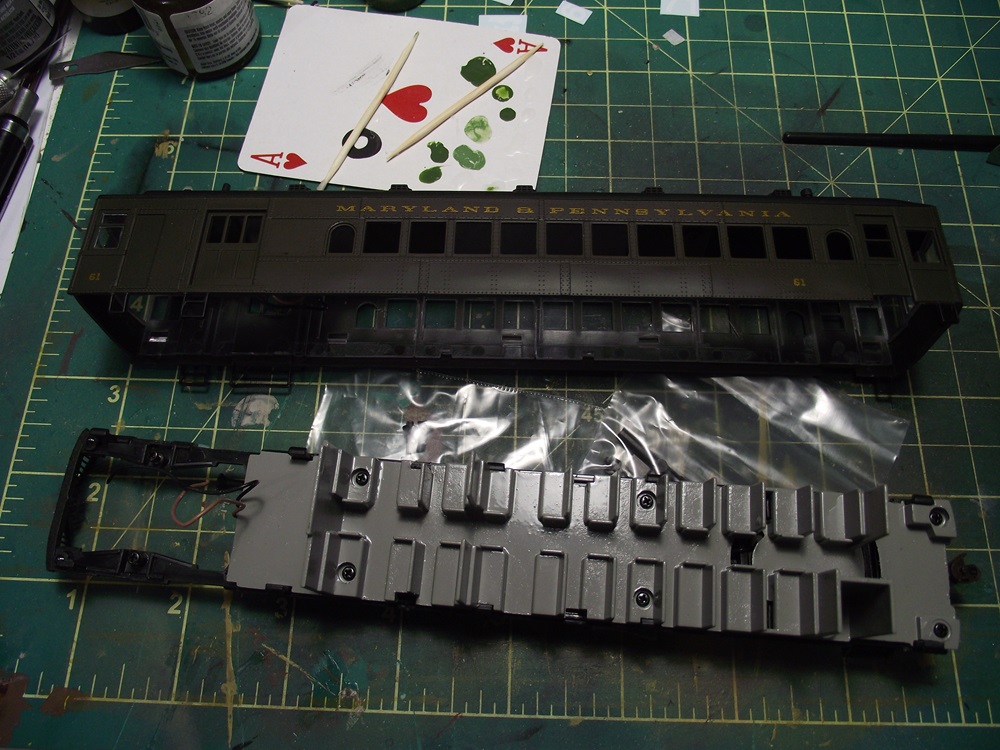
   

The modeller wants all three painted in Pacific Great Eastern schemes. In case you didn't know PGE is the forerunner of BC Rail.
I found a photo of a PGE gas electric online:
https://images.app.goo.gl/cCU8qDN7kTMzjKjAA

I did discuss paint matching with the owner and we both came to the conclusion that an exact paint match would be near impossible so we're going with 'close enough'.
I figured that the photo was taken in the late fifties/early sixties so I'm thinking that the colors are a bit washed out. I decided to go with a slightly darker tuscan on the sides and a similar yellow.
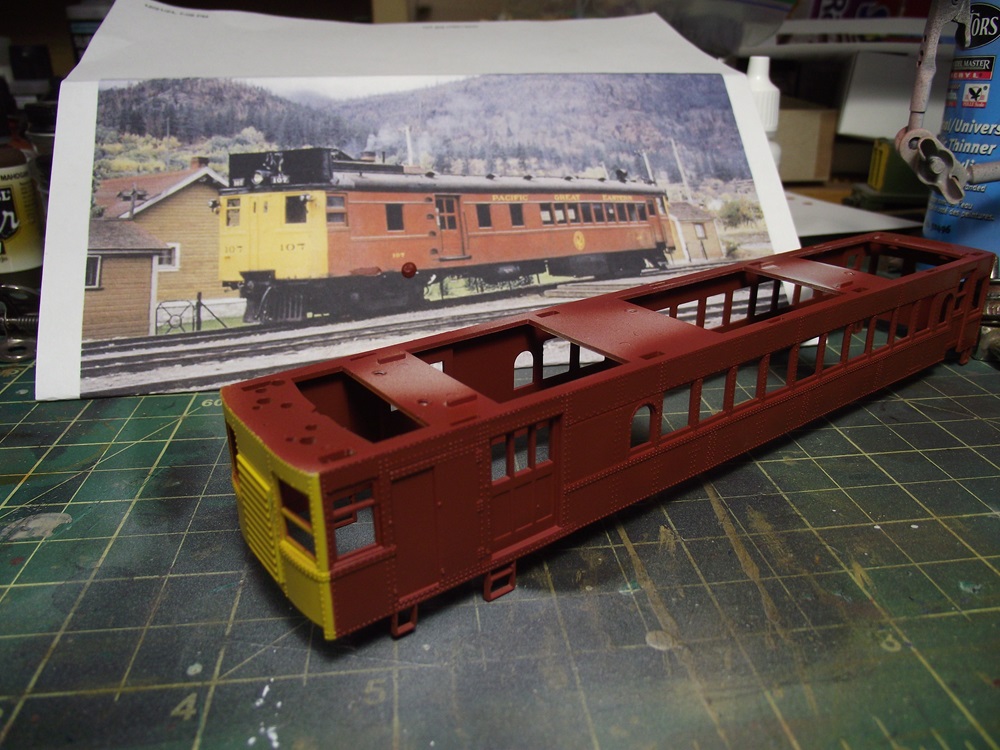
   

I did my usual painting proceedure, strip the original paint, primer in a neutral gray. I used Vallejo gold yellow on the nose, masked that and then I used Badger's light tusan on the rest of the model. I'm pretty happy with how it turned out. 
I should be able to decal it soon, then turn my attention to the other two engines that will also be in the early PGE scheme, but much brighter.
Reply
#2
The only sad thing about your work is that another Ma and Pa asset is gone... I reside in a village in Maryland with one of the only remaining Maryland and Pennsylvania stations still standing. I'm about 2 miles from the overgrown mainline, of which about 8 miles have been converted to a walking trail.

Another beautiful paint job, Glen! I'm looking forward to seeing the engines as well!
Check out my "Rainbows in the Gorge" website: http://morristhemoosetm.wixsite.com/rainbows
Reply
#3
Sorry about the Ma and Pa removal. Around here, the paint scheme isn't very popular as we're on the other side of the continent.
I'll be decaling the doodlebug and starting on the other two engines by the weekend.
Reply
#4
...nor is it popular down here, Glen - even in the heart of Ma and Pa country!  Most people here in Baltimore, Harford and York counties don't even know that the railroad ever existed.  It had a crazy and nomadic history, and was really two railroads that joined forces almost by accident.  Right on the border of the two states there was a slate quarry and their product was in demand in both states and for customers of both railroads.  Once demand dried up and Interstate 83 was constructed, the railroad was doomed.  It's a familiar story driven by economics.  The only real sadness for the passing of the railroad was the nature of the route - it went through beautiful countryside in an incredible mixture of crazy turns and steep inclines, more like a roller coaster than a railroad.
Check out my "Rainbows in the Gorge" website: http://morristhemoosetm.wixsite.com/rainbows
Reply
#5
We had a rail line through my part of the country that was abandonned starting in the late 50's until the late 80's. It's now a hiking/biking trail. Google 'Kettle Valley Railway' to see more.

I decaled the doodlebug today:


The decals came from Black Cat. They are PGE passenger car decals but give you the lettering that you would need for the doodlebug as well except:


The front tuscan numbers. I had an old CDS dry transfer set that had them so I was able to complete the lettering. I sprayed the car down with Vallejo matt clear and it's ready to be reassembled. I can't reassemble the entire car though. The front truck is at the owner's place and so I have to leave the roof off so he can snap that back in without the hassle of removing the roof again.

I did start on the other two PGE engines though:


A bachmann 70 tonner


And a Kato RSC-2

Both will be repainted in the Orange/Yellow PGE scheme, plus adding the details onto the RSC-3.
PGE had several 70 tonner engines. They were some of the first diesels that they aquired and they usually ran them in pairs.
On the other hand PGE didn't own any RSC-2's but they did own RSC-3's. They were intially bought during their construction period for their ability to handle light rail, due to the A-1-a trucks. After construction was done they were re-trucked into RS-3's using B-B trucks.
Reply
#6
The decals and paint look fabulous on that doodlebug - a lot better than the no-frills Ma and Pa livery. Looking forward to the rest. The Kettle Valley looks like a fabulous place to bike - I'm thinking of putting that on my retirement bucket list along with a trip out to Alberta.
Check out my "Rainbows in the Gorge" website: http://morristhemoosetm.wixsite.com/rainbows
Reply
#7
Have you heard the song P.G.E.? It's on an old LP called Just for a Lark by the Chanteclaires. I think my copy was $1.49. (old as over 60 years ago)
David
Moderato ma non troppo
Perth & Exeter Railway Company
Esquesing & Chinguacousy Radial Railway
In model railroading, there are between six and two hundred ways of performing a given task.
Most modellers can get two of them to work.
Reply
#8
I disassembled the 70 tonner, taking pictures as I went:


to remove the shell, you first need to remove the one screw holding the fuel tank on, then there are two screws holding the body onto the chassis. 
Taking the handrails off is quite the challenge as they are glued in from the underside of the shell. I used a chisel blade on my x-acto knife to scrape the glue off before pushing the handrail tabs out of. 


It took about an hour to remove all the handrails with minimal breakage. I also had to fish the window glass out of the cab but the headlight glass was glued in so I had to drill them out and I'll replace them later.


I soaked the shell in Isopropyl alcohol for a few hours and discouvered that the shell was molded in the bright red that you see. That will be fun to primer over later.

After that was done I went to work on the RSC-2


In contrast to the 70 tonner, it was very easy to strip down the Kato shell. The hardest part was the remval of the window glass with is a snap-fit and not glued. The tricky part came after:


The hand grabs are all on corners and curved which means you have to stretch them a bit to get them into their mounting holes. The intructions statethat no glue is needed as the grabs are a friction fit. After trying it their way for a bit, I decided it was just a bit easier to drill the holes out slightly larger and glue the grabs in from the back.


In addition to the grabs on the corners, the model also has coupler cut bars, lift rings and some more grabs on the pilots to install. Fortunetly none of these interfer with the paint or decal so I can place them before painting.
Now both engines are ready for primer.
Reply
#9
So I sprayed primer on the two engines and waited a few days for that to fully cure. In the meantime, I went through all my yellow paint to see what was the best match to the PGE yellow. I did find a mixing formula for the PGE paint but it used floquil paint which isn't produced anymore and I'd rather not use solvent based paint.
What I did do was to take 3x5 index cards and airbrush a sample on each:
   

Some were close, some were way off. I did find that Polly-s railbox yellow was the closest:
   

and with the blessing of the owner of the engines I started painting.


I'm pretty happy with how the color turned out. It took about 4-5 light coats for adequate coverage
I did have to put a strainer/filter on my airbrush pickup as the paint was a bit older and had some dried paint particles in it that would cog the airbrush tip. 


The day after I masked off the yellow and airbrushed black on the footboards and pilots on both engines. I'll probably start decaling this weekend.
Reply
#10
Like goldfiches! Awesome paint job.
Check out my "Rainbows in the Gorge" website: http://morristhemoosetm.wixsite.com/rainbows
Reply
#11
I decaled both engines:
   

The decals are from a company called Black Cat decals. I did have a few problems with getting the stripe decals to settle down properly. I tried using mircoscale's microset and microsol but it eventually took some old Walthers Solvaset to di the job. Something about the green stripe decal made it extra tough.


running the decals across the radiator grills was also a challenge. I fist used the solvaset  to make sure they stuck to the tops of the louvers, then I used a razor blade to cut them between the vanes. Then I soaked them with solvaset again to make the sides set against the edges of the vanes.


After the decal were done I sparyed a gloss clear to seal the decals, followed but a flat clear a few days later.
While waiting for the clear coats to dry, I finished my part of re-assembling the gas-electric:


The windows were a challenge as the window strips didn't want to go back in on piece so I had to cut 2-3 windows out of the strips at a time to get them to fit. I them re-attached the repaired roof.
Reply
#12
Decals over radiator grills is something I would never think to attempt. Magnificent work as always.
Check out my "Rainbows in the Gorge" website: http://morristhemoosetm.wixsite.com/rainbows
Reply
#13
Awesome job. They are so good I almost would like to have them but I don't think they will fit into Pennsylvania coal country.
Tom
Silence is golden but Duct tape is silver
Ridley Keystone & Mountain Railroad
My Rail Images Gallery
Reply
#14
Glen:
A link to The PGE Song.
https://vfss.ca/2021/09/30/the-pge-song/

(no video with it.)
David
Moderato ma non troppo
Perth & Exeter Railway Company
Esquesing & Chinguacousy Radial Railway
In model railroading, there are between six and two hundred ways of performing a given task.
Most modellers can get two of them to work.
Reply
#15
Thank you everyone.
With the painting done, all that was left was some detail painting and re-assembly
   

The 70 tonner had stainless headlight housings so I masked around them and hand painted.


I reassembled the 70 tonner first. I did have to open up the mounting holes for the handrails just a bit and then they just dropped right in. I did something a bit different this time and used matt medium to secure the handrails and other details down. It ended up gripping very well and it dries flat and almost invisible. 
The window glass in both engines was a challenge as they are a friction fit.


The RSC-2 went together a bit easier with the handrails slipping in with no real difficulty. I did have to use cut-down Kadee coupler boxes so I could convert the engine from the horn-hook couplers.

I do have an atlas RS-11 that I have plans to convert to a PGE RS-18 in the future.
Reply


Forum Jump:


Users browsing this thread: