09-04-2011, 04:36 PM
Made a little bit of progress today. I thought that if I wrote down a list of tasks to accomplish, I would be able to skip the "thinking" step that seems to drain so much of my time and make leaps and bounds in my progress - I was wrong. Oh well, at least there's no guessing as I go along.
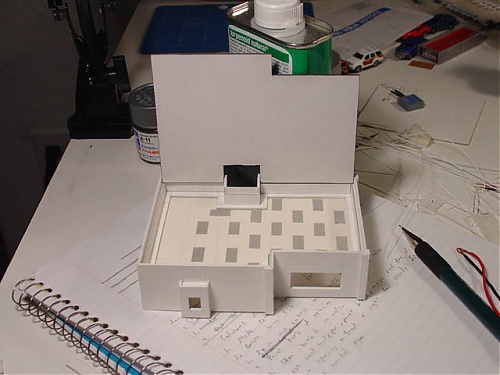
In this photo, you see the simulated ceiling tile. Basically, it's just a piece of poster board with holes cut out, painted an ivory color, then lines drawn over it with a black fine point Sharpie. There is a layer of thin translucent tracing paper glued to the backside. This helps disperse the light evenly, even with as little as a single LED.
In this picture, you can see that "attic crawlspace." It's 5/16" of room between the ceiling and the removable roof piece. This should be adequate space for whatever set-up I decide to go with in placing the lights and wiring.
Thanks folks. Val, I tried the embossing trick, but the bricks are so small that you can't tell it apart from one that's not embossed. (I did this on some scrap pieces.) At any rate, it's more work than I care to do so I'm just putting the bricks on straight from the printer.
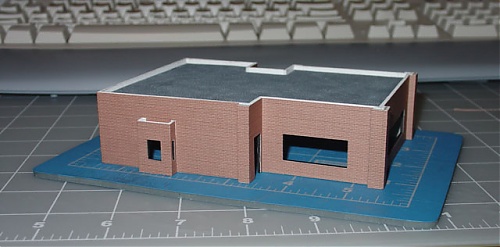
I first gave the brick print out a healthy dose of fixative, then I cut it into 33mm strips (the height of the building). I measure a piece I am going to put, then hold it in place with a piece of cardstock while I trace any openings from the backside. When I cut them out, I make sure to account for the thickness of the pencil and the tracing. Here is a sample of the results. Is this starting to look like a Wendy's?
(You never said a working N scale one )

Made a bit more progress. Did a lot of this during the chats tonight, but it went a lot quicker when I left to concentrate fully on this. How goes the spackling, Val?
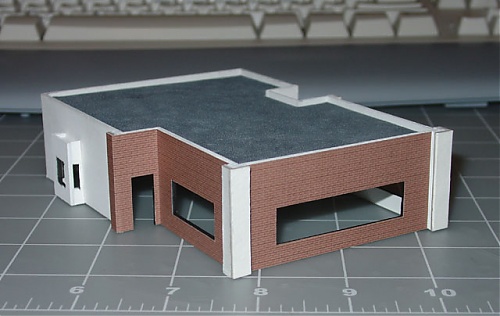
The "brick veneers" are all glued in place. I'm ready to start detailing the exterior. This phase of the project was really enjoyable, as the building seemed to make leaps and bounds in progress with minor effort put in - this part was kind of relaxing and easy going.
MarkB, I straightened out the wall on one of my research photos, then took a section of 2 bricks and tiled them endlessly to the size I needed, and the printed them out.
Dash10, the fixative I have is 10 years old! I doubt it's around today in this brand, but it's called Patricia Nimrocks Clear Acrylic Sealer MATTE. I imagine it's the same stuff that we know as "dullcote." It's purpose is to spray on charcoal or pencil drawings one they are done to protect from smudging, hence "fixing" them permanently.
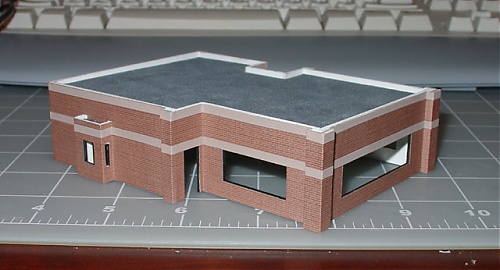
OK, made a little bit of progress. These stripes were so tedious! And to think I still have a couple more to do. Well, I haven't posted any progress on this lately, so I thought I would start with this.
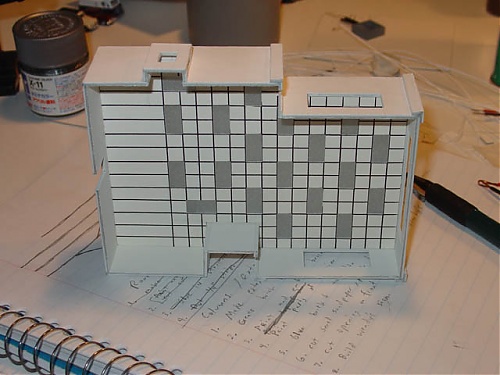
In this photo, you see the simulated ceiling tile. Basically, it's just a piece of poster board with holes cut out, painted an ivory color, then lines drawn over it with a black fine point Sharpie. There is a layer of thin translucent tracing paper glued to the backside. This helps disperse the light evenly, even with as little as a single LED.
In this picture, you can see that "attic crawlspace." It's 5/16" of room between the ceiling and the removable roof piece. This should be adequate space for whatever set-up I decide to go with in placing the lights and wiring.
Thanks folks. Val, I tried the embossing trick, but the bricks are so small that you can't tell it apart from one that's not embossed. (I did this on some scrap pieces.) At any rate, it's more work than I care to do so I'm just putting the bricks on straight from the printer.
I first gave the brick print out a healthy dose of fixative, then I cut it into 33mm strips (the height of the building). I measure a piece I am going to put, then hold it in place with a piece of cardstock while I trace any openings from the backside. When I cut them out, I make sure to account for the thickness of the pencil and the tracing. Here is a sample of the results. Is this starting to look like a Wendy's?
Quote:Originally posted by ezdaysActually I can! You see, every night, they empty out the frosty goop and store it in the walk-in fridge for tomorrow. Then they run sanitizer through the machine a couple times until it's thoroughly clean, then they disassemble the Frosty Machines and send them to the guy in the back on dish duty. Once all nice and shiny clean, they get put into the reservoir on the machine until morning when the cashier assembles it, loads the frosty goop back in, and turns the machine on. Since I've worked every position, I am pretty qualified.
That is really impressive. Can't wait to see if you can build a working Frosty machine though....

(You never said a working N scale one )


Made a bit more progress. Did a lot of this during the chats tonight, but it went a lot quicker when I left to concentrate fully on this. How goes the spackling, Val?
The "brick veneers" are all glued in place. I'm ready to start detailing the exterior. This phase of the project was really enjoyable, as the building seemed to make leaps and bounds in progress with minor effort put in - this part was kind of relaxing and easy going.
MarkB, I straightened out the wall on one of my research photos, then took a section of 2 bricks and tiled them endlessly to the size I needed, and the printed them out.
Dash10, the fixative I have is 10 years old! I doubt it's around today in this brand, but it's called Patricia Nimrocks Clear Acrylic Sealer MATTE. I imagine it's the same stuff that we know as "dullcote." It's purpose is to spray on charcoal or pencil drawings one they are done to protect from smudging, hence "fixing" them permanently.
OK, made a little bit of progress. These stripes were so tedious! And to think I still have a couple more to do. Well, I haven't posted any progress on this lately, so I thought I would start with this.


