09-04-2011, 04:43 PM
Val, I think I have gotten better at "striping". At any rate, it's not as tedious as it was before. I just make longer pieces!
Ron, I got lucky with that, all I did was start with white, then add brown until it was "close enough". I matched it on the screen and it looked OK to me, but when I checked other photos, it looked a little off. Oh well. The "Good Enough" rule applies here.
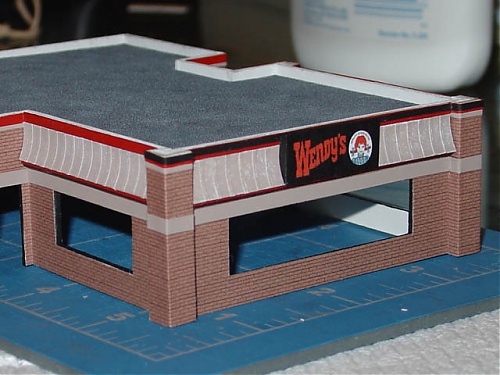
Started working on the faux roof that is trademark to Wendy's. It wasn't as hard as I thought it would be. It's just built up stuff of card stock, poster board, and paper.

Oops! Didn't see the questions/new posts... sorry I didn't respond. I started a new job this week and have a bunch of other activities going on that I just haven't had much time to spend on this project.
Mojo pretty much nailed the reason I use fixative. It's sprayed on the paper to coat it with a protective finish. As an added bonus, it gives the bricks a glossy sheen that make them look painted, which in this case, they are.
My new job is in downtown, and there's a Wendy's near by that I noticed has the "swoopy" roof line all the way around, not just around the dining area like this one does. Also, they have less ground space, so a lot of stuff is on the roof! Parking there is rather tight, too.
Charlie, to answer your question: I did study Architecture, but I never finished it. I've got an associates degree only. If my "5-year plan" falls into place, I might go back and finish it.
Hey guys, yep... work on this has pretty much halted since I started my job. I've got nothing planned for tomorrow, so hopefully I can work on this a little to get the momentum going. (Usually that's all it takes to get going at full speed...)
I use the fixative just as a means to "harden" the paper a bit. It gives it a certain stiffness that helps it keep it's edges and keeps the graphics from rubbing off from excessive handling (which is inevitable when working on a model - as you turn it this way and that way to examine it from different angles).
It hadn't occurred to me to use hairspray. I'm only using this fixative because I happened to have some left overs that is almost 10 years old! It dates back to when I was in college! The can is almost full!
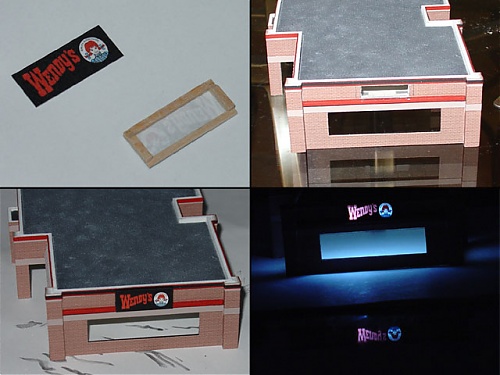
Ok, as promised, I did work a little bit on the Wendy's today. I wanted it to have a back-lit sign so I had to think up a way to do it as small as possible. Here's what I came up with:
First I printed out the wendy's logo on some paper twice... one in full color, and another in black and white (leaving the color parts out). I glued these two together using spray adhesive so that the black becomes more solid. I sprayed it heavily with fixative to give it some strength. (This was actually done months ago... I just finally got around to using them!)
Next, I took some wood and made a small frame around the perimeter of the sign. Rather than make an encasement (as I did for the Chevron) I opted to glue the wood directly to the sign. I had to carve out some odd shapes to accomodate the stripes around the top of the building. Once this was made, I painted it black.
Once I had this completed, I transfered the size and shape of it to the building and cut out the opening. This was very much a pain as I had to be careful when handling the model but apply strength because the cardstock is rather thick! The final step was gluing it to the building.
In the last picture, you see what it looks like lit up from behind using 2 small white LEDs. I held them in place with my hand while taking the picture - they will be secured a little better when the model is complete. Anyway, that's all I got for now!

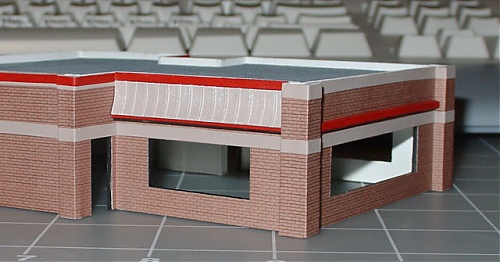
Progress is kind of slow-going, but I'm glad to have picked it back up again! I've finished the swoopy roof bit around the front of the building. Next on the to-do list is finish the stripes around the roofline and then add doors and windows. Then it's on to the interior.

Ron, I got lucky with that, all I did was start with white, then add brown until it was "close enough". I matched it on the screen and it looked OK to me, but when I checked other photos, it looked a little off. Oh well. The "Good Enough" rule applies here.
Started working on the faux roof that is trademark to Wendy's. It wasn't as hard as I thought it would be. It's just built up stuff of card stock, poster board, and paper.
Oops! Didn't see the questions/new posts... sorry I didn't respond. I started a new job this week and have a bunch of other activities going on that I just haven't had much time to spend on this project.
Mojo pretty much nailed the reason I use fixative. It's sprayed on the paper to coat it with a protective finish. As an added bonus, it gives the bricks a glossy sheen that make them look painted, which in this case, they are.
My new job is in downtown, and there's a Wendy's near by that I noticed has the "swoopy" roof line all the way around, not just around the dining area like this one does. Also, they have less ground space, so a lot of stuff is on the roof! Parking there is rather tight, too.
Charlie, to answer your question: I did study Architecture, but I never finished it. I've got an associates degree only. If my "5-year plan" falls into place, I might go back and finish it.

Hey guys, yep... work on this has pretty much halted since I started my job. I've got nothing planned for tomorrow, so hopefully I can work on this a little to get the momentum going. (Usually that's all it takes to get going at full speed...)
I use the fixative just as a means to "harden" the paper a bit. It gives it a certain stiffness that helps it keep it's edges and keeps the graphics from rubbing off from excessive handling (which is inevitable when working on a model - as you turn it this way and that way to examine it from different angles).
It hadn't occurred to me to use hairspray. I'm only using this fixative because I happened to have some left overs that is almost 10 years old! It dates back to when I was in college! The can is almost full!
Ok, as promised, I did work a little bit on the Wendy's today. I wanted it to have a back-lit sign so I had to think up a way to do it as small as possible. Here's what I came up with:
First I printed out the wendy's logo on some paper twice... one in full color, and another in black and white (leaving the color parts out). I glued these two together using spray adhesive so that the black becomes more solid. I sprayed it heavily with fixative to give it some strength. (This was actually done months ago... I just finally got around to using them!)
Next, I took some wood and made a small frame around the perimeter of the sign. Rather than make an encasement (as I did for the Chevron) I opted to glue the wood directly to the sign. I had to carve out some odd shapes to accomodate the stripes around the top of the building. Once this was made, I painted it black.

Once I had this completed, I transfered the size and shape of it to the building and cut out the opening. This was very much a pain as I had to be careful when handling the model but apply strength because the cardstock is rather thick! The final step was gluing it to the building.
In the last picture, you see what it looks like lit up from behind using 2 small white LEDs. I held them in place with my hand while taking the picture - they will be secured a little better when the model is complete. Anyway, that's all I got for now!

Progress is kind of slow-going, but I'm glad to have picked it back up again! I've finished the swoopy roof bit around the front of the building. Next on the to-do list is finish the stripes around the roofline and then add doors and windows. Then it's on to the interior.


