Posts: 1,256
Threads: 20
Joined: Jun 2022
...and it will be... YOURS! I always say (and this applies to much more than model railroading), that all of my projects have at least one flaw. I may be the only one who sees it, or is aware of it, but I know it's not perfect. Take pride in at least the attempt. If you like the end result and can live with it, the experience, blood, sweat and tears is all worth it. I'm sure I'm not the only one interested in seeing those photos.
Posts: 1,315
Threads: 34
Joined: Mar 2009
(10-22-2025, 11:41 AM)TMo Wrote: ...and it will be... YOURS! I always say (and this applies to much more than model railroading), that all of my projects have at least one flaw. I may be the only one who sees it, or is aware of it, but I know it's not perfect. Take pride in at least the attempt. If you like the end result and can live with it, the experience, blood, sweat and tears is all worth it. I'm sure I'm not the only one interested in seeing those photos.
Yes I do understand that. Just worried as this is the first big thing I've ever done. Here is what I have so far. The center of the cab was moved to the opposite end to make sure it was even with that end as well as the other end. The hole in the center of the cab was where I removed a section to replace with polystyrene. Once the paint arrives this Friday, it will be painted. I don't think its turning out to badly.

Matt
Conrail's Blairsville Cutoff - A Fictitious Alternative Route Over The Allegheny Mountains From Blairsville, Pa to Cresson, Pa
Milepost 363.8 to Milepost 338.9
Posts: 1,315
Threads: 34
Joined: Mar 2009
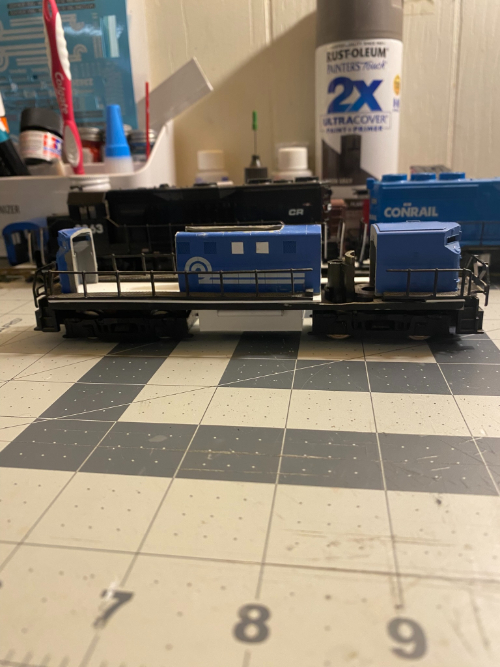
Making progress little by little. Here is another small update. I did get one side cut and in place and also painted the underneath black. Tomorrow will consist of getting the other side cut and everything glued together on the back end. Once that is all in place I will then more onto cutting the front-middle section out in polystyrene and gluing it into place. I'm hoping to have that all done by Friday as this weekend is a busy one for me and my family.

Matt
Conrail's Blairsville Cutoff - A Fictitious Alternative Route Over The Allegheny Mountains From Blairsville, Pa to Cresson, Pa
Milepost 363.8 to Milepost 338.9
Posts: 1,315
Threads: 34
Joined: Mar 2009
After looking at the height of this, I'm thinking I need to cut some more off of it to make it the correct height. If I'm not mistake the slug was even with the nose of any of the GP40's, SD38's, etc etc and this is just a little bit higher than the nose of my GP40. Am I wrong or am I right?

Matt
Conrail's Blairsville Cutoff - A Fictitious Alternative Route Over The Allegheny Mountains From Blairsville, Pa to Cresson, Pa
Milepost 363.8 to Milepost 338.9
Posts: 10,830
Threads: 248
Joined: Dec 2008
Posts: 1,355
Threads: 149
Joined: Jan 2009
interesting project fallen flags has a lot of photos of slugs. this puts me in mind of a slug project I did many years ago someone gave me a box of old Varney SW units that had zinc rot I managed to get a cab unit out of them and used the rest of them to make a calf the sad part is after some years the dreaded zinc rot did them in.
but still an interesting build coming along nicely.
Jim
Posts: 10,830
Threads: 248
Joined: Dec 2008
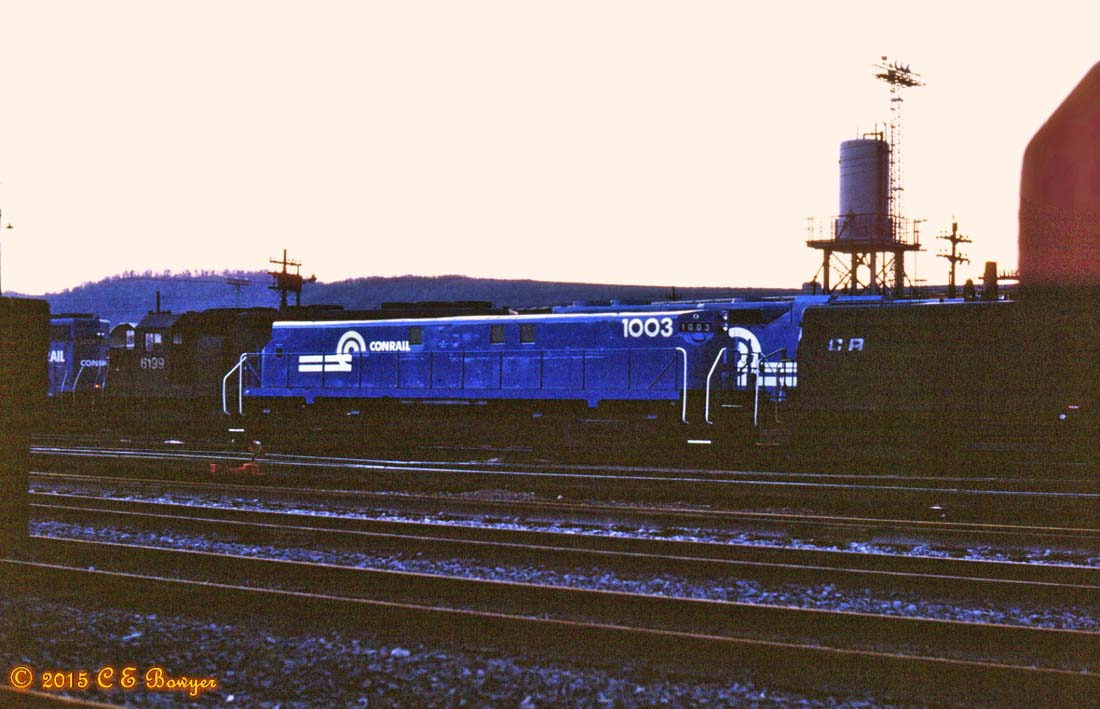
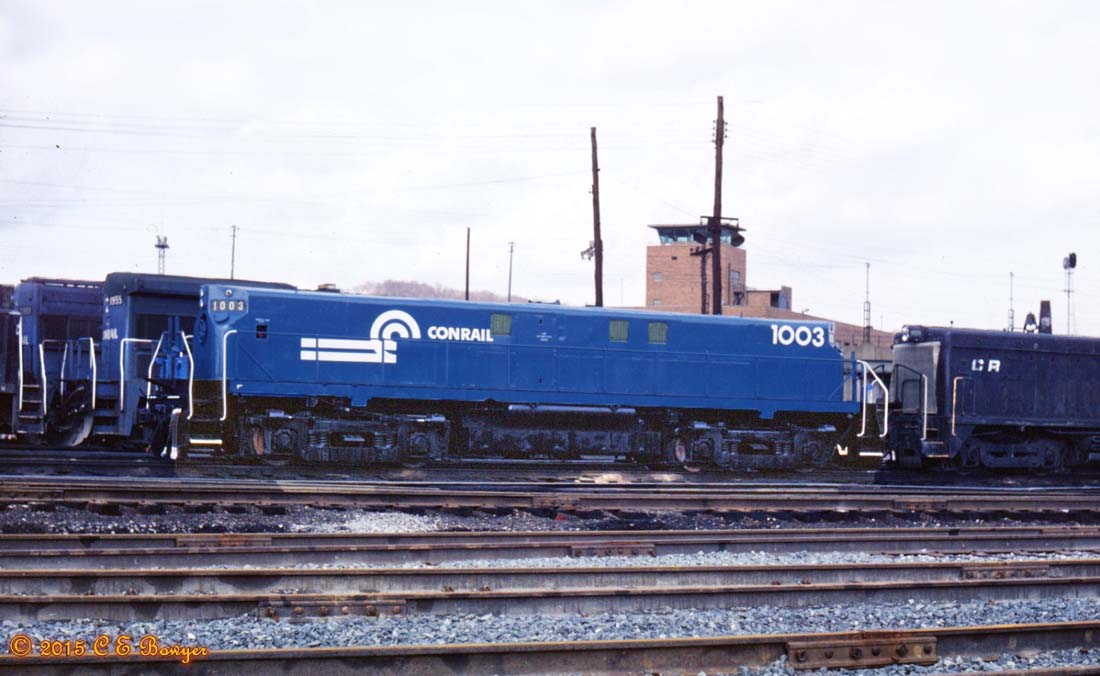
Matt, here are the only photos I have of the 4 axle slugs.

Charlie
Posts: 5,243
Threads: 362
Joined: Jan 2009
Matt,
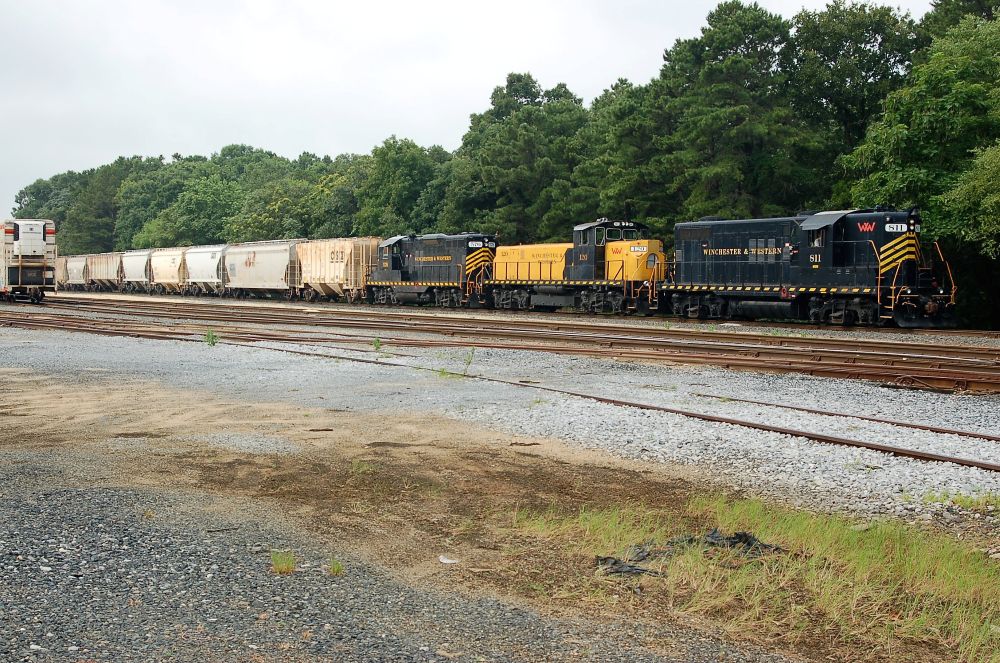
This is WW slug between an GP10 and GP9.
Bruce

Posts: 1,315
Threads: 34
Joined: Mar 2009
Thank You Everyone. All the help is much appreciated.
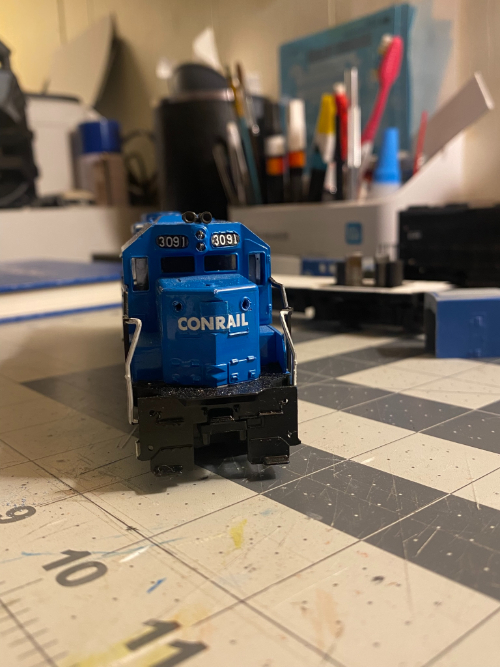
I've been busy cutting it down some more and started to sand and paint the parts that are ready once every other piece is completed. I'm also including a mock-up of the shell on the frame. You can see the height difference but that will all be flush here soon.
Also I got the front of the nose painted on the GP40 and got the final decal added. This one is in the final stages and should be completed within the next week.


Matt
Conrail's Blairsville Cutoff - A Fictitious Alternative Route Over The Allegheny Mountains From Blairsville, Pa to Cresson, Pa
Milepost 363.8 to Milepost 338.9
Posts: 1,315
Threads: 34
Joined: Mar 2009
Just a few updates:
The GP40 is nearing completion. I added a horn, painted the handrails blue, got the snowplow ordered that goes on the front. I have seen photo's of it with the snowplow on the front but never seen a rear shot of it. I also need to get the front grab irons or find the ones that I took off. If I remember where I put them.
Next is a slight update to the slug. I have glued part of the shell together and have it sitting on the frame. I did have to sand the paint off of it since the Conrail Blue is much darker than what was on the shell. I have also added a access door to the one side.
I am also including a picture of the Conrail Shops that will be on the layout.
GP40 #3091

GP40 #3091

Conrail Shops
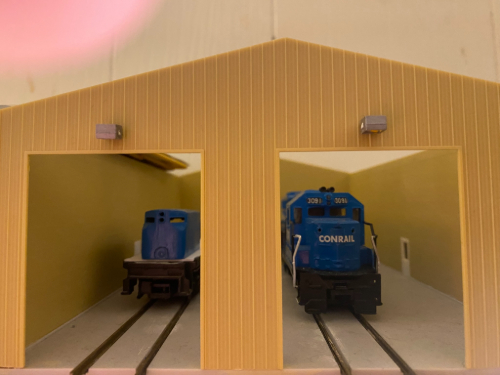
MT-4 Slug

Matt
Conrail's Blairsville Cutoff - A Fictitious Alternative Route Over The Allegheny Mountains From Blairsville, Pa to Cresson, Pa
Milepost 363.8 to Milepost 338.9
Posts: 1,315
Threads: 34
Joined: Mar 2009
I removed the second rear light off the back of the Bachmann GP40. Now it looks more like the real 3091. Now what I did to fill in the hole was something I've never seen before and wanted to give it a try. So before I did that, I tested the idea I had on a junk piece of rolling stock. What I did was, I used joint compound to fill in a hole and waited for it to dry. I then sanded it down and painted. Fingers crossed it turned out the way I wanted and it did. So now that I knew it would work, I filled the hole in with joint compound and it will dry over night. So come tomorrow the rear of 3091 will be painted. It may take a couple coats of paint to cover it but now it doesn't have that god awful second light that never existed on this engine.

Matt
Conrail's Blairsville Cutoff - A Fictitious Alternative Route Over The Allegheny Mountains From Blairsville, Pa to Cresson, Pa
Milepost 363.8 to Milepost 338.9
Posts: 1,315
Threads: 34
Joined: Mar 2009
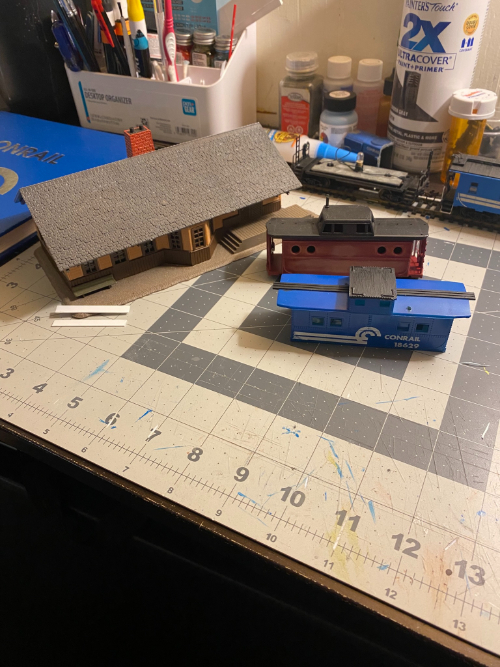
A couple other projects that are on the workbench besides the MT-4 Slug & GP40. The station is getting station name signs painted and applied to each end, the ex-PRR N5C is being stripped down and will become Conrail N5C #23014 and Conrail #18629 is having it's roof painted black and some other modifications done.
Work is still being done on the GP40 & MT-4 Slug at this time as well. I wanted to line up a couple more projects to keep me going through the winter months that are fast approaching. If my order from eBay gets here tomorrow, the plows will be painted and added to the GP40 making it 99% complete. The only thing that is left to do after that is get the front marker lights ( probably going to either order them or go to the hobby shop ) and get those on the front. I haven't found any online yet that I think would be a good fit for it but I could be wrong.
Caboose #18629 is my fiance's dad's and after doing some research today, I found that at least two of the windows were covered so I cut out some polystyrene, painted them and glued them in place while the cupola dried after being painted. Caboose #23014 will require some extensive work ( as I found out with the Bowser models ) because the ends do not sit completely in the holes and the roof is a little out of shape. With this one, I want to try and add some interior to it but haven't made up my mind 100% yet.
The Station in the picture was originally bought to go on the Cambria & Indiana RR but after much thought, I've made up my mind to model Conrail and have the C&I as a branch line. I haven't came up with a freelanced name yet for the railroad but over time I will. As of right now this is all I have for an update for all of you. Have a great weekend and stay warm if it's cold where you are.
Matt
Conrail's Blairsville Cutoff - A Fictitious Alternative Route Over The Allegheny Mountains From Blairsville, Pa to Cresson, Pa
Milepost 363.8 to Milepost 338.9
Posts: 10,830
Threads: 248
Joined: Dec 2008
Going from a short line to a class one to model is a pitfall to model railroading, there is never enough to model. Conrail pretty much allows anything. Now you need to hit the lottery so you can build a big enough building (which will never be big enough) 
Charlie
Posts: 1,315
Threads: 34
Joined: Mar 2009
(11-01-2025, 09:56 AM)Charlie B Wrote: Going from a short line to a class one to model is a pitfall to model railroading, there is never enough to model. Conrail pretty much allows anything. Now you need to hit the lottery so you can build a big enough building (which will never be big enough) 
Charlie
To hit the lottery would be amazing but can't win if I don't play. You're right on the big enough. You can have a big building but run out of room building especially with model railroading. I've made the decision to just have the branch after sitting back and wanting to build a freelanced conrail railroad.
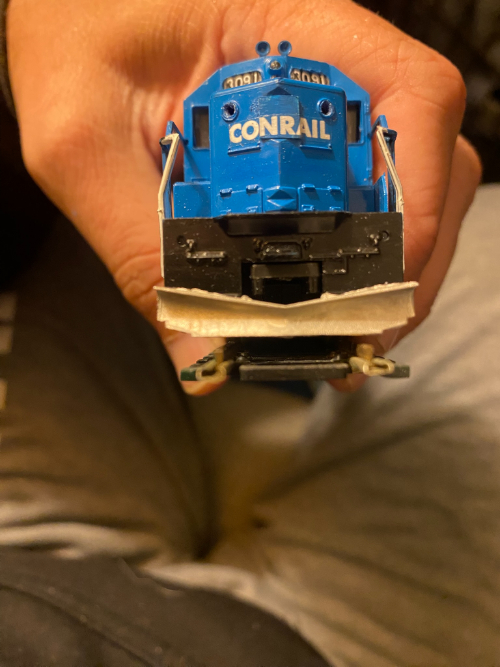
Now onto this below. I got the plows today in the mail and I want to make sure that everything is correct before cementing them in place. I have the height correct for above the rail but what is making me second guess is the gap which you will see below. Does this gap have to be a little smaller and the plow flush with the front or is there a slight gap?
The gap

The height
Matt
Conrail's Blairsville Cutoff - A Fictitious Alternative Route Over The Allegheny Mountains From Blairsville, Pa to Cresson, Pa
Milepost 363.8 to Milepost 338.9
Posts: 2,544
Threads: 63
Joined: Dec 2008
Matt: I have claimed that the probability of winning the lottery is the same, to 6 decimal places, whether you buy a ticket or not.
Tis will be left as an exercise for the student of first year statistics.
David
Moderato ma non troppo
Perth & Exeter Railway Company
Esquesing & Chinguacousy Radial Railway
In model railroading, there are between six and two hundred ways of performing a given task.
Most modellers can get two of them to work.
|


