Rainbows in the Lehigh Valley Gorge
I'm doubling down on the brewery idea.  The Cannery is going to be a local distributing hub for Pilsener, and the main brewery will be housed in the Cream City complex.  Beer... beer.... beer!

   
Check out my "Rainbows in the Gorge" website: http://morristhemoosetm.wixsite.com/rainbows
Reply
Well, the basics of the Cannery have now been completed - structure, roof, details, loading dock, stairs.  I still need to develop my signage for the building to make it understood that this is the Sales portion of the brewery.  I have some ideas, but they're going to wait until later this weekend.

Until then, a few pictures of the beast.

       
Check out my "Rainbows in the Gorge" website: http://morristhemoosetm.wixsite.com/rainbows
Reply
Todd, you are a wizard with these kits. Thanks for showing us what can be done with them. 
Charlie
Reply
Thanks, Charlie!  It's a bit of a labor of love, and I'm glad to share.

As I alluded to last night, I need to begin to convince the viewer that this is a beer distributor, and this particular one is peddling the beer made next door.

Clever has a sign that comes with this kit which is awesome, but it's for a peach and olive canning company - not peddling beer.  However, I like the scale of the sign, and I figure that I can mount it prominently on the peak of one of the roofs. 

The sign is built out of clapboard siding (light gray), and I looked at all of the kits I'd bought, but none of them were gray.  I then thought maybe I could print one of the brown or green buildings in grayscale through my printer.  Too dark.

I then thought I'd get the Windows Snipping Tool out, pull just the front of the sign out of the .pdf file that the kit came in and import it into Microsoft Paint.  I then selected a portion of the boards that didn't have the peach, olive or "Dee's Tassioraus Canning Co." on it, and pasted multiples of that planking over the peach, olive and text.  Wahlah!  After figuring out how to print to the real size and then scaling it to the right size, I now have a blank sign (shown just above the kit sign in the photo below).
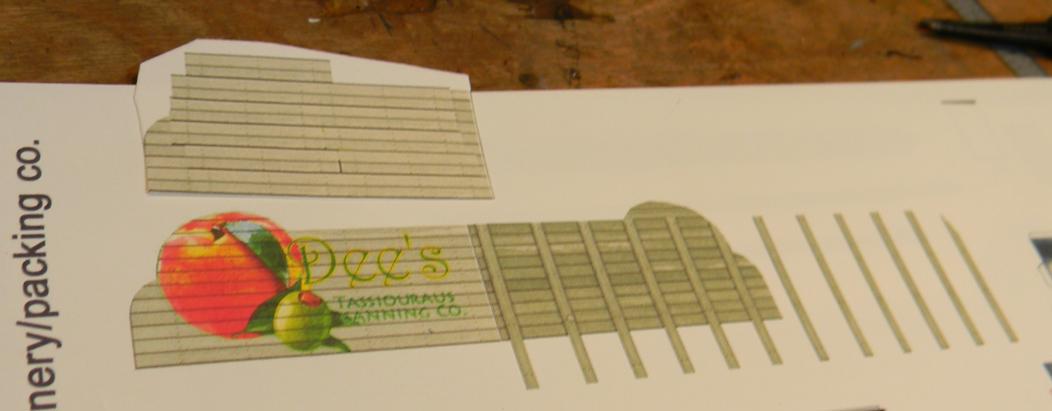


In the past, I've built a stencil and hand painted my sign (like I did with the Duplan Silk Mill), but I thought, why not cut to the chase, and while I have a digital version of the background of the sign, why don't I just add my text and graphics to it in Paint?  (See, sometime answers come at the appropriate time...)

I made the circular logo background transparent and resized it to the same size as the peach.  I then found a picture of an old circular serving tray advertising Hazleton Pilsener Beer online and pulled the center of it using the selection tool in the picture editor, and made that a rectangular sign to add next to the circular logo.  Printed that and cut around the circular logo.  Whalah #2!  Instant sign.


Time to cut it out and think about where on the Cannery to mount it.  That worked so well that I'll do some similar signage on the exterior of the building
Check out my "Rainbows in the Gorge" website: http://morristhemoosetm.wixsite.com/rainbows
Reply


Finished the roof-mounted sign late last night and this afternoon found some time to design a couple more signs - one to go up against one of the walls and the other to be mounted over the garage door...


Used the same clapboard template to build last night's sign and added text and Pilsener logos.  Found the right scale for what I wanted, printed them out on cardstock and then added a border to each of the two new signs and mounted them....

   
Check out my "Rainbows in the Gorge" website: http://morristhemoosetm.wixsite.com/rainbows
Reply
Well done. That came out very good.
Tom
Silence is golden but Duct tape is silver
Ridley Keystone & Mountain Railroad
My Rail Images Gallery
Reply
Thanks Tom!  It's a good looking building and would have a lot of potential uses on any layout.  

Had one of my coworkers fire up his 3D printer on Wednesday and he pumped out some HO scale pallets and kegs in a few minutes.  I said a lower resolution print was fine, but after looking at the pictures up close maybe I should have had him take more time and up the quality.  However, after they appeared at my desk in minutes, it makes me consider buying a 3d printer of my own.  I'll get the paints out sometime this weekend.

   
Check out my "Rainbows in the Gorge" website: http://morristhemoosetm.wixsite.com/rainbows
Reply
On to the Pilsener Brewery itself!  This will be an adaption of the Cream City Tool Works complex, which has 4 separate buildings which can be combined or excluded.  I'm building Building A first, which is an odd shaped single story with a smaller 2nd story.  Here's a look at one portion of one wall:


One neat new idea in this kit is the inclusion of "shiny windows".  In past Clever Kits there were suggestions to add clear window glazing in between window layers, but they've thoughtfully added a new option employing transparent tape.  The window units are three layers deep, so two of the layers get tape followed by the final layer of upper mullions and upper frame.  The photo below shows the taped frames before I got the knife out to remove the "white space" between all of the mullions.  Window units are probably the least favorite part of these kits, it's just really a lot of precise cutting to ensure a nice clean window, but the depth of this stuff is what convinces you that these kits are not just flat printouts.

     
Check out my "Rainbows in the Gorge" website: http://morristhemoosetm.wixsite.com/rainbows
Reply
Beginning to take shape.  This kit's a little odd in that the walls are spread over multiple pdf pages since in O-scale (that's the default) these walls are too long to fit on a single page.  HO scale gets scaled at 55% before it gets printed, so maybe getting the older HO scale kit (minus some of the details and printed with grayish brick) which includes all of the buildings (A through D) might have been the easiest and most cost-effective option.  HOWEVER, we soldier on!


Wall No. 4 (pictured below) includes provisions for a single story garage door, but this is supposed to be a brewery - there will be a lot of deliveries and a need to bring in large vats, etc.  I need a decent-sized door for that.  Back to one of my older buys and I collect the rollup door (on the right of the picture below).  Although the new door fits well in terms of width, it's not high enough to cover the 2nd floor door (what's the purpose of that anyway?), so I'll have to do some brick replacement for the 2nd story opening to complete the kitbash.

   
Check out my "Rainbows in the Gorge" website: http://morristhemoosetm.wixsite.com/rainbows
Reply
More loading bays the better.  On the opposite corner of the building I decided to put in an inset loading dock (courtesy of the Warehouse kit).  Individual wall construction is now complete, next will be a full assembly of the walls followed by the roof.  I'll be kicking around ideas for signage, maybe a big billboard on the roof.

   
Check out my "Rainbows in the Gorge" website: http://morristhemoosetm.wixsite.com/rainbows
Reply
The walls went together fairly quickly, so I moved on to parapets and roofing adding reinforcements as I went both to keep things plumb and square and to add some structural support.  For instance, the floor pages were multiple pieces of cardstock - I just cut a piece out to fit the profile of the structure and glued it right down.  This thing is pretty tight now, and all I have to add are a chimney and a couple of other detail pieces and do some touchups.  I still haven't finalized the sign idea.

           
Check out my "Rainbows in the Gorge" website: http://morristhemoosetm.wixsite.com/rainbows
Reply
Looks great. I am amazed at what you do with these kits.
Tom
Silence is golden but Duct tape is silver
Ridley Keystone & Mountain Railroad
My Rail Images Gallery
Reply
Thanks Tom!  I continue to say that if I can do it....   anyone can!  If I continue to get better at it...   anyone can! 

The Brewery complex is going to consist of Cream City Tool Works Buildings A (above) and B (which is similar and I'll have pictures coming probably sometime this weekend) with some add-ons and doodads.  First I want to get the buildings built and then figure out how many doodads I'll be adding based on the terrain and available free space around the buildings.  Building B is a smaller version of A with the same brick and details, so it should look like it was built at the same time.

The Brewery will be the last building built specifically for the Hazleton project (at least that's the current plan).  As soon as Building B is finished, I'm going to play around with the total space available to include modeling the terrain in and around the buildings - it'll be a bit of a jigsaw puzzle.  I'd hoped all of this would be part of the contest entry, but as I've said quite a few times now, I completely underestimated the amount of effort needed to devote to these buildings.
Check out my "Rainbows in the Gorge" website: http://morristhemoosetm.wixsite.com/rainbows
Reply
Things are coming along well!
————————————————————————————
Modeling the East Broad Top as it was between 1937-1942
~Amanda
Reply
Its quite informative to see one of these paper buildings come together.
Reply


Forum Jump:


Users browsing this thread: 1 Guest(s)