06-05-2009, 10:09 AM
** Redetailing of a Athearn USRA Mikado into a Pennsy L2s**
**This is going to be a ongoing kitbashing project. It starts today.
Athearn a few years ago released a USRA Mikado 2-8-2. I have a undecorated version G9001. I purchased it with the idea to make it a Pennsylvania railroad L2. The Pennsylvannia had 5 of these. For Pennsy that is just enough for testing purposes. I don't think they were to inpressed with them, but they didn't get rid of them. In 1947 4 were still their
** The only change from the USRA prototype was a high front headlight and the PRR style marker lights. It seams Alco the builder had no trouble makeing them this way. All the photos I've seen show them with this Pennsy change. BLI release is stock USRA. Athearns PRR 2-8-2 has the correct high headlight but not the right marker lights. My undec version has the center mounted headlight.
** Now what do I do. Do I also make the basic USRA loco by just appling the hand rails stock marker lights, whistle, and bell making the Ahtearn, BWI version of this locomotive. Lets look at the loco as it comes out of the box.

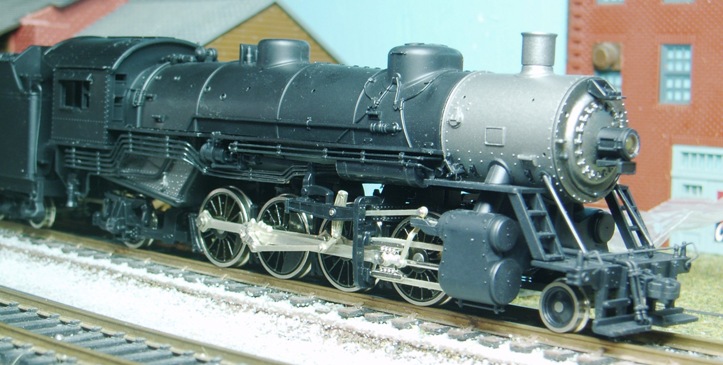
** Photo 1: The locomotive. When compairing it to photos, the gererator needs to move up to foward of the somke stack. The bracket at the smoke box door top is for the bell. It doesn't go here. The bell mounts on top the boiler between the sand and steam domes. The headlight need to move from it's center on the smoke box door to the door top where the bell bracket is. Maybe this bracket can be used in some way to hold the relocated headlight. The front marker lights are stock USRA lights, they are in the wrong location and need to be replaced. New Pennsy style lights need to be aquired and relocated down to the top of the front pilot . A round number board need to be aquired and placed in the center of the smoke box door. That is basicly it for the locomotive changes. The hand rails and whistle still need to be installed as per Athearn.

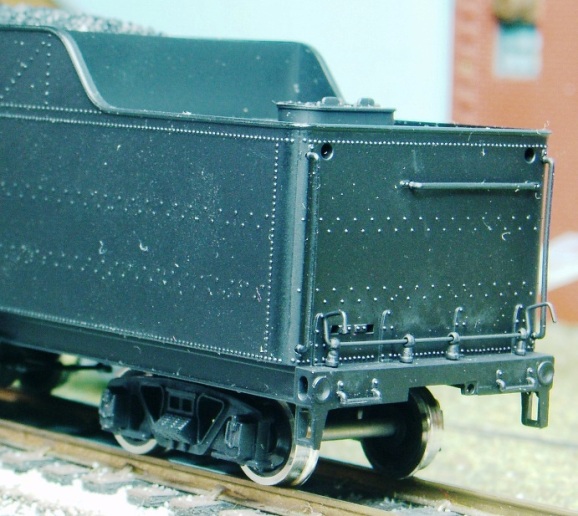
** Phot 2 : The Tender rear detail. The two holes for the marker light on the tender rear are like the two holes on the smoke box front. They present a problum,and need to be filled somehow. The Athearn ladder can be installed. New Pennsy style marker lights need to be aquired with a Pyile tender headlight. These need to to installed on the tender's top floor along the rear edge. The marker lights in the corrners, and the reverseing headlight close to center I think. I have no real photo showing the exact location. So as long as a photo doesn't exist, center sounds good for now.
** I'll contact Athearn first to see if the other boiler front is aviable.
** Bowser made the marker lights, rear tender headlight and number board. in their catalog they are the same for all their tenders and loco pilots. If I am to redo this loco these must be purchased. Now it is time to check with a hobby shop or Bowser.
Bowser parts :
Marker Lights 1 pr # 7500 ( I need two pairs )
Headlight # 90042 ( same light used for the tender. I need two )
Headlight Bracket # 90041 ( Maybe I can get the light with the bracket )
Other parts possiably needed ;
Generator # 32119
Bell # 90030
**This is going to be a ongoing kitbashing project. It starts today.
Athearn a few years ago released a USRA Mikado 2-8-2. I have a undecorated version G9001. I purchased it with the idea to make it a Pennsylvania railroad L2. The Pennsylvannia had 5 of these. For Pennsy that is just enough for testing purposes. I don't think they were to inpressed with them, but they didn't get rid of them. In 1947 4 were still their
** The only change from the USRA prototype was a high front headlight and the PRR style marker lights. It seams Alco the builder had no trouble makeing them this way. All the photos I've seen show them with this Pennsy change. BLI release is stock USRA. Athearns PRR 2-8-2 has the correct high headlight but not the right marker lights. My undec version has the center mounted headlight.
** Now what do I do. Do I also make the basic USRA loco by just appling the hand rails stock marker lights, whistle, and bell making the Ahtearn, BWI version of this locomotive. Lets look at the loco as it comes out of the box.
** Photo 1: The locomotive. When compairing it to photos, the gererator needs to move up to foward of the somke stack. The bracket at the smoke box door top is for the bell. It doesn't go here. The bell mounts on top the boiler between the sand and steam domes. The headlight need to move from it's center on the smoke box door to the door top where the bell bracket is. Maybe this bracket can be used in some way to hold the relocated headlight. The front marker lights are stock USRA lights, they are in the wrong location and need to be replaced. New Pennsy style lights need to be aquired and relocated down to the top of the front pilot . A round number board need to be aquired and placed in the center of the smoke box door. That is basicly it for the locomotive changes. The hand rails and whistle still need to be installed as per Athearn.
** Phot 2 : The Tender rear detail. The two holes for the marker light on the tender rear are like the two holes on the smoke box front. They present a problum,and need to be filled somehow. The Athearn ladder can be installed. New Pennsy style marker lights need to be aquired with a Pyile tender headlight. These need to to installed on the tender's top floor along the rear edge. The marker lights in the corrners, and the reverseing headlight close to center I think. I have no real photo showing the exact location. So as long as a photo doesn't exist, center sounds good for now.
** I'll contact Athearn first to see if the other boiler front is aviable.
** Bowser made the marker lights, rear tender headlight and number board. in their catalog they are the same for all their tenders and loco pilots. If I am to redo this loco these must be purchased. Now it is time to check with a hobby shop or Bowser.
Bowser parts :
Marker Lights 1 pr # 7500 ( I need two pairs )
Headlight # 90042 ( same light used for the tender. I need two )
Headlight Bracket # 90041 ( Maybe I can get the light with the bracket )
Other parts possiably needed ;
Generator # 32119
Bell # 90030
" It's a Heck of a Day " !!!!


 Where does it all come from/go to...?


