Posts: 446
Threads: 23
Joined: Mar 2009
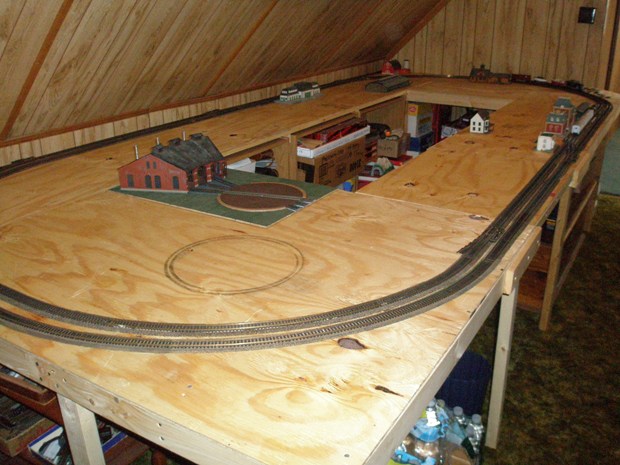
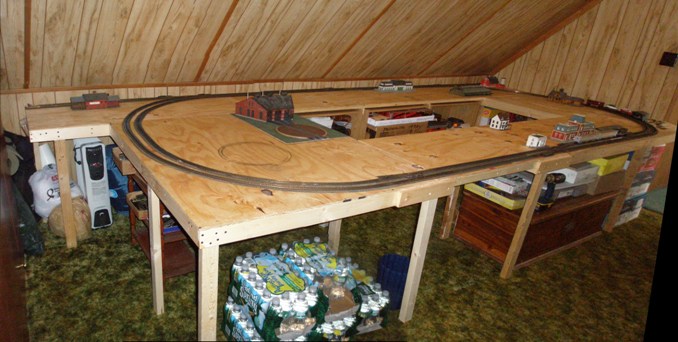
** I have not been to bussy here for awile. Their is a reason for this. That attic switching layout I have, that replaced my large basement layout, well I can't handle going back and forth, even if it has a purpose to deliver, and pick up railroad cars. I got to go round, and round! This necessitated a rebuild. My switcher layout was 2, 2'X8', of 3/8" plywood surfaceses. Put together longways to make a 2' X 16' switching layout. It was stiffened up and held together with 2" X6" X 8' boards. Their was not table legs or even table bases because of the 4 shelf units I have along that wall of the attic were used to support the layout. Well that is gone now!
** The new layout has kept the 2' X 16' deminsions, and location of that section but added to it. Their is a 3' X 2'6" addition. Also another 2' X 8' section. There is a 4' X 4'6" section and a removiable 2' X 2'6" section. I have made all new table supports as bases for this thing. That meant alot of carpentry work, noise, and sawdust. I did all the cutting and alot of the assembly in the basement. All the tables were made, then brought up to the attic where the legs were added. My table tops, to save cutting of large plywood sections, don't match my tables. The supplier of the wood products would give me one free cut of a 4X8 sheet of plywood with the purchase. This determined alot of the table top sizes. The only cutting of pylwood I did was a section, provided for me by the suppiler that was 4' X 3'6". I took a 1' length off, then cut the remainder in half. Also this 1' X 4' length had to be cut down to a 1' X 2'6" piece. This when added to one of the halfed two, 2' X 2'6" pieces became the 3' X 2'6" addition metioned above. The other 2' X 2'6" piece became the removiable section. it has all came together nicely. This is not a big layout surface, but it fits the attic. Also the tables have supplied so much underneath storage that the first thing my wife did was order draperies the cover from table top to floor. Of corse I get to put them on. This is what it looks like now with the two mainline loops added.
frank
PS. See you next saturday at the show in East Rutherford NJ.
" It's a Heck of a Day " !!!!
Posts: 992
Threads: 81
Joined: Dec 2008
That's a great start! Looking forward to seeing more!
Posts: 446
Threads: 23
Joined: Mar 2009
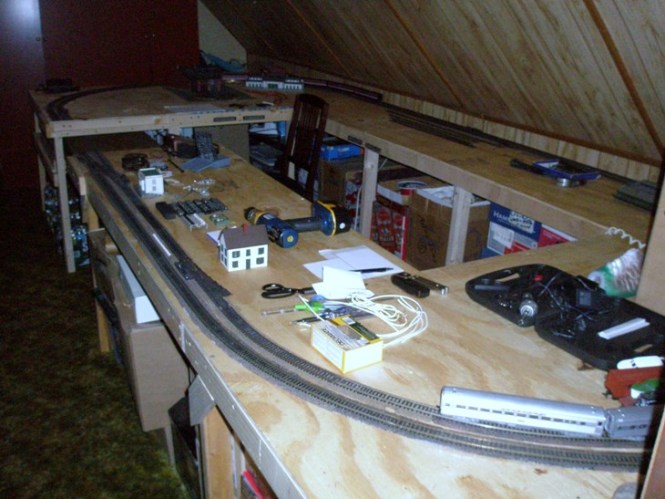
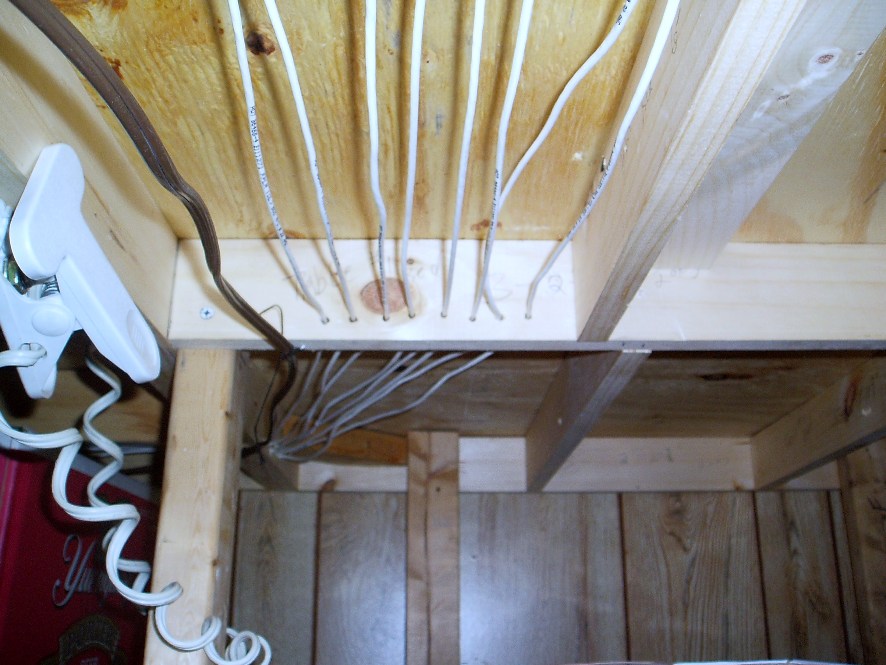
Here it is today. The removal section has a storage shelf. Their is extra braceing. And the underneath wireing is almost done.
frank
PS. See you next saturday at the show in East Rutherford NJ.

" It's a Heck of a Day " !!!!
Posts: 2,959
Threads: 158
Joined: Dec 2008
That's a real nice start. I hear ya about the the round and round vs back and forth. I have had "back and forth" switching layouts before, and found I would lose interest in the layout. Sometimes you just want to watch a train run and relax. But then again, I have had small round and round layouts before and gotten bored - seemed like they didn't have much of a purpose. I'm hoping you find pleasure in sitting on a chair in the middle of this one, relaxing, and watching two trains pass each other. Sometimes there is nothing more relaxing than listening to the clickety clack of the wheels.
--
Kevin
Check out my Shapeways creations!
3-d printed items in HO/HOn3 and more!
<!-- m --><a class="postlink" href="https://www.shapeways.com/shops/kevin-s-model-train-detail-parts">https://www.shapeways.com/shops/kevin-s ... tail-parts</a><!-- m -->
Posts: 446
Threads: 23
Joined: Mar 2009
nachoman Wrote:That's a real nice start. I hear ya about the the round and round vs back and forth. I have had "back and forth" switching layouts before, and found I would lose interest in the layout. Sometimes you just want to watch a train run and relax. But then again, I have had small round and round layouts before and gotten bored - seemed like they didn't have much of a purpose. I'm hoping you find pleasure in sitting on a chair in the middle of this one, relaxing, and watching two trains pass each other. Sometimes there is nothing more relaxing than listening to the clickety clack of the wheels.
This is so right.
frank
" It's a Heck of a Day " !!!!
Nice start with the layout Frank. Looks good. I have a small switching layout. It is only 2'x8' but I have a lot of fun with it. I feel that the modeler needs to have the type of layout that fits his needs. If he likes to run trains on medium to large layouts,that's great.If he wants something smaller,that's great also. I guess what I'm trying to say here is this,I don't really think it matters what size layout a person has as long as it fits the modelers needs and he has fun running it.
Bob
Posts: 2,724
Threads: 160
Joined: Dec 2008
I've got some male/female connectors for your lift out section. I'll drop them off the next time I'm it town.
My other car is a locomotive, ARHS restoration crew
Posts: 446
Threads: 23
Joined: Mar 2009
steve: I will start soldering on connections today.
pop
" It's a Heck of a Day " !!!!
Posts: 446
Threads: 23
Joined: Mar 2009
** "Opening Day of the new two Main Lines."
Today was a good day. The first train runs of the two mainlines were today. Due to a large demand to ride the new line on opening day. Little HO people came from everywhere to attend this inaugural event. Multiple passenger trains had to be brought out for this very special days runs. The Pennsy, Lehigh valley, CNJ, Anna, Reading, and B&O all supplied trains. Even tho their were few places for the people attending to rest, a good time had by all.
frank
" It's a Heck of a Day " !!!!
Posts: 2,458
Threads: 57
Joined: Dec 2008
And the media that covered the event..?? Did they get some pics/videos..?? 
Gus (LC&P).
Posts: 446
Threads: 23
Joined: Mar 2009
Gus you realy can't tell. At 63 I have trouble reading my newspaper and have to put on glasses. To read those little newspappers is a very hard thing to do. Glasses aren't enough. You nees some kind of supper dupper magnifyier. *********** frank
" It's a Heck of a Day " !!!!
Posts: 446
Threads: 23
Joined: Mar 2009
**** Here we go the roundhouse,turntable.
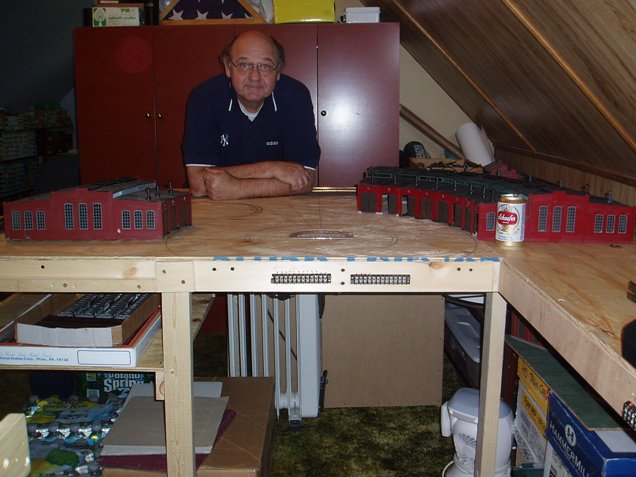
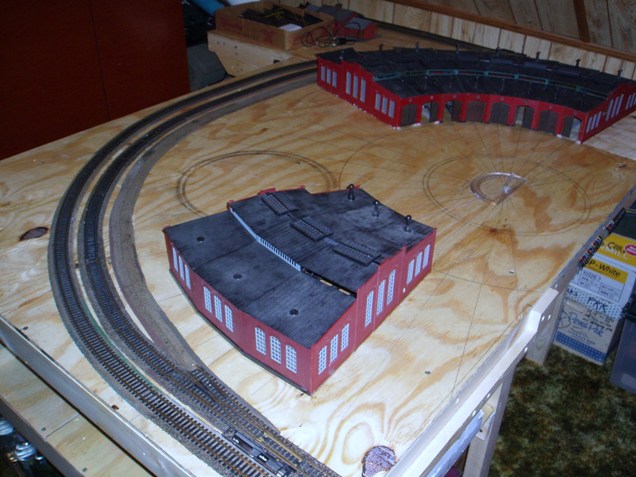
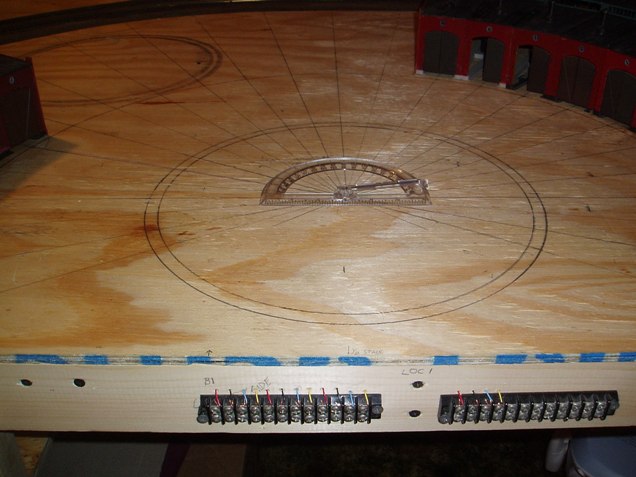
* As I had said I would have to install my yard entrance track. This is now done. the road bed is there. Next measure a viable space between the tracks. It is 66". Mark the centre. The centre of the turntable will be 9" from the edge of the board. Next I make another circle at a 15" radius. Now I extend the turntable centre line across the entire 66" clear space. The roundhouse segments are 10 degrees apart. 8 stalls times 10 is 80 degrees. I make a mark at 80 degrees. I make a line from the turntable centre thro my 80 deg mark to the roadbed. I placed my 8 stall round house in its location aliening the centre line as a track centre for stall #1 going cc wise. Using the 15" radius circle as a curve outline to match up my roundhouse front, sliding the round house back away from centre till the 0 deg centre line and the 80 deg. line match up with the door centres for section #1 and #8. Also keeping the space between the 15' circle line and the roundhouse even my alignment is done for doors 1 and 8. I marked the centres of the other 6 door sections. Then I removed the roundhouse placing it aside. I drew the remaining 6 lines for the track centrelines thro the other 6 sections. Placing the roundhouse back in its spot I checked all alignment marks front and rear of the round house. I now have the roundhouse properly aliened and all track centres located. I just have to mark the location of the complete rear wall. Note it thickness. then mark my centrelines to show the length of the tracks into the roundhouse. this completes the marking for the 8 stall round house. I choose a location for the 3 section roundhouse and do it all again using the marks already there. For the Heljan setup of these modles a 10 degree spaceing is what works. 15 deg is to wide.
" It's a Heck of a Day " !!!!
Posts: 6,198
Threads: 1,126
Joined: Nov 2008
Looks good so far   I Love Roundhouses!!! Really cool!!!!
Posts: 1,999
Threads: 98
Joined: Dec 2008
Schafer...Is the ....one beer to have...When you're having more than one!
Sorry...Couldn't resist.....
Does look good. Like the split roundhouse idea.
Torrington, Ct.
NARA Member #87
I went to my Happy Place, but it was closed for renovations.
Posts: 2,959
Threads: 158
Joined: Dec 2008
they still make schaefer beer?!
--
Kevin
Check out my Shapeways creations!
3-d printed items in HO/HOn3 and more!
<!-- m --><a class="postlink" href="https://www.shapeways.com/shops/kevin-s-model-train-detail-parts">https://www.shapeways.com/shops/kevin-s ... tail-parts</a><!-- m -->
|


