Posts: 57
Threads: 5
Joined: Dec 2008
Hello all...
Thanks to everyone over the past year on the "other" board who gave me ideas and inspiration on getting my layout going... those who may remember, my wife and I were putting an addition on our house and one of the "benefits" was a new train room... we had a smaller raised ranch style house with very little space to build a train, well suffice to say, I finally got the room (and it is still not enough, but I digress!).
A little about me... I am 38 years old and live about 10 miles south of Buffalo, NY in the Village of Hamburg. I have been into model railroading since I was a kid... I built layouts growing up with my dad and have enjoyed the hobby in one way shape or form since. During the day I am a software engineer and at night enjoy playing roller and ice hockey while not working on my trains. (There is more than one way to let off steam in this world! )  .
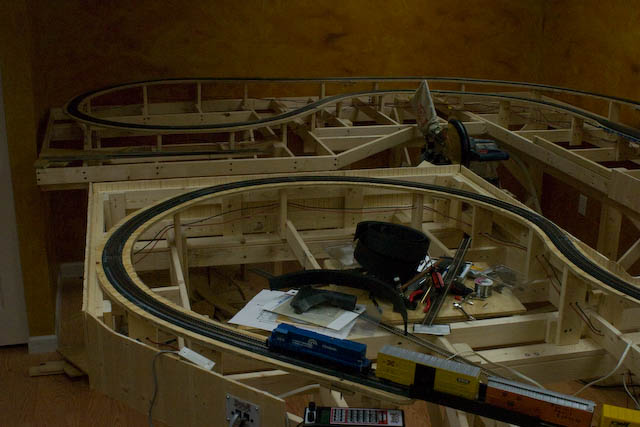
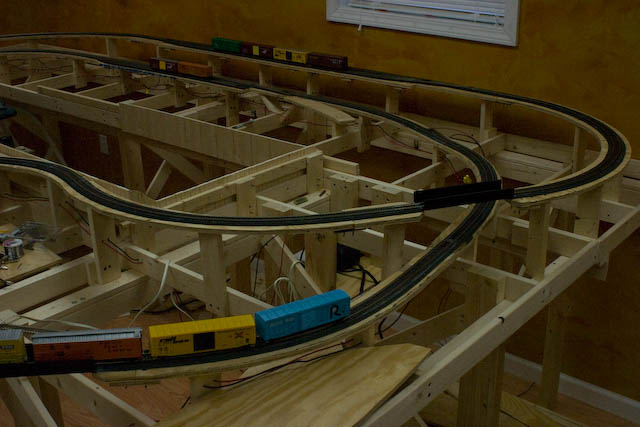
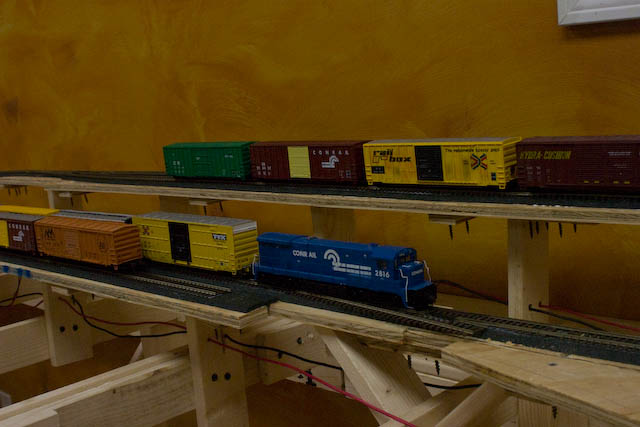
About my layout... well right now it is a pine and plywood jungle with most of the track in place. The goal is to model autumn in New England... lots of color. I originally wanted a double track, however, space did not permit that without resorting to 18" radius curves which I was dead set against doing... and double track is not seen in much of New England anyways. The layout is a sort of dogbone shape... my main interest is to work on scenery, not operations so the train going in a "circle" is OK with me. Along the back wall there will be a spot for a "downtown" area with storefronts and some light industry. Along the left side I expect this town to continue converging into a more rural setting. My thought is that loop of track will be enclosed in a tunnel. On the right side, I have placed a couple of bridges and I am not sure what I am thinking as of yet for scenery. Finally, there is space in the back corner for staging / a small yard. The layout is controlled by a Digitrax Super Chief system and I am also playing with JMRI on an old laptop connected to the Loconet via a Locobuffer USB.
Here are some pictures of the "first 30 days" of work on the layout:
Posts: 57
Threads: 5
Joined: Dec 2008
Posts: 1,992
Threads: 81
Joined: Dec 2008
Cool! I always liked New England, On conrail it tends to have more U-boats and other old GE locomotives like the C30-7s and its relatives, rather than all EMD GPs all the time as it is in New Jersey. Its no surprise you have what looks like a B23-7 on your layout!
Modeling New Jersey Under the Wire 1978-1979.
![[Image: logosmall.png]](http://i543.photobucket.com/albums/gg445/CAB_IV/Model%20Trains%202013/logosmall.png)
Posts: 1,902
Threads: 159
Joined: Dec 2008
Rob you have made some nice looking benchwork and it looks like you have a nice layout going so far  
I like the idea of having alot of scenery, even tho i am an industrial type guy, i think you have layed out the tracks very well and it will allow for some nice scenery!!  
Look forward to seeing some more pics of your progress :mrgreen:
Josh Mader
Maders Trains
Offering everyday low prices for the Model Railroad World
Posts: 57
Threads: 5
Joined: Dec 2008
GEC: Yep, thats a B23-7 in the pics... I know what you mean about the geeps... thats all we saw here in Buffalo too during the Conrail days... I also have a Green Mountain Railroad GP-40 that I will be running on the layout... I need to upgrade the decoder to get some sound in that one though! I chose to model a New England (specifically Vermont) style layout because I love the natural beauty of that area along with the fact that the small towns and villages don't look like they have left the late 1800's yet... something magical about modern meets old times... My wife and I have made numerous trips in the fall to New England and that love of the area determined my fate when thinking about a new model railroad. Last time we were up there we rode on the Green Mountain Railroad Foliage train... it was in I think 1940's coach cars pulled by an old RS-11... I think that have an old steam engine too but I believe they generally run the RS-11... anyways, the natural beauty winding through the rural areas is just stunning and I hope to capture some of that on my layout.
Trucklover: Thanks for the comments on the benchwork... I had some old 2x4's laying around so I used them as the legs and the rest of the benchwork is 1x3's... I made sure it would support anything I put on it by putting through the ultimate torture test... I sat on it!  If it can support my 200 lb frame, I am quite sure it will handle whatever scenery I throw at it. The track plan was the result of about 5 months of playing around with Empire Express on my Mac, and then some ad-lib changes as I started building. This was the first time I have ever used flextrack and I am quite happy with the results so far... much to my surprise the thing runs smoother than anything else I have ever built... even some of my suspect rolling stock manages to stay on track.
Thanks for the comments! I have enjoyed looking at each of your progress and work and I hope I can provide the same enjoyment to the board as you guys do!
--Rob.
Posts: 1,902
Threads: 159
Joined: Dec 2008
RobL Wrote:Trucklover: Thanks for the comments on the benchwork... I had some old 2x4's laying around so I used them as the legs and the rest of the benchwork is 1x3's... I made sure it would support anything I put on it by putting through the ultimate torture test... I sat on it!  If it can support my 200 lb frame, I am quite sure it will handle whatever scenery I throw at it. The track plan was the result of about 5 months of playing around with Empire Express on my Mac, and then some ad-lib changes as I started building. This was the first time I have ever used flextrack and I am quite happy with the results so far... much to my surprise the thing runs smoother than anything else I have ever built... even some of my suspect rolling stock manages to stay on track. If it can support my 200 lb frame, I am quite sure it will handle whatever scenery I throw at it. The track plan was the result of about 5 months of playing around with Empire Express on my Mac, and then some ad-lib changes as I started building. This was the first time I have ever used flextrack and I am quite happy with the results so far... much to my surprise the thing runs smoother than anything else I have ever built... even some of my suspect rolling stock manages to stay on track.
Thats a very well built and sold workbench you have built, which is always a plus, unless you ever want to move it   Most of the time i use 2x4's and rip them in half so they are a little less then 2x2's after they have been planned and squared off. Works good for me, and i usually finish it all off with a 1/2" sheet of plywood and then followed by a layer or 2 of foam. This is how i did my old layouts. My Shelf layout, i just hung up a bunch of 15" heavy duty shelf brackets with some ply on top secured with carriage bolts. Anyways, enough of my rambling lol
Empire Express, now that is a GREAT program, i got it a couple months ago and i designed my whole M&ET module trackplan in it. There isnt one thing i dont like about that program and the cost was just right for me too  How do you like it?
Josh Mader
Maders Trains
Offering everyday low prices for the Model Railroad World
Posts: 57
Threads: 5
Joined: Dec 2008
I loved working with Empire Express... I really liked how you can set the minimum radius and the flex track adheres to that rule. I wanted nothing less than a 22" radius and it was nice knowing the software wouldn't let me violate that rule. I am thinking that is part of the reason my track work has worked out so well this time and that my trains aren't jumping off the track... in the past I would always try to rig together a layout with sectional track and of course nothing ever lines up perfectly and bam, trains jump the track!
Overall I couldn't have been happier with Empire Express for the layout planning... the cost was more than fair and the time it saved me when building my benchwork and laying the track was worth every penny. One bit of advice I got from reading the forums was don't go into building without a plan, and while I think it is impossible to have a "perfect plan", either from a piece of software or from good old graph paper, there is certainly a lot to be said for that advice!
--Rob.
Posts: 4,161
Threads: 174
Joined: Dec 2008
I have to say that I'm impressed by the appearance of your benchwork. It looks neat and well done...your photos are like the shots you see in progress photos of model magazine project layouts. 
Ralph
Posts: 3,021
Threads: 160
Joined: Dec 2008
That looks like quality, sturdy construction  And the folded dogbone design lets you have an around-the-walls type layout without having a lift bridge or duckunder. What type of scenery do you plan, foam or plaster?
--
Kevin
Check out my Shapeways creations!
3-d printed items in HO/HOn3 and more!
<!-- m --><a class="postlink" href="https://www.shapeways.com/shops/kevin-s-model-train-detail-parts">https://www.shapeways.com/shops/kevin-s ... tail-parts</a><!-- m -->
Posts: 1,902
Threads: 159
Joined: Dec 2008
RobL Wrote:I loved working with Empire Express... I really liked how you can set the minimum radius and the flex track adheres to that rule. I wanted nothing less than a 22" radius and it was nice knowing the software wouldn't let me violate that rule. I am thinking that is part of the reason my track work has worked out so well this time and that my trains aren't jumping off the track... in the past I would always try to rig together a layout with sectional track and of course nothing ever lines up perfectly and bam, trains jump the track!
Overall I couldn't have been happier with Empire Express for the layout planning... the cost was more than fair and the time it saved me when building my benchwork and laying the track was worth every penny. One bit of advice I got from reading the forums was don't go into building without a plan, and while I think it is impossible to have a "perfect plan", either from a piece of software or from good old graph paper, there is certainly a lot to be said for that advice!
--Rob.
I couldnt agree more about the program, i think the makers of it did a very nice job with it. I know Shaun here uses it and likes it as well :mrgreen:
Josh Mader
Maders Trains
Offering everyday low prices for the Model Railroad World
Posts: 57
Threads: 5
Joined: Dec 2008
Thanks for the kind comments on the benchwork... during the two or so weeks I was putting it together I started getting a little antsy... wanted to get that track down! But I decided that I really wanted to take my time and do as good of a job as I could with my limited woodworking skills... the benchwork is actually a series of 6 benches that were screwed together to create the 1 bench. I decided working on smaller benches gave me more control on keeping things level, etc. In the end I am very pleased with how it came out.
I wanted go around the walls, and in a perfect world the room would have been a few feet wider and few feet longer, but the deck and the pool deck gave my contractor hard boundaries to work with. I resisted the temptation to make it any bigger than I could manage. The isles are a minimum of 24", most are over 30". The front-to-back of each area is no more than 26" from an isle, with the exception of the far left loop because of the "closet" where the sump pump is located, for this area I framed the benchwork to allow for underneath access to the back. Duck unders were a big no-no for me since I have a bad back (yet I still play hockey  )... anyways, I wanted to stay "vertical" as much as possible while working on this thing!
For scenery I am planning on weaving cardboard strips and covering them with plaster cloth and sculptamold. I used this method on a small N-scale layout I built for our fireplace mantel and I really like how it works out. I expect for some of the larger areas I will build supports using left over 1x3's and the left over plywood from the sub-roadbed.
One of the other "features" of my room is it is very well lit. I had my contractor put 5 florescent light troffers in the room (the room is 19 x 14). Originally I asked for 6, but the sump pump closet got in the way and quite frankly that would have been serious overkill! Suffice to say it is like daylight in there! I think it helps for taking pictures which is one other thing I will be doing a lot of during this build as my wife does scrapbooking and she is going to make me a book showing the history of the build as it goes.
Thanks again for the kind comments!! I continue to look forward to seeing everyone elses work as inspiration and motivation as well as sharing my progress with the group.
--Rob.
Posts: 442
Threads: 73
Joined: Dec 2008
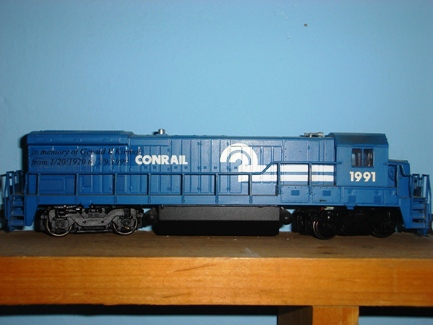
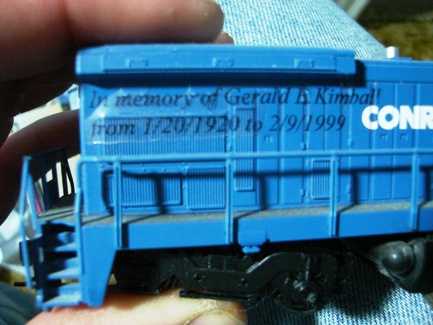
Nice work Rob cant wait to see some sceanery going on and i noted that B23-7 also #1991 as i also have one. 1991 was my first serious loco my grandfather bought me back in 91. To make it short she sports a banner in memory of him and here is a pic of mine.
Harry Check out my blog at <!-- m --><a class="postlink" href="http://newyorkontariowestern.blogspot.com/">http://newyorkontariowestern.blogspot.com/</a><!-- m -->
Posts: 4,161
Threads: 174
Joined: Dec 2008
That's a nice tribute to your grandfather.
Ralph
Posts: 629
Threads: 15
Joined: Dec 2008
Very nice Rob. I see your running with DCC as well , good choice. I've always thought the next layout will be open grid like this. I look forward to the progress of filling in.
Lynn
New Adventure <!-- l --><a class="postlink-local" href="http://bigbluetrains.com/forum/viewtopic.php?f=46&t=9245">viewtopic.php?f=46&t=9245</a><!-- l -->
Great White North
Ontario,Canada
Posts: 57
Threads: 5
Joined: Dec 2008
That is a nice tribute to your grandfather! I wish I still had some of the stuff my dad bought me when I was a kid, but alas, kids and delicate models don't always make the best of friends!
Given that I program computers for a career, it only made sense to go DCC! I wanted a system that could be hooked up to a computer, so I went with the Digitrax Super Chief... this afternoon I spent about 2 hours playing with JMRI tweaking the parameters of my locos... that is some fun stuff! (Except for the fact I spent about an hour trying to get my B23-7 to actually program!! Turns out the QSI decoder in that loco doesn't like direct byte mode which seems to be the default in JMRI)... once I turned on Paged Mode, everything was golden! (Of course the Digitrax manual talks about using Paged Mode...  )
So last night before I settled into the watch my Sabres beat the Kings, I decided to play with a little cardboard, plaster cloth, and sculptamold... I learned something in regards to open benchwork and using these mediums... if the area is large, don't do it! Turns out there was simply not enough support and the amount of sag was unacceptable to me... I figured tear it out BEFORE it becomes a problem once I begin adding additional weight to it. Needless to say I will be using the scrap lumber I talked about in previous replies. The good news is that the elevation between the back and front tracks worked great using this method, so I am learning what will work and what won't work.
The hot glued and weaved cardboard strips:
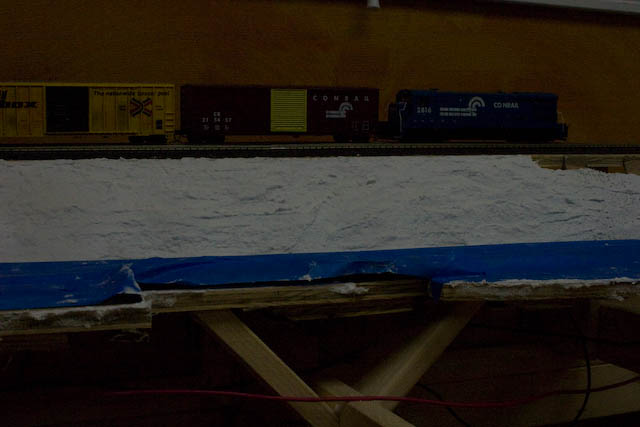
Covered with plaster cloth:
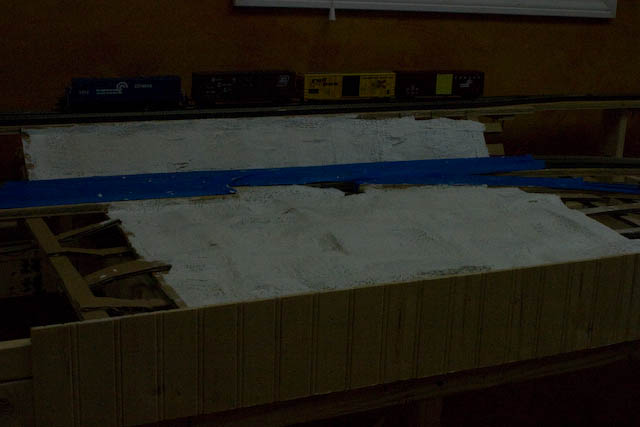
Once the sculptamold was added, the elevation worked great, the front... meet the trash can!
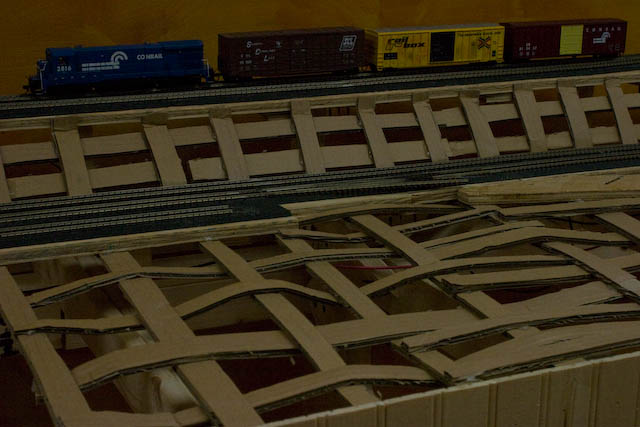
--Rob.
|
 .
. 


 .
. 


![[Image: logosmall.png]](http://i543.photobucket.com/albums/gg445/CAB_IV/Model%20Trains%202013/logosmall.png)

 If it can support my 200 lb frame, I am quite sure it will handle whatever scenery I throw at it. The track plan was the result of about 5 months of playing around with Empire Express on my Mac, and then some ad-lib changes as I started building. This was the first time I have ever used flextrack and I am quite happy with the results so far... much to my surprise the thing runs smoother than anything else I have ever built... even some of my suspect rolling stock manages to stay on track.