Posts: 496
Threads: 22
Joined: Dec 2008
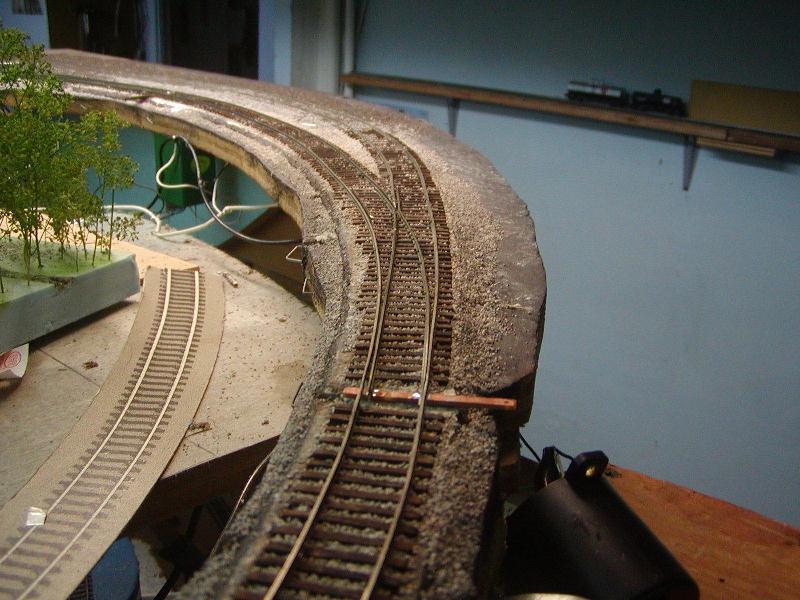
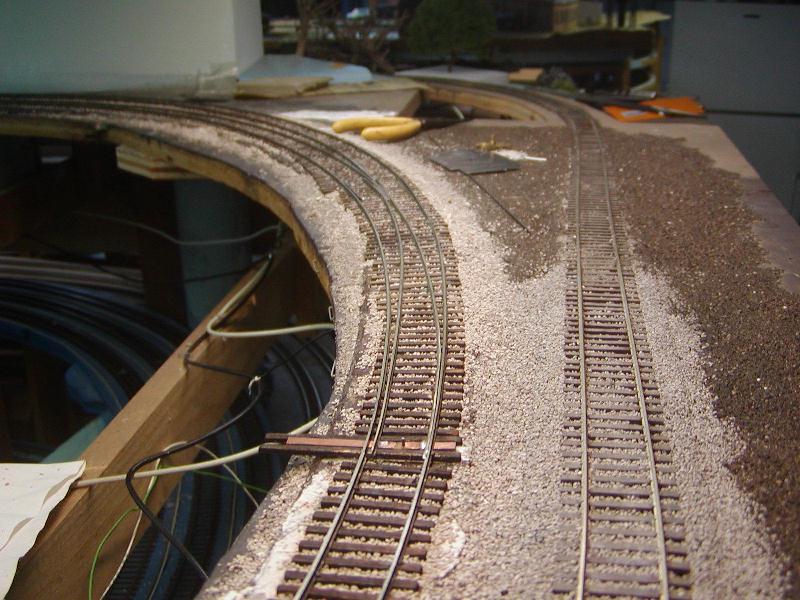
Finished for the most part. I've successfully run most of the brass locos which had given me problems at this location and have run a loaded coal train thru with no tilting. I'm a very happy person! In the length of rail spanned by the yellow grips of teh needlenose pliers, on the outside route, I'm trying to see why the drivers of one of my Hudsons spin a bit. Only at a creep, and longer wheelbase units, Mikados and Mohawks, have no problem. The Hudson runs thru fine at normal speed, and in fact hauled 6 passenger cars thru with no evidence of slippage, I just always try to get all equipment to run thru with no glitches. It may be the tender wheels at the frog. Maybe I need to check their gauge.

The other turnout, which i just realized, some of the previous in process photos were of this one. This leads to the Garfield branch. The points are not yet connected to a machine, but I spiked them ineach route and everything is fine.

Posts: 496
Threads: 22
Joined: Dec 2008
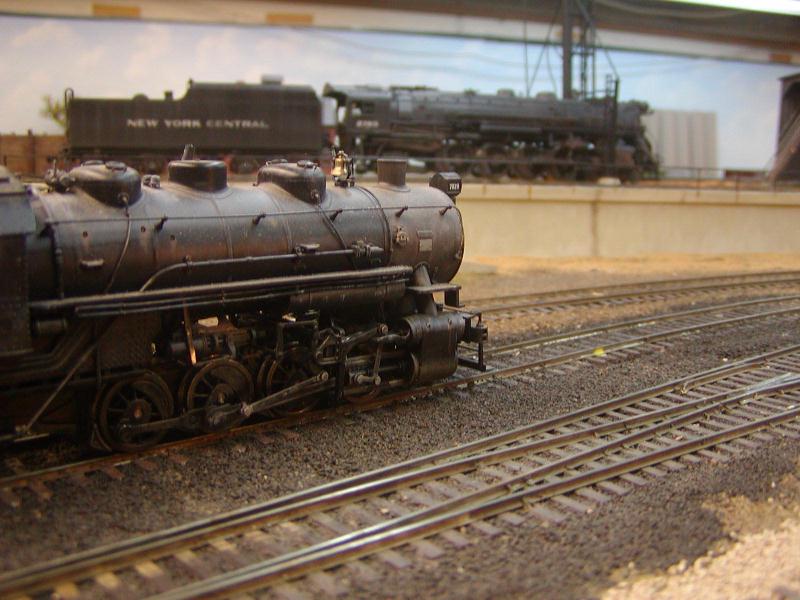
So, I'm ready to go back to work on the passenger station. It was nice to take a break from it and feel recharged and anxious to get back to it. And it feels great to be able to run the trains which were planned on thru that curve now! I had fun running all my equipment thru, especially since a minimum of tweaking was required. But my days of handlaying are now behind me! A few pics of the yard/station area with the trains recently arrived there:
The Hudson which I metioned earlier (maybe the diameter of its drivers?) in the foreground, a Mikado behind it just brought in that loaded coal train. In the far distance is a Mohawk which had brought in an earlier train, it has been turned on the turntable and is sitting taking on sand, ready for its westbound run.

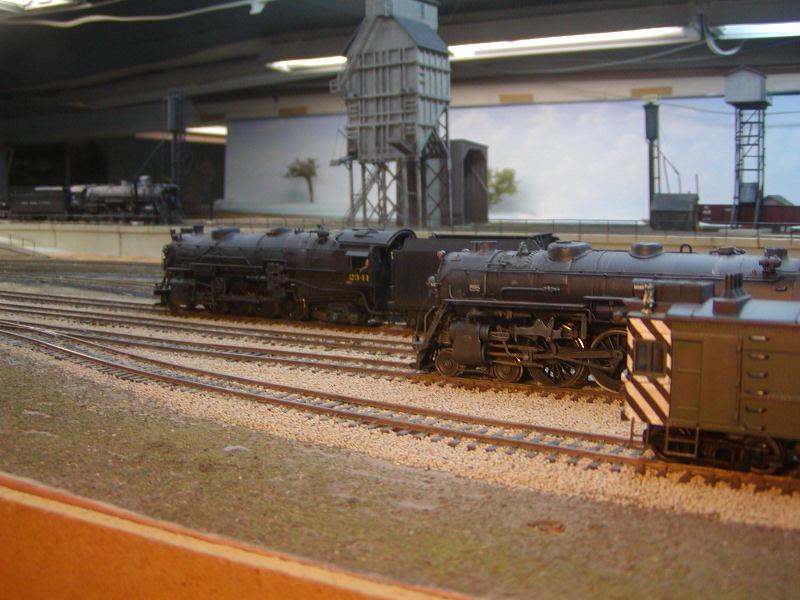
Another view of the Mohawk at the sanding tower, with the yard switcher preparing the westbound she will be taking charge of shortly. Oh, the yellow dot marks an undertrack magnet, when I noticed it in the photo I remembered a thread by Gary on this topic. I think this method works well.

The NYC geeps in this view from Eddie Willers office will be taking charge of that coal train the Mikado just brought in once the Mike cuts off and the yard switcher removes the JGL hack. The to be completed station is at far right.

Posts: 1,817
Threads: 27
Joined: Dec 2009
The track work looks great! I love the look of hand-laid track!
biL
Lehigh Susquehanna & Western
"America will never be destroyed from the outside. If we falter and lose our freedoms, it will be because we destroyed ourselves." ~~Abraham Lincoln
Posts: 709
Threads: 35
Joined: Jun 2010
JGlFan
As a fan of trackwork I really enjoyed taking a look at what you have been up too. I am glad you were able to get the little hiccup taken care of and can get back to the important things, running trains. I have been wondering about ballasting my track before I lay the rails on it but I am worried since i have very little experience about having to remove things that I think on my first attempt I will jsut wait until my track has been tested. I will say you sure have figured out a good way to keep everything looking clean and even.
Keep us posted and we look forward to progress on the station!!
Posts: 496
Threads: 22
Joined: Dec 2008
Thanks bIL!
Greg, if you use white glue you'll have no problem scrapping up whatever errors you may make. But you are not likely to make any anyway, if you keep thinks simple. If you are new to handlaying and aren't going to use jigs for turnouts, I suggest buying a BK tunrout kit (assuming they are still made and available) as they make it easier by providing assembled frogs. I believe they include a tie template as well. I made a jig on a piece of 1x4, using stripwood thinner than the ties, at a width I wanted my ties to be spaced at. I glued these to the 1x4 butted up against a stop strip, at a right angle. So I just place ties in and apply a thin strip of masking tape on top, and I have a length of ties ready to glue to the roadbed. Mark your centerlines well and you should have no problems. Ballasting before laying rail is a snap, really.
Posts: 1,817
Threads: 27
Joined: Dec 2009
Is that a Hankscraft display motor (SwitchMaster) I spy up there in the second photo? It's good to see someone still uses them! I bought quite a few of them when I started to build the "ultimate LS&W" in my basement in Lansdale, PA after having lived there, spending the bulk of my free time fixing the house, for three years ... and six months later after starting to fill the basement with benchwork, Burroughs bought Sperry, it became Unisys and all of the former Sperry people (like me) were systematically, by department, laid off and replaced by former Burroughs people from the Plymouth, MI area and I ended up having to pack everything up, sell the house and move.
So ... can you still get them? Or should I forget it and just go with Tortoise for any turnouts beyond what I currently have motors for?
biL
Lehigh Susquehanna & Western
"America will never be destroyed from the outside. If we falter and lose our freedoms, it will be because we destroyed ourselves." ~~Abraham Lincoln
Posts: 454
Threads: 18
Joined: Sep 2010
Best option these days is RC plane servos. Check out http://www.tamvalleydepot.com Tortoise used to be my choice, but they've gotten WAY too expensive lately. There's still a commercial version using the Hankscraft type motors but I guess I never understood the fascination. They need a resistor to kee from burinign up, they have no contacts for frog power like a Tortoise, cost about the same as a Tortoise, and aren't nearly as easy to install. For the price of a Tortoise though, you can get a servo and the controller for it, which happens to ALSO be a DCC stationary decoder. So you get the mechanical part plus the fascia buttons and LED indicators AND a DCC decoder. I'm using nothing but on my new layout.
--Randy
Posts: 496
Threads: 22
Joined: Dec 2008
I can't say for sure if they are still available, I last bought mine about 5 years ago, at which point they were getting harder to find, just because the Tortoise were so popular. I believe the motors are still made for whatever their original purpose was, and were available in 6 packs last time I purchased.
Posts: 496
Threads: 22
Joined: Dec 2008
Hi Randy, I was running back and forth during the Giant's game so only just got a chance to check out the link you provided. I'm not sure if I understand the product correctly. I don't use my DCC to operate turnouts and if I did, I think this product would be something I'd check out further. Am I correct that each servo is $19.95? I haven't had to buy any machines in some time but a quick look at one shop I like shows Tortoise at $15.95, a bit cheaper in 12 packs. Am I missing something?
Posts: 454
Threads: 18
Joined: Sep 2010
Uggh, I hate that when you accidently click somewhere else your whole message is gone. Anyway, that is $19.95 for each turnout including the buttons and LEDs and the DCC decoder as well as the servo itself. If you aren;t going to use DCC then the Octopus is for you, it controls 8 servos and is not a DCC decoder. You cna use whatever toggle switches orpushbuttons you like, or get the pushbuttons with LEDs that they have. I get my servos from eBay in 6 packs for $13, although there is a note that some of those cheap servos do not work with the Octopus. I plan to someday have a CTC panel so I use the Singlets and Quads although I will for now only be using the pushbuttons on the fascia to control them. The Motrak servo mounts make it as easy as any Tortoise although there are alternate ways to mount the servos that are cheaper, including simple 90 degree brackets. All in all it costs about the same as a Tortoise (they list for $19.95 in singles now) but you get the buttons and LEDs too. Singlets in quantity (5 or more) plus the ebay servos comes out to about $15 per turnout, the Octopus may or may not be cheaper because of what appears to be the inability to use the cheap servos.
This is not limited to turnouts, it will handle semaphors and just about anythign else you need to animate. Plus if you have some wierd one where the turnout access is blocked by scenery or a lower level you have the millions of items in the model airplane department to chose from for all sorts of crazy linkages. Although you might not have any clearance problems - a servo is a fraction of the size of a Tortoise. Craig Bisgeier is using them to great affect on his Housatonic layout. I sold because I do want the DCC option, and no where can I get a Tortoise, a DCC decoder, buttons for manual control, and LEDs for $19.95 a turnout. With my benchwork being no more than 2' wide at any point I generally don't even need any extension cords, the ones that come witht he servos are long enough. Those too you cna get for a miniscule price on eBay, to the point of it not being worth it to make your own.
--Randy
Posts: 496
Threads: 22
Joined: Dec 2008
So I take it the servo's are not stall type motors, and need something (like the Octopus) to turn them off? You push a button or flip a toggle to initiate movement and you need something to stop it? Otherwise I'm not sure why they need controllers in addition to a switch. Forgive my ignorance!
Interesting that Craig is using them, I've met him at Harold Werthwain's Erie Railroad operating session and a few shows and a friend knows him pretty well, I should try to get an invite.
Posts: 454
Threads: 18
Joined: Sep 2010
Correct, servos are not stall devices. That's not the only reason they need a controlelr though, the position is determined by a pulse signal, the duration of the pulse determines how far the output shaft rotates. The controlelr has always been the epensive part, and servos have alsways been fairly heavy, to have high strength gears and a strong motor. The forces to move the control surfaces of even a smaller RC plane are pretty high. But int he past few years there have been lightweight small electric planes, these need lightweight small servos plus the forces aren't nearly as high as with a fast flying gas engine plane. Thus lightwight small servos. About the only place you might need a larger servo would be for a very low frog number handlaid all-rail turnout (non-hinged points) with high code track (100 or greater). Second, the controllers have gotten super cheap. A PIC chip can be had for almost pennies - and even the low end ones usually have a PWM output or two that can drive a servo. Even fancier bigger ones with tons of inputs and outputs are only a buck or two. Of course you need to knwo how to program one. Thus commercial products like the contollers from Tam Valley and Team Digital, or DIY ones (code provided for you) like the one Hans Deloof sells.
--Randy
Posts: 1,797
Threads: 81
Joined: Dec 2008
Nice work JGL! Your hand laid track is spot on! 
I admire you guys who can spike your turnouts in place. I tried it once and decided to stick to soldering to PC ties. :oops:
Posts: 496
Threads: 22
Joined: Dec 2008
Thanks Tetters, I have the same admiration for those who solder! I think it is far easier to spike.
Posts: 3,683
Threads: 118
Joined: Jan 2009
Enjoyed the discussion on the servos and turn-outs. And JGL, I always marvel at the vast expanses of your layout room. 
Three Foot Rule In Effect At All Times
|


