dave_long 2012 resolution challenge
#1
Happy New year to you all,

I thought I'd add to the challenge, I like having deadlines to aim for, focuses the mind. Anyway my project for the challenge is to turn a old BB athearn GP50 into a Norfolk southern GP38-3. Its going to be a big overhaul, with lots of add on parts and hopefully a good number of scratchbuilt parts. NS 5828 http://www.rrpicturearchives.net/showPic...?id=756455

Here's where the start is a fully stripped BB ex Santa FE gp50
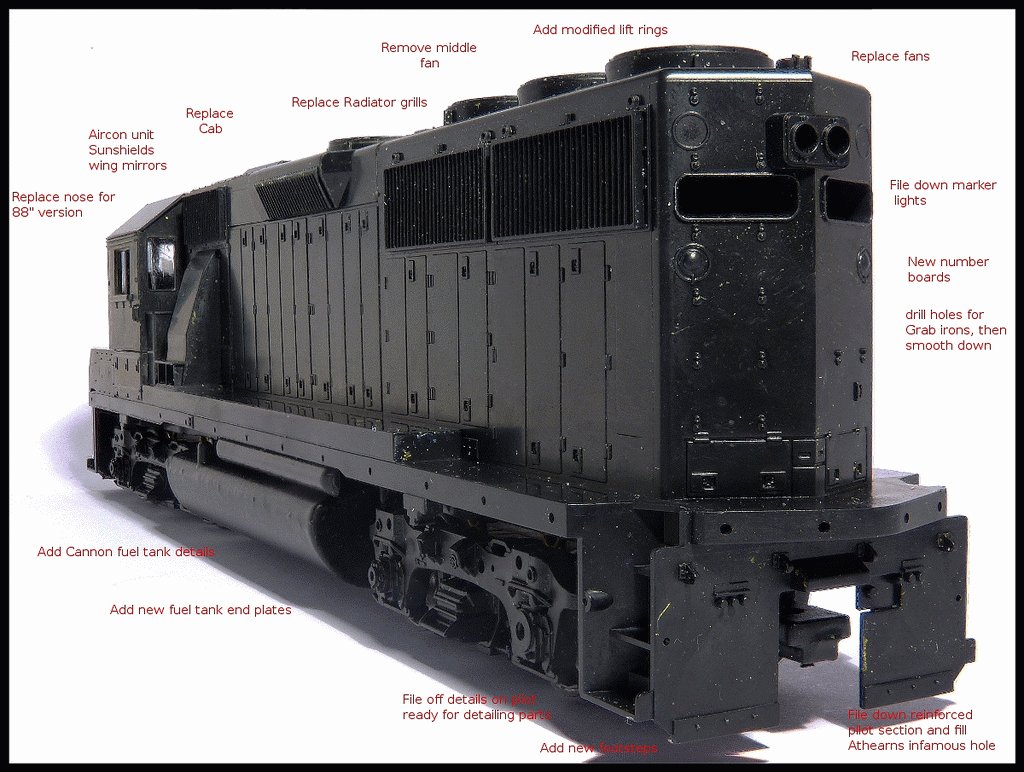
   

Just like the prototype I'm using a GP50 and removing an exhaust fan and altering some of the other details (if you can make out the text in the image). For now the BB motor is staying, I will be doing the motor maintenance and see how it fairs after a good run. The wheels will be changed as i dont have gradients or long trains.

I'll list the parts used as an when I update the thread. There will be parts from most of the detailing companies. The cab and nose will need doing so the battery box will be done too and those will be cannon parts. I'm hoping that railflyer will get their Q fans sorted in time, but if not then DA Q fans will be used, unless a source of overland ones can be found.

Thanks for reading, hopefully I'll get some work updates added over the next week or so.

Dave
My Miami NW 22nd St layout and modelling blog http://dlmr.wordpress.com/ Please come by and leave a comment.
Reply
#2
Good luck Dave,

Bashing and detailling is always a part of this hobby that is great. Looks like you're aiming for something special!

Matt
Proudly modelling Quebec Railway Light & Power Company since 1997.

Hedley-Junction Club Layout: http://www.hedley-junction.blogspot.com/

Erie 149th Street Harlem Station http://www.harlem-station.blogspot.com/
Reply
#3
Thanks Matt

Yeah the aim is to get something really detailed, I'm hoping to get that prototype modellers kind of loco, I'm no expert but I'm aiming high with this one. There will be a number of under the hood type details too, like traction cables and struts behind the pilot etc.
My Miami NW 22nd St layout and modelling blog http://dlmr.wordpress.com/ Please come by and leave a comment.
Reply
#4
Dave,

Wow, I can't wait to see this transformation take place.
Popcornbeer

Mark
Reply
#5
Looks like a fun project, Dave. Make sure to take lots of "in-progress" shots so that we can see the "before" and "after".

Wayne
Reply
#6
Dave,

How'd you get than INCREDIBLE depth of field for that shot?
Reply
#7
Hi Guys

Mark, Thanks for the encouragement.

Wayne, I'm waiting on a whole bunch of items to get shipped from the US over here so in the mean time I've been very busy with the camera, there are plenty of before shots to go along with the project. I've also got a bunch of prototype photos of NS 5807 to post alongside. So you'll hopefully get a few proto - before - after photo sets.

Mileswestern, Thanks glad you like the photo, its actually about 15 photos stitched together. I take lots of images with the same conditions but manually focus on a different section of the body and then use a photo stitching program to make one in focus image. I use CombineZP is a free ware program and very good! See here CombineZP wiki page: http://en.wikipedia.org/wiki/CombineZP and homepage: http://hadleyweb.pwp.blueyonder.co.uk/CZP/News.htm There's plenty of programs that will do stitching, the hardest part is making sure you've enough photos with the correct focus points. The image above isn't perfect there is a slight out of focus section by the fuel tanks, but I was happy with it so I used it.

Any questions please ask.
I'm hoping to get going with some progress in the next week or so. There is a lot of surgery to do to the body and the DB blister, just removing the Turbo exhaust hatch to replace it with a flat panel and non turbo exhaust stacks is going to be quite a challenge.

Dave
My Miami NW 22nd St layout and modelling blog http://dlmr.wordpress.com/ Please come by and leave a comment.
Reply
#8
Work has stated on modifying the Athearn body to try and correct the big errors. The blower housing has been drilled and cut out but still needs to be tidied up, but I'm taking that slowly as not to damage the engine room doors and the walkway. The Inertial grille above the blower has been sanded back and drilled so as to allow the replacement grille to be glues in place better. The inertial hatch on the roof needs to be removed and replaced but I'm leaving that until the new blower housing has been glued in place and cured to keep some of the strength in the plastic body.

[Image: 6811227037_113055ab61_z.jpg]
blower housing

First level of sanding started on the filter grilles and the chain drilling on the the blower housing

[Image: 6811227593_a348c986e7_z.jpg]
inertialgrilleandblower

Chain drilling then removal of panel leaving a lot of cleaning up to do, also this shows the cannon blower than will replace the old incorrect housing.
[Image: 6811227795_35c3b7143c_b.jpg]
replacingblower

Now on to an inaccuracy from the Athearn body shell is what can only be labeled as a trench than a panel seam!! Not only is this so deep and wide its also too far over to the right and will be under the cannon part so this needs filling and sanding before fitting the new panel!

[Image: 6811228119_512d9718fd_z.jpg]
trench

I shall probably fill the seam line and then add the blower housing a inertial filter grille and then fabricate a panel from 0.005" brass sheet cut to size and glued in rather than try and scrape a new seam in the plastic.

Hopefully now things are underway the updates will be more frequent. Thanks for reading.
Dave
My Miami NW 22nd St layout and modelling blog http://dlmr.wordpress.com/ Please come by and leave a comment.
Reply
#9
Nice, I look forward to following along.

Dave
-Dave
Reply
#10
Well the nose, cab and sub base have been removed from the short hood of the Athearn body. Now Cannon and Co suggest adding a piece of 0.040" styrene under the sill from the climber back to under the long hood, to help keep the body from breaking as removing all these parts really weakens the body plastic and breaking the sills is something you really need to avoid!

Here is where we are up to:


I didn't take Cannons advice and use a supporting piece of styrene as I managed to get hold of a flush cutting razor saw which manages to make the job really easy and without much strain on the plastic body. You have to make sure you very careful as the saw blade is very flexible and can wander off line. Thats ok if you go upwards but again you want to avoid going down through the sill!

As you can also see from the above shot, the smaller inertial filter grille has been sanded down and the body worked flush. The hatch on the roof has not been removed yet, so that will be done before parts start being added. The filter grille on the other side has also been sanded down flush, and the trench I spoke about earlier in the thread has been filled, the blower housing has also been removed and sanded flush, again once the roof hatch has been done I can start thinking about adding the new filters and blower housing.

I've now started thinking about adding the new sub base, so I went back to my proto photos to check what was needed for the sub base boxes. What do you know Cannons kit contains a number of variants and yes they do the parts that I need, however they dont do enough of the parts I need in 1 kit Wallbang

This is whats needs:

   
Photo copyright Erik C ©2011

Although I only have this side in photos of #5807 if you check any of the photo sites especially RR archive then you can see that both sides are identical, this is where the problem lies, The following is what I can make from the C&c kit:


As you can see from the photos above that although I have one side from the kit the smaller box on the left has 2 singular vents on the prototype, so 1 of each vent will need removing from the Cannon parts to match. Plus I need to find some more parts for the other side.
So if anyone has any spares from one of these kits and is willing to ship to the UK (I'll pay the shipping fees!) Or I get another kit sent over.

Thanks for reading folks...

Dave
My Miami NW 22nd St layout and modelling blog http://dlmr.wordpress.com/ Please come by and leave a comment.
Reply


Forum Jump:


Users browsing this thread: 1 Guest(s)