Posts: 3,683
Threads: 118
Joined: Jan 2009
Don, on the loose track section - saw this somewhere, can't remember if it was in a magazine or on the net - a thin piece of plastic sheet was glued underneath the ties (to the ties, not to the roadbed) and then the track was ballasted. This left the piece free to move, but still had ballast. Don't know if that will work for you, as it would seem to minimize the flexibility.
Three Foot Rule In Effect At All Times
Posts: 2,724
Threads: 160
Joined: Dec 2008
That's shaping up to be a nice little seen. 
My other car is a locomotive, ARHS restoration crew
Posts: 11,776
Threads: 572
Joined: Nov 2008
Thank you everybody, this is one that I'm winging as I go and hope it turns out OK.
Gary,
Thanks for that tip, I was wondering what I was going to do to get the ballast on that flexible part and still have some movement there, and I think that's the answer. It will inhibit the movement some, but I don't need much movement to begin with. Right now I've got about half an inch, I would be happy with half that, so we'll see how that works out. Maybe instead of white glue I can use something more flexible, like rubber cement, to hold the ballast in place and keep some flexibility. I'll experiment a bit and see what works, but the basic idea is great.
Don (ezdays) Day
Board administrator and
founder of the CANYON STATE RAILROAD
Posts: 3,683
Threads: 118
Joined: Jan 2009
Flexible glue sounds good, and if the plastic sheet was cut in a few segments, maybe that would help too. I hope it works, and glad I could pass the idea along.
Three Foot Rule In Effect At All Times
Posts: 1,817
Threads: 27
Joined: Dec 2009
If you decide to use rubber cement, go to an art supply store and get some "Bestine," a rubber cement thiner marketed by the company that makes "Best Test" rubber cement, the brand that most professionals that I know use (I've always bought it in gallon cans.)
"Paint on" some full strength rubber cement, add some ballast, pressing it in to the rubber cement. Thin some rubber cement with the Bestine to a runny consistency. Then add additional ballast and drizzle the thinned rubber cement on top.
Make sure the top is on the Bestine container very tightly, since in an evaporation race, Bestine makes alcohol and lacquer thinner look like a couple of turtles! Leave the cap off and you'll have an empty container in which to put something else in short order!
biL
Lehigh Susquehanna & Western
"America will never be destroyed from the outside. If we falter and lose our freedoms, it will be because we destroyed ourselves." ~~Abraham Lincoln
Posts: 11,776
Threads: 572
Joined: Nov 2008
P5se Camelback Wrote:If you decide to use rubber cement, go to an art supply store and get some "Bestine," a rubber cement thiner marketed by the company that makes "Best Test" rubber cement, the brand that most professionals that I know use (I've always bought it in gallon cans.)
"Paint on" some full strength rubber cement, add some ballast, pressing it in to the rubber cement. Thin some rubber cement with the Bestine to a runny consistency. Then add additional ballast and drizzle the thinned rubber cement on top.
Make sure the top is on the Bestine container very tightly, since in an evaporation race, Bestine makes alcohol and lacquer thinner look like a couple of turtles! Leave the cap off and you'll have an empty container in which to put something else in short order! Today's the day I do some experimenting on a mock-up first. I have some MEK, acetone, lacquer thinner, 90% alcohol and CraftBond rubber cement. I was hoping that one of these thinners would work on the rubber cement and that I don't have to go to the store for anything this weekend. I was headed to Home Depot for something yesterday and had to do a "fly by" since the line to get into the parking lot was a block long, and that was late in the afternoon. Today isn't going to be much better out there.
It sounds to me like Bestine is about as volatile as MEK or acetone and I was hoping that either one of these would work. I was also hoping that I could use something like wax paper rather than a sheet of plastic to get more flexibility. Unlike with using white glue, there'll be no turning back with rubber cement.
Don (ezdays) Day
Board administrator and
founder of the CANYON STATE RAILROAD
Posts: 1,817
Threads: 27
Joined: Dec 2009
Don -
I'm sure you must have a very short scrap of flex track you've trimed from putting track together (You do know it's against the Model Railroaders Creed to toss stuff like that, don't you?!) You could use a short piece like that to run a test. Try the MEK ... that might work.
I just dug out my gallon can of Bestine. Yep, pretty volatile stuff! The end of the can only says "Danger - contains HEPTANE!" It doesn't list any other ingredients, but it does list fire and exposion hazards. Funny I never read any of that stuff before!
Anyway and howsomeever ... good luck with the testing and finding the eventual solution! Don't forget to take pictures!
biL
Lehigh Susquehanna & Western
"America will never be destroyed from the outside. If we falter and lose our freedoms, it will be because we destroyed ourselves." ~~Abraham Lincoln
Posts: 11,776
Threads: 572
Joined: Nov 2008
P5se Camelback Wrote:Don -
I'm sure you must have a very short scrap of flex track you've trimed from putting track together (You do know it's against the Model Railroaders Creed to toss stuff like that, don't you?!) You could use a short piece like that to run a test. Try the MEK ... that might work.
I just dug out my gallon can of Bestine. Yep, pretty volatile stuff! The end of the can only says "Danger - contains HEPTANE!" It doesn't list any other ingredients, but it does list fire and exposion hazards. Funny I never read any of that stuff before!
Anyway and howsomeever ... good luck with the testing and finding the eventual solution! Don't forget to take pictures! Yep, got lots of short pieces of flextrack, plus scraps of cork roadbed as well, so that's what I plan on experimenting with. I'll let you know what works and what doesn't.
Don (ezdays) Day
Board administrator and
founder of the CANYON STATE RAILROAD
Posts: 2,959
Threads: 158
Joined: Dec 2008
Another "glue" that stays flexible is RTV. If you use silicone RTV caulk (the non-paintable bathroom stuff, NOT the paintable latex stuff) and spread a thin layer and do as biL suggests by pressing the ballast into the glue, it may work. Another suggestion is to simply leave it unballasted. Ballast the sides of the roadbed, but under where the movable track goes simply paint the cork a matching color. You can even try to "speckle" different colors of paint to blend better. In N scale, that probably won't be too noticeable if done right. Plenty of people use the same method for their turnouts to avoid gluing them shut. They paint the roadbed underneath and don't place ballast in the area where the points are.
--
Kevin
Check out my Shapeways creations!
3-d printed items in HO/HOn3 and more!
<!-- m --><a class="postlink" href="https://www.shapeways.com/shops/kevin-s-model-train-detail-parts">https://www.shapeways.com/shops/kevin-s ... tail-parts</a><!-- m -->
Posts: 11,776
Threads: 572
Joined: Nov 2008
Some progress and a solution that works. After weathering the ties and rails, I then cut away the roadbed under the track that I wanted movable. I then formed some ballast on a piece of thin laminate to fit underneath. I found an adhesive called, Handi-Tak which is kind of like rubber but remains soft and pliable, and embedded some ballast in it. I sprayed that with some clear fixative and cut it into small chunks to fit between the ties. I then ballasted the rest of the track to fit in. I now have just about the right amount of movement in the track over the fixed ballast to compensate for any misalignment should that occur. The Handi-Tack package says that it won't dry out, and since I've had it for a good five years and It's still as pliable as the day I bought it, I can believe what they're saying. I thank you all for giving me that inspiration. 
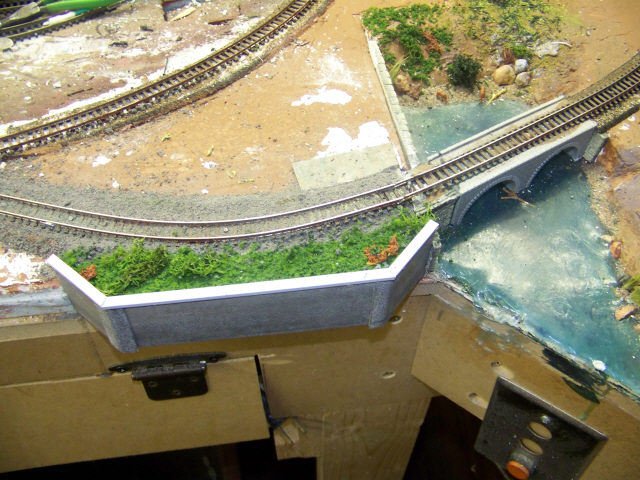
After that, I added a retaining wall to the small section that was added because the track wound up so close to the edge of the layout.
Forming the ballast insert:
Inserting the fixed ballast:
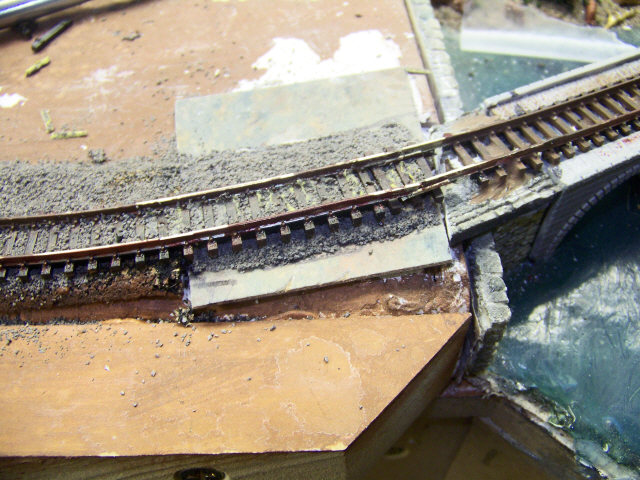
Insert is in place:
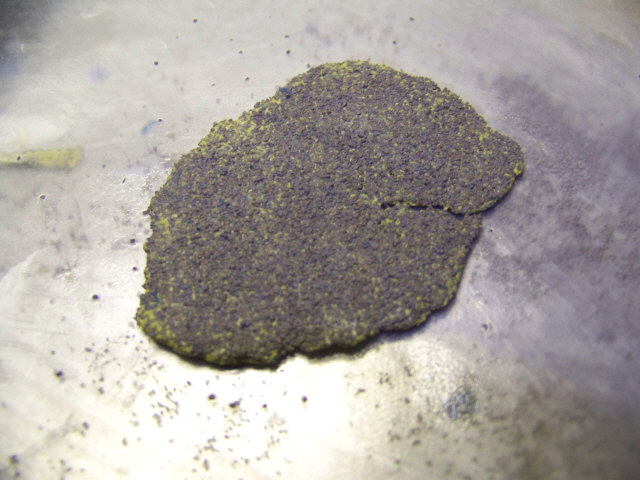
Making pliable ballast:
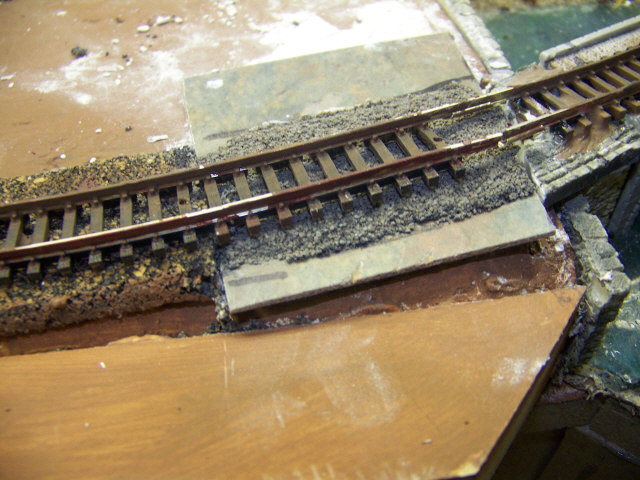
Pliable ballast in place"
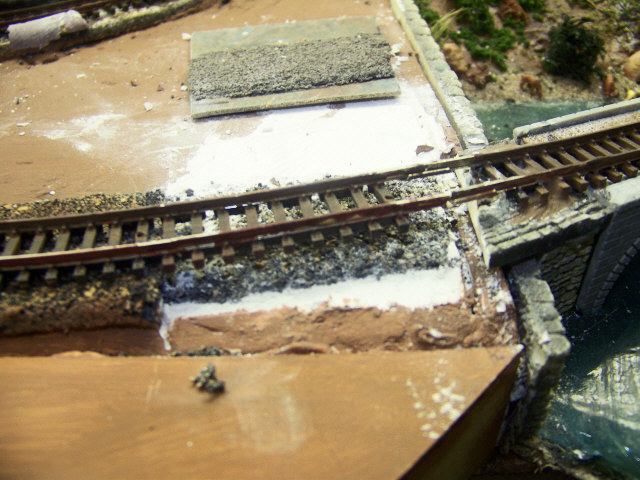
Adding retaining wall and shrubs:
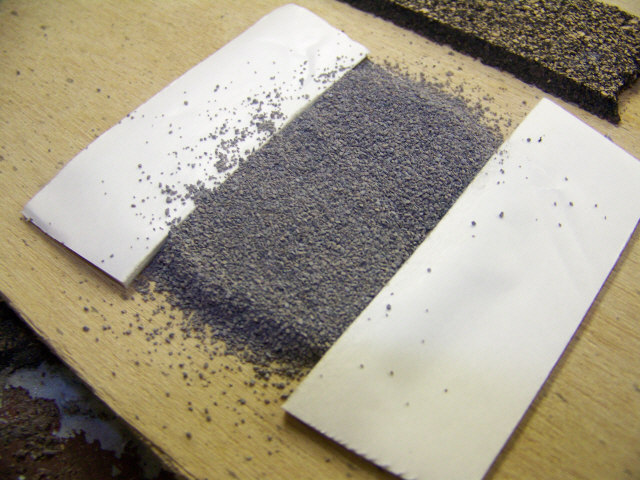
Don (ezdays) Day
Board administrator and
founder of the CANYON STATE RAILROAD
Posts: 1,817
Threads: 27
Joined: Dec 2009
Lookin' Good!


biL
Lehigh Susquehanna & Western
"America will never be destroyed from the outside. If we falter and lose our freedoms, it will be because we destroyed ourselves." ~~Abraham Lincoln
Posts: 3,683
Threads: 118
Joined: Jan 2009
But now we gotta see a train going across!
Three Foot Rule In Effect At All Times
Posts: 11,776
Threads: 572
Joined: Nov 2008
Gary S Wrote:But now we gotta see a train going across! But now I gotta get the wiring done before we can see any trains going across... That could take another year............... 
No, I guess you're right, the job isn't finished until I can run trains over it and finishing the job is what this challenge is all about..
Don (ezdays) Day
Board administrator and
founder of the CANYON STATE RAILROAD
Posts: 2,458
Threads: 57
Joined: Dec 2008
Methinks you got it..!! That should work. 
We've all been fixating on that transition trackage, but that pond turned out pretty good as well...
Gus (LC&P).
Posts: 3,683
Threads: 118
Joined: Jan 2009
ezdays Wrote:But now I gotta get the wiring done before we can see any trains going across... That could take another year............... 
:o
How about some alligator clips from your PS to your track? Then you can at least make a maiden voyage across the bridge and transition. 
Three Foot Rule In Effect At All Times
|


