Old Steamers
#16
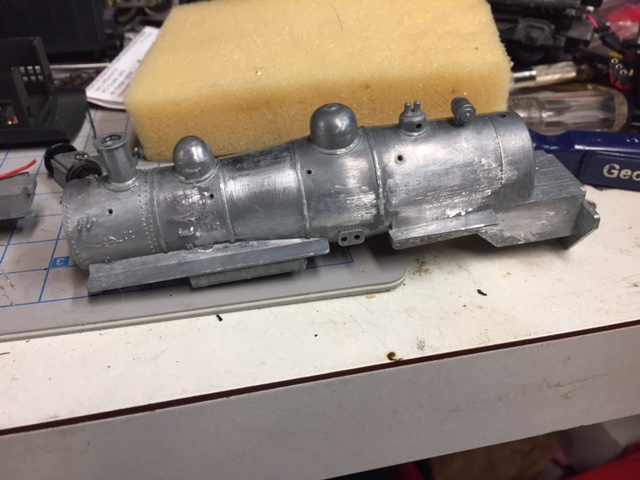
Started to grind off the cast on details:


Found a Nathan Top Feed Check Valve Cal-Scale (190-251) at my LHS:

[Image: s-l225.jpg]

Didn't find any pilot ladders/steps, though. Also haven't found a picture of the other side of 1303, but I found another picture of the fireman's side (from Frisco Archive):

[Image: 2-8-0-1303-at-Enid-Oklahoma-on-February-13-1938.jpg]

It seems to have been shopped since the last picture--looks like two New York air compressors. Apparently the Frisco converted some of their many 2-8-0s as switchers, hence the two compressors and the air tank above the pilot. So I'm guessing the engineer's side may not have looked like 1304 above, as that's set up as a switcher. So I'm trying to decide how, and how much, to detail my 2-8-0.
Reply
#17
All right, some basic questions for you steam guys:

I was talking to my friends at work night on the layout. I mentioned detailing my 2-8-0. I thought CA/ACC/Crazy Glue was what one used to attach brass details to a die cast shell, but I was told the parts would fall off. One guy claimed the parts could be soldered, but I'm skeptical. Another guy said epoxy. Yet another said Goo. What do you recommend?

When installing lines from the lifting injectors or sand dome, do you drill through the running boards? Or just stop them there?
Reply
#18
I believe I used a mix of CA and epoxy for the MDC locos that I reworked over the past year. The larger components usually have a mounting pin or post that you can use for mounting them, if not you can drill the part out and add one. When I added the sanding lines to my engines I drilled through the running boards using my small drill press. I found that the die-cast boiler was not the easiest thing to drill into but it was doable.

Just in case you haven't seen it, this is my MDC engine rebuild thread:
<!-- l --><a class="postlink-local" href="http://bigbluetrains.com/forum/viewtopic.php?f=17&t=8413">viewtopic.php?f=17&t=8413</a><!-- l -->
Reply
#19
If the detail part has a mounting pin, drill the boiler casting to accept it, and if the fit of the pin in the hole is fairly tight, use ca to affix it permanently. If the fit is a bit sloppy, epoxy would be a better choice.
For parts with no mounting pin, you can drill the back of the part to accept a piece of wire - music wire or brass will work, and use a wire size appropriate to the size of the detail.
Where there are pipes running to details, drill the detail part to accept the proper diameter of pipe before mounting the detail part. Usually, such parts have a depression in the casting wherever a pipe is to be attached, but drilling it deeper will allow a much stronger joint. Keep in mind, too, that prototype pipe sizes are for the inside diameter (somebody wasn't aware of that, and that's why all of the piping on the Proto 0-6-0s and 0-8-0s was undersize) Crazy .
I like to solder the pipes to the details where possible and with some care and some tape, the parts can be temporarily placed where they're supposed to go, then the pipe bent to suit. If you've drilled out the holes as suggested, and cleaned the wire used for forming the pipes (drag the wire through some fine sandpaper before making the bends), all you need to do is add a little flux to the areas to be joined, and a quick touch with some solder and a hot iron will make the joints easily. You can then remove the details with the pipes connected and apply epoxy to the mounting holes and re-install the details. If you're using ca, no need to remove the details...simply place some ca on the tip of your X-Acto, and then touch that to the area wher the mounting pin enters the boiler. The reason for doing the soldering before permanently affixing the details is that excessive heat can weaken or break bonds made with ca or epoxy. Naturally, if you don't care to solder, the pipes can be attached with ca or epoxy, as long as you've drilled out the holes as suggested.

Because the material used for cast boilers is often difficult to drill, I save my modelling drill bits for friendlier material, and use regular drill bits for this work - anything from 1/16" and larger. Drill a suitable such hole where it's needed, then apply some solvent-type cement to a piece of styrene rod (or some sprue material left-over from a plastic kit) slightly larger in diameter than the hole - about .004"-or-so works well. Allow the solvent to soften the plastic a bit (re-coat if necessary), then jam it into the hole 'til it bottoms-out. Let the plastic re-harden, then trim off the excess and sand the area smooth. You now have a nice easy spot to drill a model-sized hole, suitable for wire-type pin mounts, without wrecking another small and expensive bit. Misngth

Here's a Proto USRA 0-8-0, re-done to match its prototype as seen in a photo....

[Image: NewcrewsfortheGrandValley021.jpg]


These locos have cast boilers...

[Image: 033.jpg]

...and there's a thread HERE showing the build, including details.

Wayne
Reply
#20
gna,

all the glueing was done with CA:

[Image: dsc01028z81l.jpg]
The built was done ten years ago and still yet no signs of parts falling off or even falling apart.
But pay attention of proper degreasing all parts before glueing. And i use CA glue as glue in normal quantities and not in homeopathic dosings.
A part of the details was soldered as Wayne described before.

Cheers Lutz
Reply
#21
   

Here is a Mantua/Lee town 0-8-0 E class conversion. I have just painted and lettered it.
frank
" It's a Heck of a Day " !!!!
Reply
#22
This is an old Mantua Steam locomotive from the 1950's and before. A Mantua Pacific that is made with brass and cast metal parts. I have it painted for the CNJ.
frank

   
" It's a Heck of a Day " !!!!
Reply
#23
Got one of them too, Toptrain. Mine though has spoked drivers and different tender and also is not as nice as yours. This is one of those hope to get to someday projects.
[Image: IMG_0273_zps2yaef65w.jpg]

Even have been able to come across the the Mantua 4-4-2 with the whooten firebox. But, I don't have a tender for that yet, I don't think?
Reply
#24
Nice loco. About future projects. I do the same. I have a bunch of trains awaiting work.
" It's a Heck of a Day " !!!!
Reply
#25
I have a few scratch built locomotives, not built by me. I got them at the last Allentown Train show at Merchants square mall.
This one is PRR K2 pacific.

    *

   
" It's a Heck of a Day " !!!!
Reply
#26
       

This is my other scratch built locomotive from the last Allentown train show. The previous post shows the other one from that show. This one is a New Haven Mikado. The aluminum tender sides show oxidation of the metal.
frank
" It's a Heck of a Day " !!!!
Reply
#27
***** I WILL CALL THIS THE 3 TEAKETTLE MISTERY.


Here is a familiar old 0-4-0t Teakettle. It looks just like the plastic one that Life Like makes but isn't. This one is made by New One Japan and is all die-cast metal. It was sold by the old track and power pack produced Silvine. I like them so much and they run so well that I have 5. 2 are in original B&O #25 paint, 2 I have done in CRRofNJ, and the other is a Reading teakettle.    

   
" It's a Heck of a Day " !!!!
Reply
#28
***Well, this mystery has a second main event! B&O saddle-tanker #62.

Moving on. still with the Teakettle. Now A friend of mine catfordken, a Londoner found over in England a 0-4-0t diecast teakettle with a saddle tank. Not like the Silvine side-tanked. But also not unlike it. The drives are interchangeable but the bodies are different. One, the Silvine, is labeled New One Japan. The other nothing. Ken had it for over a year then traded it to me. I have had it for 2 weeks. No one to this date has found any catalog reference to this second Teakettle. Has anyone seen this loco before and definitely know who sold it? By that, I mean the company who Imported and distributed it AND CATALOGED IT.
* Here is what it looks like. It is another beauty, just like the Silvine B&O #25.
frank

   
" It's a Heck of a Day " !!!!
Reply
#29
Well, don't start reading this post here for it is the third of three posts. Go back 2 more posts to start, for starting reading here will be like reading the last page of a mystery.


The Teakettle mystery continues!
* Today at the Allentown train show I got this. New Haven #60 another 0-4-0t saddle tanker. It is in an original box with no information on who distributed it and sold it.


OK! This one has a bigger cab and a bigger saddle tank and a different road-name New Haven #60. The drive again is the same and interchangeable with any of the others. This one like B&O # 62 has no name on it identifying who made it.
*** So does anybody really know who made it. Everyone I know suspects it to be New One Japan. Suspecting and knowing are two different things. I have original boxes for both B&O 62 and NH 60. Thier is no sign anywhere on and in the boxes telling of who made them.

**** WILL THIS MYSTERY CONTINUE?

A view of B&O 25 and B&O 62 together at Frankford Roundhouse earning their keep.


A view after they crossed over on the turntable and sit waiting for their next assignment.


***** So will anyone out there in computer land share with us all a scrap of a magazine page, or a page from a catalog or anything, showing, and telling. who the heck made and sold these last two Mysterious Locomotives.

FRANK
" It's a Heck of a Day " !!!!
Reply
#30
So many classics in this thread... I love it!
--
Kevin
Check out my Shapeways creations!
3-d printed items in HO/HOn3 and more!
<!-- m --><a class="postlink" href="https://www.shapeways.com/shops/kevin-s-model-train-detail-parts">https://www.shapeways.com/shops/kevin-s ... tail-parts</a><!-- m -->
Reply


Forum Jump:


Users browsing this thread: 1 Guest(s)