| Welcome, Guest |
You have to register before you can post on our site.
|
| Forum Statistics |
» Members: 552
» Latest member: Boki
» Forum threads: 10,046
» Forum posts: 181,961
Full Statistics
|
| Online Users |
There are currently 4373 online users.
» 0 Member(s) | 4369 Guest(s)
Applebot, Baidu, Bing, Google
|
| Latest Threads |
SIDE SHOT SATURDAY
Forum: Shutterbug area
Last Post: Charlie B
1 hour ago
» Replies: 749
» Views: 434,105
|
Trains This Day/Month in ...
Forum: Shutterbug area
Last Post: Charlie B
Today, 07:33 AM
» Replies: 1,138
» Views: 529,560
|
Photo Fun July 2026
Forum: Shutterbug area
Last Post: FiatFan
Today, 04:57 AM
» Replies: 18
» Views: 617
|
The Hobo Camp Fire Is goi...
Forum: Hobo's Camp
Last Post: FiatFan
Today, 04:50 AM
» Replies: 254
» Views: 29,190
|
Here's the new and improv...
Forum: Stop here and say "Hello"
Last Post: FiatFan
Yesterday, 06:35 AM
» Replies: 190
» Views: 69,256
|
Tail End Tuesday
Forum: Shutterbug area
Last Post: tompm
07-21-2026, 09:16 PM
» Replies: 449
» Views: 409,011
|
HO Scale Berkshire Knitti...
Forum: Scratchbuilding and kitbashing - All Scales
Last Post: ngauger
07-21-2026, 07:18 PM
» Replies: 14
» Views: 2,505
|
2026 Big Blue NASCAR Raci...
Forum: Lower Berth
Last Post: ngauger
07-20-2026, 10:33 AM
» Replies: 62
» Views: 8,904
|
Remaking of the Ridley Ke...
Forum: Layouts
Last Post: LiveSteamer
07-13-2026, 03:01 PM
» Replies: 304
» Views: 332,041
|
Rainbows in the Lehigh Va...
Forum: Layouts
Last Post: TMo
07-10-2026, 05:29 PM
» Replies: 669
» Views: 495,969
|
Patched and Restencilled ...
Forum: Shutterbug area
Last Post: bdw9535
07-08-2026, 08:46 PM
» Replies: 65
» Views: 13,246
|
Current Projects
Forum: HO Modeling
Last Post: LiveSteamer
07-06-2026, 12:11 PM
» Replies: 472
» Views: 264,408
|
Northern Alberta Railway ...
Forum: HO Modeling
Last Post: cnrglen
07-05-2026, 09:00 PM
» Replies: 6
» Views: 274
|
N Scale rolling stock bui...
Forum: N/Z and Smaller Modeling
Last Post: zzrguy
06-30-2026, 03:33 PM
» Replies: 1
» Views: 969
|
Big Blue has inspired som...
Forum: Upper Berth
Last Post: TMo
06-24-2026, 07:55 AM
» Replies: 158
» Views: 120,382
|
|
|
| Photos from A Recent EBT Trip |
|
Posted by: Amalynn - 06-25-2024, 05:52 AM - Forum: Shutterbug area
- Replies (18)
|
 |
So while I was home a bit over a week ago I took my wife along to a ride on the East Broad Top. We rode the train out to Colgate Grove and back, had lunch, and then I went on their new extended shop tour. My wife wasn't really interested in the shop tour so I went by myself while she went and found something else to get in to. I took lots of pictures. 
Our train, consisting of the ex-Algoma Steel GE 55-tonner (while 16 is still down for repairs), an open car, combine 17, coach 22, and one of the cabooses (which didn't get included in the photo, whoops). Combine 17 and COach 22 are new production cars that were acquired last year to help take strain off of the aging wood cars and give an alternative to the open cars.
![[Image: Sw8grEd.jpg]](https://i.imgur.com/Sw8grEd.jpg)
The interior of our coach. The new cars are swanky and do include walkover seats. They were really nice.
![[Image: K7oiKDy.jpg]](https://i.imgur.com/K7oiKDy.jpg)
The new coaches ride pretty nicely. Fairly smooth. The new combine also has wheelchair lifts in it. We did not disembark at Colgate Grove, but the newly fixed up facilities there are quite nice.
The shop tour starts at the Freight Office in ROckhill Furnace. There's a lot of really cool stuff in there.
Antique Dynamite boxes always get my attention. Growing up, my Dad was a commercial blaster and collected these antique boxes everywhere we found them.
![[Image: ZsoefTg.jpg]](https://i.imgur.com/ZsoefTg.jpg)
![[Image: 4gz31MA.jpg]](https://i.imgur.com/4gz31MA.jpg)
This desk in the Freight Office included some interesting paraphernalia.
![[Image: ELkJnWO.jpg]](https://i.imgur.com/ELkJnWO.jpg)
Note the blank pad of waybills :O
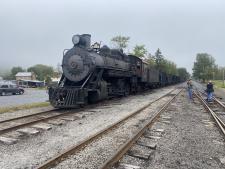
This photo is just to show the size difference between the standard gauge and narrow gauge equipment.
![[Image: XhaYaNo.jpg]](https://i.imgur.com/XhaYaNo.jpg)
The boxcar was donated by the Kiski Junction RR and was just yesterday propped up on some of the EBT's in-house built transfer trucks and is now rolling on a 36" gauge. They are going to do some minor mechanical work and a cosmetic restoration then plans are to include the car in photo freights.
This old Ford straight truck caught my eye, can't help it anymore as a truck driver.
![[Image: fDotRZD.jpg]](https://i.imgur.com/fDotRZD.jpg)
Here's the little work train they were using when working on trackwork both north of the station on the way to COlgate Grove as well as going south. Once the PA-475 crossing is reactivated they will be able to take the work train all the way down to the current end of track nearing Jordan Summit, approximately 1 mile south of the station. I just love little trains like this with critters. An open car for people and a flat car being used for tools and materials, powered by M-4.
![[Image: PI8Axkw.jpg]](https://i.imgur.com/PI8Axkw.jpg)
#12 and #18 in the roundhouse.
![[Image: epnku6d.jpg]](https://i.imgur.com/epnku6d.jpg)
M-1.
![[Image: LxV0FQt.jpg]](https://i.imgur.com/LxV0FQt.jpg)
The 18th century stone farmhouse as well as the recently restored section of the storehouses. The farmhouse was historically used as the yard office. It has apparently been remodelled a few times in its history, as well. The storehouses were sinking in to the ground to the point that the little structure between the storehouses proper and the stone farmhouse went from having a flat roof to having a heavily slanted roof. The FEBT pulled all of the parts in it out, jacked the whole thing up, rebuilt the bottom and poured a concrete foundation, rigthted the warping in the shelves, and then put it all back down and carefully replaced everything right where it was.
![[Image: MjRUTgQ.jpg]](https://i.imgur.com/MjRUTgQ.jpg)
A better view of the restored storehouses. You can also see the sandhouse here.
![[Image: qXbBmlC.jpg]](https://i.imgur.com/qXbBmlC.jpg)
Inside one of the storehouses.
![[Image: ScObEUJ.jpg]](https://i.imgur.com/ScObEUJ.jpg)
These are all spare locomotive parts. THere are parts to locomotives that haven't been at the railroad since *before* the shutdown in 1956. They really just never threw anything out.
![[Image: LBRxJ0u.jpg]](https://i.imgur.com/LBRxJ0u.jpg)
More to come
|

|
|
| Nachoman Layout addition '24 Challenge |
|
Posted by: nachoman - 06-24-2024, 03:58 PM - Forum: Contests & Challenges
- Replies (33)
|
 |
I have a 3x4 HOn3 layout that I want to get to a state of completion with people, details, vehicles, and other things of scenic interest. The ultimate goal is to make the layout worthy of taking to shows for display, or for a feature magazine article. Right now there are a few things that would make the layout a whole lot more interesting. My list includes:
- Add 3-4 more vehicles
- Add ~20 more custom hand painted figures.
- Make sure all structure windows have glass and window treatments.
- Every square inch of layout space has appropriate ground cover
- add signs, interesting details, trash cans, power lines, junk, tools, etc.
It's really an open list - I will try to get as much done by the close of the contest.
|
|
|
|
| tompm's layout addition '24 build challenge |
|
Posted by: tompm - 06-14-2024, 04:06 PM - Forum: Contests & Challenges
- Replies (18)
|
 |
For the layout addition portion of the challenge I am going to working on the Bridges Area of the Layout.
I want to accomplish the following:
Layout down the roadway and sidewalks.
Place the roadway tunnel portal.
Place the pedestrian tunnel portals.
Place the retaining walls.
Fill in behind the bridge abutments and retaining walls.
Shape the terrain at the wingwalls
Scenery
It may be a little too ambitious but we will see.
|
|
|
|
|


![[Image: StTgI72.jpg]](https://i.imgur.com/StTgI72.jpg)
![[Image: KZ66NfT.jpg]](https://i.imgur.com/KZ66NfT.jpg)
